

Here’s a clean and simple card featuring the Excellent Eggs Dies, and the fun “Inlay” technique.
These dies are the perfect tool to have fun with a little bit of “paper inlay”. It’s a technique that allows you to piece the die cuts together (like fitting together puzzle pieces), to create colorful, custom die cut images with the appearance of lots of dimension.
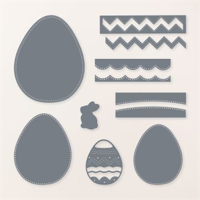
Parts & Pieces

- If you take a close look at my “Parts & Pieces” photo above, you’ll see that I die cut three eggs using the Excellent Eggs Dies.
- Once I had the three eggs cut, I mixed the pieces and glued them inside the open sections of the eggs. I “inlaid” the pieces to custom design my eggs!
- How about die cutting a Glimmer Paper egg. Would’t a little shimmer and sparkle be a pretty accent to a custom egg?
- It’s a quick and easy technique, and the results are great.
- By layering the pieces inside the open areas of the eggs, I also created fun texture.
- Glue the large egg die cut outline to the front of your card base, as shown.
- Mix the die cut pieces, “inlay” them to their corresponding home in the egg design, and create a custom colored egg!
- It’s fun and easy. Try it!
I kept my card clean and simple to focus on the technique. When I first saw these Dies, I knew I would use them, not only for Easter, but for lots of little extra touches on other card designs.

What about adding a small border to a die cut circle, or square. Or, adding a border across a card base or layer to create a unique “grounding” layer” for an element cluster. These are just a few uses. There’s more that will come to you as you create your designs.
So, get Excellent Eggs, send Easter Wishes, and use the die cuts to border, decorate, and embellish lots of other projects.
… the only limitation is your imagination!

Today’s Product Details


March Customer Card Kit

The March cards are showcasing the Perennial Lavender Designer Series Paper.
- You will receive everything you need to put the cards together as I’ve designed them.
- The kit will include the card bases, layers, die cuts, embellishments, sentiment layers, and envelopes.
- I cannot send stamped images, but you will have a sentiment layer you can customize to a stamp you already own.
- You will also receive a printed PDF Tutorial, along with a video link so you can put the cards together along with me.
- You will automatically receive this kit with a minimum product purchase of $50.00 through my online store.
- This card kit will be available through March 31st.
SHOP WITH ME


