I needed a few quick and easy thank you cards, and it’s time I took a little break from the wonderful colors of Christmas, so I designed this Clean And Simple card with the help of the Regal Flora Bundle.
I’m sure most of you know, Clean And Simple cards have their unique spot in our paper crafting world. “CAS” cards have lots of white space, few layers, and little or no embellishments.
Inspired by one of the patterns in the Regal Winter Designer Series Paper, I chose to use Night of Navy and Blackberry Bliss for my color combination. I stampes the top and bottom card front elements with Night of Navy ink and die cut them with the matching die.
The center element isn’t stamped. I used the brush end of my Blackberry Bliss and Night of Navy Stamin’ Write Markers to add the ink directly to the stamp, then stamped the image to my cardstock. If you look clopsely, you can see both colors on the image.
I wanted to keep this color palette simple, but you could duplicate this design (which I will definitely do), using a brighter, or more subtle color palette. It would also be fun to give it a Fall theme with oranges, reds, and maybe a little touch of Wild Wheat!
You can experiment with some of the color combinations below. I think a few of these cards in a pretty hand made box, tied with a soft ribbon, would be a beautiful gift.
more color inspiration
Below is my color palette.
Below are softer coolor combinations.
And, here are a few bright color combinations.
Don’t forget, today is the last day for the Seasonal Sale. All of the ink pads, cardstock, and markers are on sale. Pick your favorite color palette and take advantage of the discounted prices.
So, find three pretty stamps with coordinating dies, attach them to your card front with Dimensionals, add a sentiment, and create something to share gratitude.
You will receive everything you need to put the cards together as I’ve designed them except for adhesives. You will receive Dimensionals, if used.
The Kit will include the card bases, layers, die cuts, embellishments, sentiment layers, and envelopes.
I cannot send stamped images, but you will have a sentiment layer you can customize to a stamp you already own, or you can purchase the Reindeer Funb Stamp Set. It’s on page 27 in the September-December, 2024 Mini Catalog.
You will also receive a printed PDF Tutorial, along with a video link so you can put the cards together with me.
You will automatically receive this kit with a minimum product purchase of $50.00 through my online store.
This card kit will be available through November 30th, 2024.
I’m finishing up on some Christmas cards using the ephemera punch-out images from the A Little Bit Festive Specialty Designer Series Paper Pack. I had so much fun coordinating the pretty wreaths with ribbon bows and embellishments.
If you need quick and easy holiday cards and you haven’t gotten this DSP pack, you’ll love to create cards with the punch out pieces. Let your imagination create your unique designs.
All three showcased cards are Clean and Simple. That means they have lots of white space, little or no layers, and few embellishments.
Here’s The How-To:
For all three, I cut a Thick Basic White cardstock card base 4 1/4″ x 11″, and scored at 5 1/2″.
I chose one of the large punch-out wreaths to center on the card front.
I attached the wreaths to the card front using Dimensionals.
Therr are separate choices of punch-out ribbon bows. I attached one to each of the wreaths.
I chose sentiments from the Sophisticated Skates and Light The Year Stamp Sets, stamped them, and attached them to the wreaths.
I added some sparkle to each card with embellishments from my stash.
You can stamp a sentiment on the inside, along with a small image to finish your beautiful card.
So, cut a few cardstock card bases, choose some ephemera punch-outs, and create quick and easy Holiday cards to share.
You will receive everything you need to put the cards together as I’ve designed them except for adhesives. You will receive Dimensionals, if used.
The Kit will include the card bases, layers, die cuts, embellishments, sentiment layers, and envelopes.
I cannot send stamped images, but you will have a sentiment layer you can customize to a stamp you already own, or you can purchase the Reindeer Funb Stamp Set. It’s on page 27 in the September-December, 2024 Mini Catalog.
You will also receive a printed PDF Tutorial, along with a video link so you can put the cards together with me.
You will automatically receive this kit with a minimum product purchase of $50.00 through my online store.
This card kit will be available through November 30th, 2024.
I hope you have a fun Labor Day holiday weekend, and can spend a little time in your craft space.
It’s been a bit since I’ve done a CAS inspiration card. I thought it would be a fun way to showcase the Regal Winter Suite. It will be available to customers on September 4th, only a few days away.
The Regal Winter Sutie is at the top of my favorites. I was drawn to the colors in the Regal Winter Designer Series Paper. The Regal Floral Stamp Set is one of Stampin’ Up!’s Distinktive sets. The stamps are cling, red rubber, which allows for greter detail in the stamped images. The stamps also allow you to stamp shades of color with one inked, stamped image to the paper. You can see the shades of color in the focal point flower of my card.
I put together a Project Tutorial you can download with assembly instructions, including pictures. I will share the quick and easy layering dimensions here.
The Thick Basic White cardstock card base is 11″ x 4 1/4″. It’s scored at 5 1/2″.
The Basic White cardstock card front layer is 3 3/4″ x 5″.
The label Focal Point layer is die cut from the Regal Flora Dies. It measures about 1 3/4″ x 3 3/4″.
The flower is stamped with Berry Burst ink.
The leaf image is stamped with Pretty Peacock ink.
I stamped the dotted background with Basic Beige ink.
Click the blue button below to download the Project Tutorial.
I didn’t put a sentiment on the outside of this card, but stamped the inside.
So, be sure to download the free Project Tutorial. You can use it now with supplies you already have, enjoy it with the Regal Winter Suite of products. Remember …
Today is the last day to redeem your Bonus Days Coupons. You should have received an email from Stampin’ Up! shortly after you placed your order in July. This email contains a Coupon Code. When you place your order in August, you will be prompted to put in the Coupon Code(s). If you have more than one Coupon Code, enter them in the space provided separated by a comma. The discount will appear when you check out.
Last Day For August Customer Card Kit
This is a Fall-Themed Kit that features the Autumn Leaves Bundle. You will receive your Kit automaically with a minimum product purchase of $50 through my online store at Stampin’ Up! The Kit will include:
Everything you need to put the cards together as I’ve designed them;
Card bases, layers, die cuts, embellishments, sentiment layers, and envelopes;
I cannot send stamped images, but you will have a sentiment layer you can customize to a stamp you already own, or you can purchase the Autumn Leaves Bundle through my Online Store.
A printed PDF Tutorial, along with a video link so you can put the cards together with me.
This card kit will be available through August 31st.
This month, the theme is the new 2024-2026 In Colors. We hope to inspire you with our creations today! You will find the lineup at the end of my post to help you “hop” along from Pal to Pal.
Here’s a Clean and Simple In Color Sampler that is quick and easy to put together. A Clean And Simple (CAS) card has lots of white space, few layers, and little or no embellishments. The design is versatile. You can reverse the squares and circles, add a different die cut element, embellish differently, and customize your sentiment.
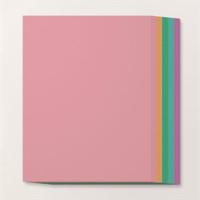
My card showcases three of the five new In Colors: Peach Pie, Petunia Pop, and Summer Splash. I enjoy combining these three. They’re crisp, clean and will give any project a fun pop of color.
Below are the five new 2024-2026 In Colors.
So, let’s make a card!
Parts & Pieces
Cut a Thick Basic White cardstock card base 11″ x 4 1/4″, and score at 5 1/2″ on the 11″ side.
I cut a Basic White cardstock layer 3 1/2″ x 5″.
Each of the cardstock squares are 1 3/4″.
I die cut three cardstock circles using the Everyday Details Dies. The circle is about 1 7/8″ in diameter.
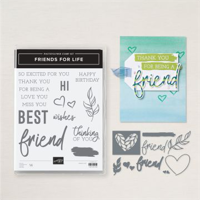
The Basic White die cut decorative elemtns are from the Friends For Life Dies.
Put It All Together
Attach the cardstock squares to the back side of the Basic White layer as shown.
The Summer Splash layer is centered on the back of the right side.
The bottom of the Petunia Pop square is about 1/2″ from the bottom of the layer.
The top of the Peach Pie square is about 1/2″ from the top of the layer.
Stamp your sentiment.
I attached the circles with Dimensionals.
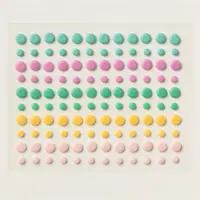
I embellished with the coordinating 2024-2026 In Color Resin Dots.
I stamped the inside and added a little stamped and die cut heart.
So, I hope you enjoy my In Color circles and squares sampler as much as I enjoyed putting it together. Have fun with this clean and simple design. Try your favorite colors, and add a die cut element.
Most importantly, have fun creating your design.
… the only limitation is your imagination!
There’s more inspiration to show you, so use the lineup below to visit the rest of the Design Team. Please mark your calendars for our next blog hop in July, when our theme will be Our Favorites in the New Catalog.
It’s time for a new Customer Card Kit. The June, 2024 Monthly Customer Card Kit celebrates Country Flowers and Country Lace. The Card Kits feature a Fun Fold and an easy layered card design.
Below are additional Kit details.
You will receive everything you need to put the cards together as I’ve designed them.
The kit will include the card bases, layers, die cuts, embellishments, sentiment layers, and envelopes.
I cannot send stamped images, but you will have a sentiment layer you can customize to a stamp you already own, or you can purchase the Country Flowers Bundle.
You will also receive a printed PDF Tutorial, along with a video link so you can put the cards together along with me.
You will automatically receive this kit with a minimum product purchase of $50.00 through my online store.
This card kit will be available through June 30th.
Bundle Savings Are Even Better
Do you love Bundles? I do. It’s rare that I purchase a stamp set without the dies, or dies without the stamp set. Aside from that, there’s ALWAYS a 10% discount on Bundles. Starting today, Wednesday, June 5th, Stampin’ Up! is dicounting Bundles an additional 10%. If there’s a Bundle you’ve had your eyes on, you can save more from June 5th through June 30th with the additional discount.
Even Better! As much as I love Bundles, you absolutely have to have a cutting machine. If you don’t have one, think about investing in one during the month of June. From today, June 5th through June 30th, the Stampin’ Cut And Emboss Machine and the Mini Stampin’ Cut And Emboss Machine will be discounted 10%.
I’m sure you’ve heeard me say that I love my “Mini”. I do! Its smaller size makes it easy for me to keep it on my work surface when I’m making a card or project. The dies run through the machine smoothly and it cuts evenly.
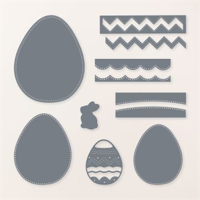
Here’s a clean and simple card featuring the Excellent Eggs Dies, and the fun “Inlay” technique.
These dies are the perfect tool to have fun with a little bit of “paper inlay”. It’s a technique that allows you to piece the die cuts together (like fitting together puzzle pieces), to create colorful, custom die cut images with the appearance of lots of dimension.
Parts & Pieces
If you take a close look at my “Parts & Pieces” photo above, you’ll see that I die cut three eggs using the Excellent Eggs Dies.
Once I had the three eggs cut, I mixed the pieces and glued them inside the open sections of the eggs. I “inlaid” the pieces to custom design my eggs!
How about die cutting a Glimmer Paper egg. Would’t a little shimmer and sparkle be a pretty accent to a custom egg?
It’s a quick and easy technique, and the results are great.
By layering the pieces inside the open areas of the eggs, I also created fun texture.
Glue the large egg die cut outline to the front of your card base, as shown.
Mix the die cut pieces, “inlay” them to their corresponding home in the egg design, and create a custom colored egg!
It’s fun and easy. Try it!
I kept my card clean and simple to focus on the technique. When I first saw these Dies, I knew I would use them, not only for Easter, but for lots of little extra touches on other card designs.
What about adding a small border to a die cut circle, or square. Or, adding a border across a card base or layer to create a unique “grounding” layer” for an element cluster. These are just a few uses. There’s more that will come to you as you create your designs.
So, get Excellent Eggs, send Easter Wishes, and use the die cuts to border, decorate, and embellish lots of other projects.
I am Debbie Crowley and welcome to my blog. Here you'll find fun projects that are sure to inspire you. I hope you'll stop
by often and leave a comment or two. To contact me, you can email me at: expressivelydeb@gmail.com
Current Catalogs
What are you looking for?
The content of this blog is the sole responsibility of Debra Crowley, expressively deb.com, as an Independent Stampin' Up! Demonstrator. The use of and content of classes, services or products offered is not endorsed by Stampin' Up!