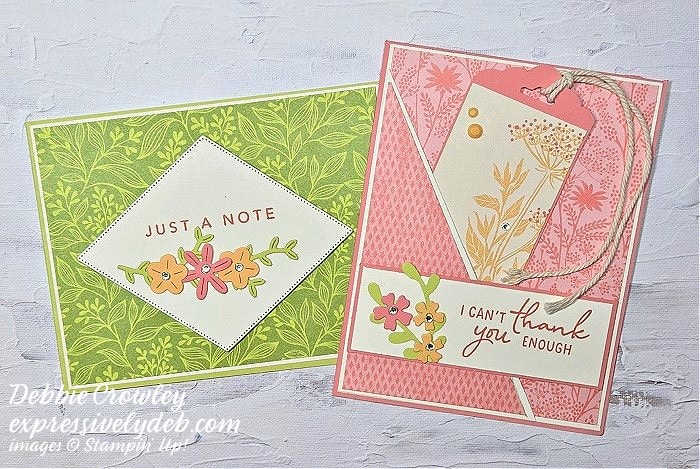
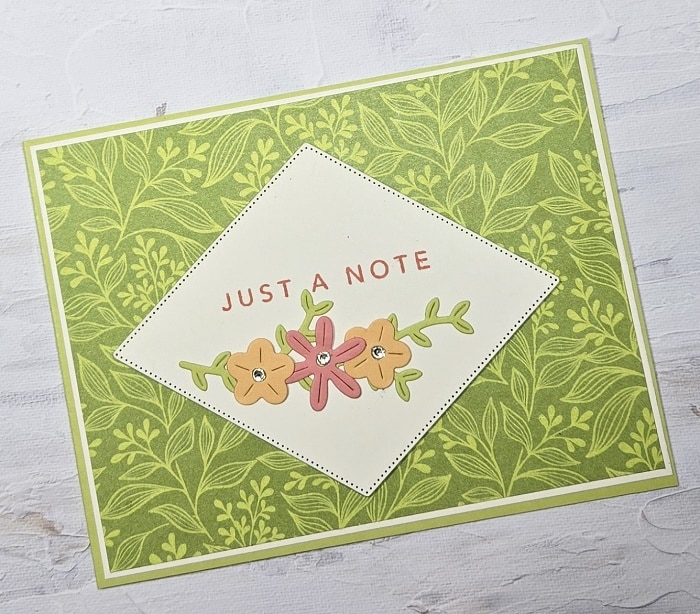
The Refreshed Beauty Designer Series Paper pack showcases bright color combinations. Along with these fresh “happy” colors, the patterns are subtle, making them perfect backgrounds for your cards and scrapbook layouts.
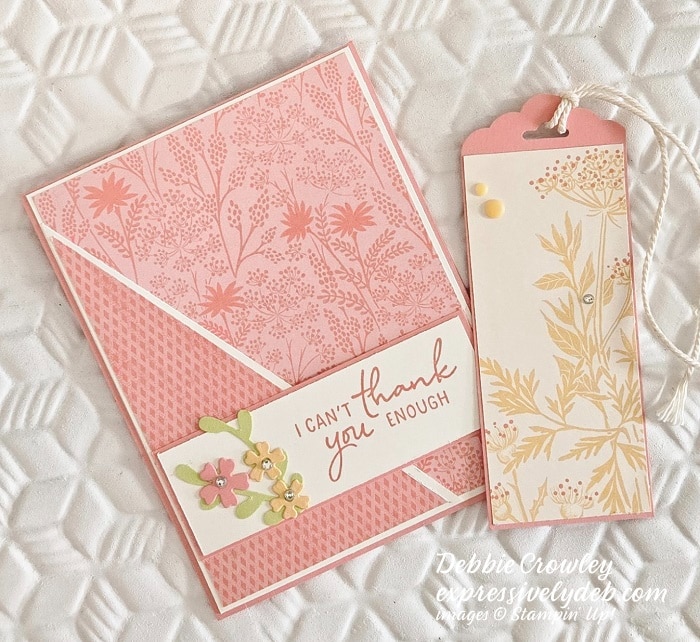
My February Customer Card Kit celebrates this pretty Designer Series Paper pack. As always, there’s a quick and easy card, and one that’s a bit more detailed. They’re both fun to put together and send to someone special.
The second card includes a removable bookmark. It makes an adorable gift for so many occasions, or just to say “hi”.
February Card Kit Details
You will receive everything you need to put the cards together as I’ve designed them except for adhesives.
The Kit will include the card bases, layers, die cuts, embellishments, sentiment layers, and envelopes.
I cannot send stamped images, but you will have a sentiment layer you can customize to a stamp you have.
You will also receive a printed PDF Tutorial, along with a video link so you can put the cards together with me.
You will automatically receive this Kit with a minimum product purchase of $50.00 through my online store.
This card kit will be available through February 28, 2025.
I had so much fun putting these cards together. I think you will, as well.
As always, you can reawch out t o me with any questions.
A new month, and a new Customer Mini Card Kit! It’s my gift to customers with a minimum product purchase of $50.00 through my Online Store.
I couldn’t resist celebrating the Marbled Elegance Designer Series Paper. It’s a recent Product Release in the Online Exclusives, and it’s gorgeous! My cards are both “thank you” cards. Think about changing the sentiment to create a pretty “happy birthday” card, or “thinking of you” card. The sentiment part of putting these cards together is up to you!
Let’s talk about the Card Kit.
You will receive everything you need to put the cards together as I’ve designed them except for adhesives.
The Kit will include the card bases, layers, die cuts, embellishments, sentiment layers, and envelopes.
I cannot send stamped images, but you will have a sentiment layer you can customize to a stamp you have.
You will also receive a printed PDF Tutorial, along with a video link so you can put the cards together with me.
You will automatically receive this Kit with a minimum product purchase of $50.00 through my online store.
This card kit will be available through December 31st, 2024.
Now, I have a lot of news (and links) to share with you. There’s a lot going on over at Stampin’ Up!
Two New Kits in the Kits Collection
You can click on the images below for more details. Both Kits are unique and beautiful.
Stampin’ Up! has released the retiring products from the September-December, 2024 Mini Catalog and selected Online Exclusives products into a new category of the Stampin’ Up! Website called the “Last Chance Products”.
Product discounts will vary.
The retiring products will remain in the new Last Chance category while supplies last.
Once a retiring product is sold out, you won’t be able to get it.
Now that all of the clicking is out of the way, I hope you enjoyed getting the dcetails on the new products released, along with the retiring products in the Last Chance section of the Website.
I’ll be back in the next day or two with new project inspiration for you.
On this day of gratitude, I want to let you know I am so very grateful for you. For those who are my Blog subscribers, thank you for your continued support. Thank you to those who pop in for a visit. I appreciate your time.
I am grateful for the goodness that reaches me through my family, friends, and my paper crafting community. It’s truly a gift to have the opportunity to do something you love, and to be able to share it.
Have a wonderful and safe Thganksgiving Day!
Thank you always for stopping by.
Debbie
NOVEMBER CUSTOMER CARD KIT
Let’s talk about the Card Kit.
You will receive everything you need to put the cards together as I’ve designed them except for adhesives. You will receive Dimensionals, if used.
The Kit will include the card bases, layers, die cuts, embellishments, sentiment layers, and envelopes.
I cannot send stamped images, but you will have a sentiment layer you can customize to a stamp you already own, or you can purchase the Reindeer Funb Stamp Set. It’s on page 27 in the September-December, 2024 Mini Catalog.
You will also receive a printed PDF Tutorial, along with a video link so you can put the cards together with me.
You will automatically receive this kit with a minimum product purchase of $50.00 through my online store.
This card kit will be available through November 30th, 2024.
As a follow-up to yesterday’s post, I’m showcasing another card we made at our crafty gitls group gathering this past week. As I mentioned, we enjoyed ink blending and creating inked backgrounds with stencils.
I completed this card using the Layers of Beauty Bundle and one of the Basic Pattern Decorative Masks. (Stampin’ Up! refers to Stencils as “Masks”).
The Layers of Beauty Bundle includes the stamps, dies, and Layers of Beauty Decorative Masks. This makes it so easy to create the flower cluster.
How To Create This Inked Background
Stamp the large flower cluster using Black Memento Ink.
Choose your color palette. I chose Pool Party, Lost Lagoon and Pretty Peacock for my flowers.
The Color Coach Color Wheel can help you choose the colors. You can choose a light, medium and dark tone of a color family by looking at the Coloc Wheel.
One of the ladies chose Petal Pink, Flirty Flamingo and Calypso Coral; one chose Lemon Lolly, Daffodil Delight and Crushed Curry. We also had Poppy Parade, Real Red and Cherry Cobbler flowers. They were all stunning!
Here are the color combinations we used:
The “How To” Continued
We inked the leaves on the flowers with Granny Apple Green and Old Olive ink.
There are five Masks you will use to complete the flower cluster.
The Masks are numbered. Starting with “Number 1”, use the lightest color, then work from there.
Use Granny Apple Green, then Old Olive when you get to the leaf Masks.
Once your flowers are inked, the last step is to cut the cluster using the coordinating die in the Bundle.
We used different background Masks for our projects. I used one of the patterns from the Basic Pattern Decorative Masks. Although, no longer available, I thought it worked well with the flowers. I used my White Pigment Ink and a Blending Brush.
One of the ladies used a linear background pattern from the Lovliest Layers Decorative Masks for her card.
Although, not all of the products we used for this card are available, you can create an inked background using a favorite background stamp and ink.
I truly enjoyed sharing this post with you, and hope it inspires you to get out some ink, a blending brush, a stamp or Mask, and create a beautiful and unique card to share.
You will receive everything you need to put the cards together as I’ve designed them except for adhesives. You will receive Dimensionals, if used.
The Kit will include the card bases, layers, die cuts, embellishments, sentiment layers, and envelopes.
I cannot send stamped images, but you will have a sentiment layer you can customize to a stamp you already own, or you can purchase the Reindeer Funb Stamp Set. It’s on page 27 in the September-December, 2024 Mini Catalog.
You will also receive a printed PDF Tutorial, along with a video link so you can put the cards together with me.
You will automatically receive this kit with a minimum product purchase of $50.00 through my online store.
This card kit will be available through November 30th, 2024.
I needed a few quick and easy thank you cards, and it’s time I took a little break from the wonderful colors of Christmas, so I designed this Clean And Simple card with the help of the Regal Flora Bundle.
I’m sure most of you know, Clean And Simple cards have their unique spot in our paper crafting world. “CAS” cards have lots of white space, few layers, and little or no embellishments.
Inspired by one of the patterns in the Regal Winter Designer Series Paper, I chose to use Night of Navy and Blackberry Bliss for my color combination. I stampes the top and bottom card front elements with Night of Navy ink and die cut them with the matching die.
The center element isn’t stamped. I used the brush end of my Blackberry Bliss and Night of Navy Stamin’ Write Markers to add the ink directly to the stamp, then stamped the image to my cardstock. If you look clopsely, you can see both colors on the image.
I wanted to keep this color palette simple, but you could duplicate this design (which I will definitely do), using a brighter, or more subtle color palette. It would also be fun to give it a Fall theme with oranges, reds, and maybe a little touch of Wild Wheat!
You can experiment with some of the color combinations below. I think a few of these cards in a pretty hand made box, tied with a soft ribbon, would be a beautiful gift.
more color inspiration
Below is my color palette.
Below are softer coolor combinations.
And, here are a few bright color combinations.
Don’t forget, today is the last day for the Seasonal Sale. All of the ink pads, cardstock, and markers are on sale. Pick your favorite color palette and take advantage of the discounted prices.
So, find three pretty stamps with coordinating dies, attach them to your card front with Dimensionals, add a sentiment, and create something to share gratitude.
You will receive everything you need to put the cards together as I’ve designed them except for adhesives. You will receive Dimensionals, if used.
The Kit will include the card bases, layers, die cuts, embellishments, sentiment layers, and envelopes.
I cannot send stamped images, but you will have a sentiment layer you can customize to a stamp you already own, or you can purchase the Reindeer Funb Stamp Set. It’s on page 27 in the September-December, 2024 Mini Catalog.
You will also receive a printed PDF Tutorial, along with a video link so you can put the cards together with me.
You will automatically receive this kit with a minimum product purchase of $50.00 through my online store.
This card kit will be available through November 30th, 2024.
I am Debbie Crowley and welcome to my blog. Here you'll find fun projects that are sure to inspire you. I hope you'll stop
by often and leave a comment or two. To contact me, you can email me at: expressivelydeb@gmail.com
Current Catalogs
What are you looking for?
The content of this blog is the sole responsibility of Debra Crowley, expressively deb.com, as an Independent Stampin' Up! Demonstrator. The use of and content of classes, services or products offered is not endorsed by Stampin' Up!