It’s official! The Painterly Pears Suite Collection is available in the Online Exclusives. It’s beautiful!
From the delicately shaded pear images and blossoms in the Designer Series Paper, to the shimmery ribbon, this Suite is certain to give you lots of fun creative time.
I designed this card to include a sampling of products in the Suite. The Painterly Pears Designer Series Paper is my color inspiration – Petal Pink and Old Olive. I decided to substitute Darling Duckling with Lemon Lolly.
So, let’s make a card!
Pieces And Parts
The Old Olive cardstock card base is 4 1/4″ x 11″, scored at 5 1/2″.
The Basic White mat layer is 4″ x 5 1/4″, and the patterned paper top layer is 3 3/4″ x 4 3/4″.
I used the 2 3/8″ Circle Punch to act as a grounding layer for the element cluster.
I die cut the pears directly from the Designer Series Paper.
The grid-like trellis, leaf vine, flowers, and sentiment layer are also die cuts using the Perfectly Pears Dies.
The sentiment is an image from the Perfectly Pears Stamp Set.
My ribbon embellishment is the Mossy Meadow and Gold Trim. I used about 7″ to form a bow and attached is under the circle layer.
So, take out your favotire pack of Designer Series Paper, cut a few layers, create an element cluster, and make a beautiful card to share with someone special.
This card was so much fun to put together. What do you think about the tempting pitcher of (might be) fruit punch? I love it! As the punch is refreshing, so are the elements I used to put this card together.
I love patterned paper. When I saw the Celebrate Together Scrapbooking Workshop Kit, I had to have it. I’m a card maker at heart, butI I thought it would be fun to see what I could do with a Workshop Kit. The Workshop Kit coordinates with the Sweet Blooms Bundle, and the Celebratory Sips Designer Series Paper Pack. So many possibilities!
Fun, Refreshing Colors
Here are some color combinations you can use with the Workshop Kit, or the Celebratory Sips Designer Series Paper, along with the Celebratory Sips Suite products.
Let’s make a card!
Pieces And Parts
I started with a Basic White top fold card base 11″ x 4 1/4″, and scored at5 1/2″.
The card front top layer is 4″ x 5 1/4″. It’s one of the cardstock sheets from the Workshop Kit. It is double sided. One side is darket than the other. For this layer, I used the lighter side of the Strawberry Slush cardstock. I found that the weight of this cardstock is great for layering!
The bottom white circle is a sticker from the Kit Sticker Sheet. The circle diameter is 3 1/2″.
I also used the floral design circle sticker from the Kit for the top circle. It measures 3″ in diameter.
The lemon slices are also stickers. They’re about an inch in diameter.
The sentiment is from the Sweet Blooms Bundle.
Below is a Sketch you can download and print. As I was creating this card, I thought it would be fun to add a sketch. It’s simpe and you can let your imagination soar with these fun circles and some patterned paper. Have fun with it.
So, pick a color palette, cut some Celebratory Sips Designer Series Paper Circles, add a few lemons, and create a fun, refreshing card to celebrate Summer!
You will receive everything you need to put the cards together as I’ve designed them except for adhesives.
Includes card bases, layers, die cuts, embellishments, sentiment layers, and envelopes.
I cannot send stamped images, but you will have a sentiment layer you can customize.
You will also receive a printed PDF Tutorial, along with a video link so you can put the cards together with me.
You will automatically receive this Kit with a minimum product purchase of $50.00 through my online store.
This card kit will be available through June 30, 2025.
Enjoy The Online Exclusives Special Promotion – A Suite Sale
During the month of June, 2025, you can take advantage of Stampin’ Up!’s BOGO – 5-% Off Product Suites and Suites from the current Annual Catalog and available in the Online Exclusives.
Get Your Updated Copy Of Stampin’ Up!’s 2025 Color Coach
You can download the new 2025 Color Coach cards to get tons of new color inspiration. Click on the image below to download your copy.
2025 Color Coach
The 2025 Annual Catalog Is Live Today
You can download a digital copy of the new Catalog by clicking here
My inspiration for today’s card came from a combination of an image in the Annual Catalog for the Florals In Bloom Suite, and my wanting to use my Everyday Arches Dies. I’ve had the Dies for a while, and hadn’t used them. It’s about time, right?
Along with mixing the beautiful florals in the Florals in Bloom Designer Series Paper, I matched patterns from the Paper Pack. Doing both in one project made me very happy!
Once I had the flowers fussy cut, and the patterned paper chosen, this card came together quickly.
Here’s How I Did It
I fussy cut the flowers directly from the Designer Series Paper.
The Everyday Arches Dies quickly gave me a grounding layer for the flower cluster.
The Secret Sea patterned paper layer is a great background that helps the flowers pop.
I used glue to attach the layers to the card front, and Dimensionals to attach the flowers.
The sentiment, from The Right Words Stamp Set, is stamped with Secret Sea ink.
A little White Baker’s Twine bow, and a few Secret Sea Flat Pearls embellished the card nicely.
I hope you enjoy today’s inspiration. If you love flowers, you will love creating with the Florals In Bloom Suite.
So, fussy cut a few flowers, add a fun ground layer, a sentiment, simple embellishments, and create a beautiful card to make someone’s day special.
You will receive everything you need to put the cards together as I’ve designed them except for adhesives.
Includes card bases, layers, die cuts, embellishments, sentiment layers, and envelopes.
I cannot send stamped images, but you will have a sentiment layer you can customize.
You will also receive a printed PDF Tutorial, along with a video link so you can put the cards together with me.
You will automatically receive this Kit with a minimum product purchase of $50.00 through my online store.
This card kit will be available through June 30, 2025.
Enjoy The Online Exclusives Special Promotion – A Suite Sale
During the month of June, 2025, you can take advantage of Stampin’ Up!’s BOGO – 5-% Off Product Suites and Suites from the current Annual Catalog and available in the Online Exclusives.
Get Your Updated Copy Of Stampin’ Up!’s 2025 Color Coach
You can download the new 2025 Color Coach cards to get tons of new color inspiration. Click on the image below to download your copy.
2025 Color Coach
The 2025 Annual Catalog Is Live Today
You can download a digital copy of the new Catalog by clicking here
Sometimes, the patterned paper is perfect to create a beautiful card that will make anyone smile! The Lovely Garden Designer Series Paper workes for this simple layered card design. It’s one of the cards in my May Customer Card Kit. It’s on my “favorites list”, without a doubt!
The details for the Kit are below.
May 2025 Customer Card Kit
May CARD KIT DETAILS
You will receive everything you need to put the cards together as I’ve designed them except for adhesives.
The Kit will include the card bases, layers, die cuts, embellishments, sentiment layers, and envelopes.
I cannot send stamped images, but you will have a sentiment layer you can customize to a stamp you have.
You will also receive a printed PDF Tutorial, along with a video link so you can put the cards together with me.
You will automatically receive this Kit with a minimum product purchase of $50.00 through my online store.
This card kit will be available through May 31, 2025.
I had a lot of fun putting these cards together. I’m sure you will, as well.
You can reach out to me with any questions. Remember …
… the only limitation is your imagination!
Thanks for stopping by,
Debbie
Get Your Updated Copy Of Stampin’ Up!’s 2025 Color Coach
You can download the new 2025 Color Coach cards to get tons of new color inspiration. Click on the image below to download your copy.
2025 Color Coach
The 2025 Annual Catalog Is Live Today
You can download a digital copy of the new Catalog by clicking here
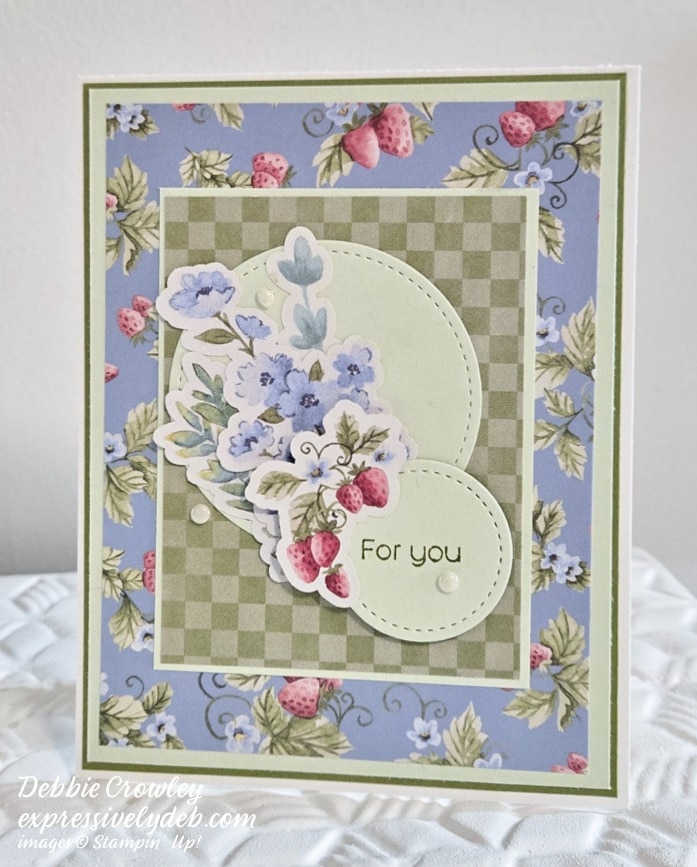
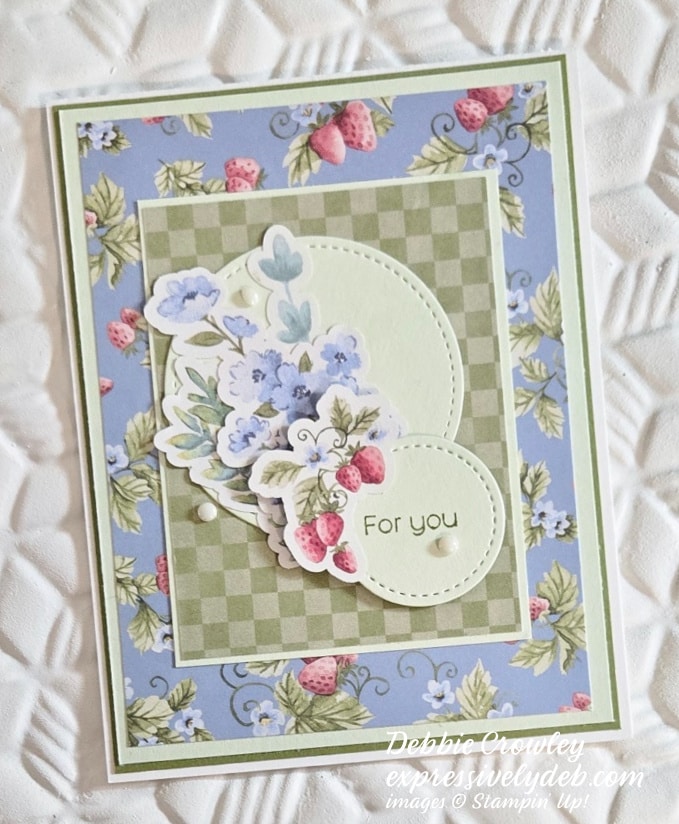
I wanted to capture the elegant simplicity of the strawberry pattern from the Storybook Moments Designer Series Paper. This card came together so quickly for me. I decided I wanted to cut the strawverry pattern, and the rest fell into place.
My design is simple – just layers and a large Focal Point element cluster. I used circles to soften the focal point, and keep in line with the (curcular) swirly lines in the strawberry paper. The die cut elements are from one of the sheets in the Specialty Paper Pack. They’re laser cut punch-outs. I enjoyed picking the elements I thought would work together. In this card, the Storybook Moments Designer Series Paper does all the work.
Have fun with this card design by switching up some of your favotire patterns and elements.
So, let’s make a card!
Parts & Pieces
The Basic White card base is 4 1/4″ x 11″, scored at 5 1/2″.
The Old Olive mat layer is 4 1/8″ x 5 3/8″.
The Soft Seafoam mat layer is 4″ x 5 1/4″.
The patterned paper layer is 3 3/4″ x 5″.
The center Soft Sea Foam cardstock layer is 2 7/8″ x 3 3/4″
The gingham patterned paper layer is 2 3/4″ x 3 5/8″.
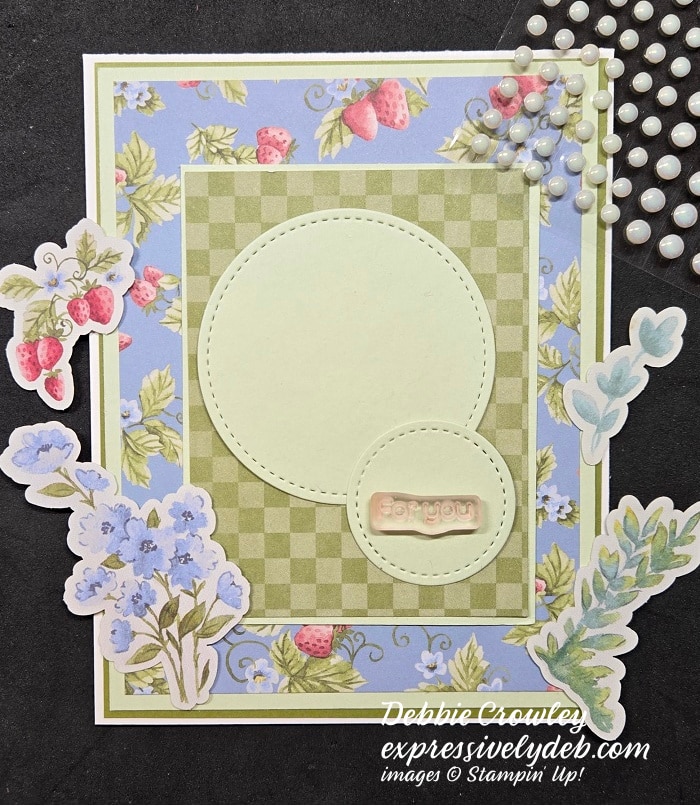
I die cut the circles. The larger circle is 2 1/4″ in diameter, and the smaller circle is about 1 1/2″ in diameter.
The elements are all punch-outs from one of the DSP Specialty sheets.
I used one of the sentiments from my Hooray For Surprises Stamp Set.
Once you adhere the layers to the card front, and attach the circles, you can arrange the elements as shown. I added a few Antique Pearls to embellish.
I hope you enjoy putting this card together as much as I did.
I am Debbie Crowley and welcome to my blog. Here you'll find fun projects that are sure to inspire you. I hope you'll stop
by often and leave a comment or two. To contact me, you can email me at: expressivelydeb@gmail.com
Current Catalogs
What are you looking for?
The content of this blog is the sole responsibility of Debra Crowley, expressively deb.com, as an Independent Stampin' Up! Demonstrator. The use of and content of classes, services or products offered is not endorsed by Stampin' Up!