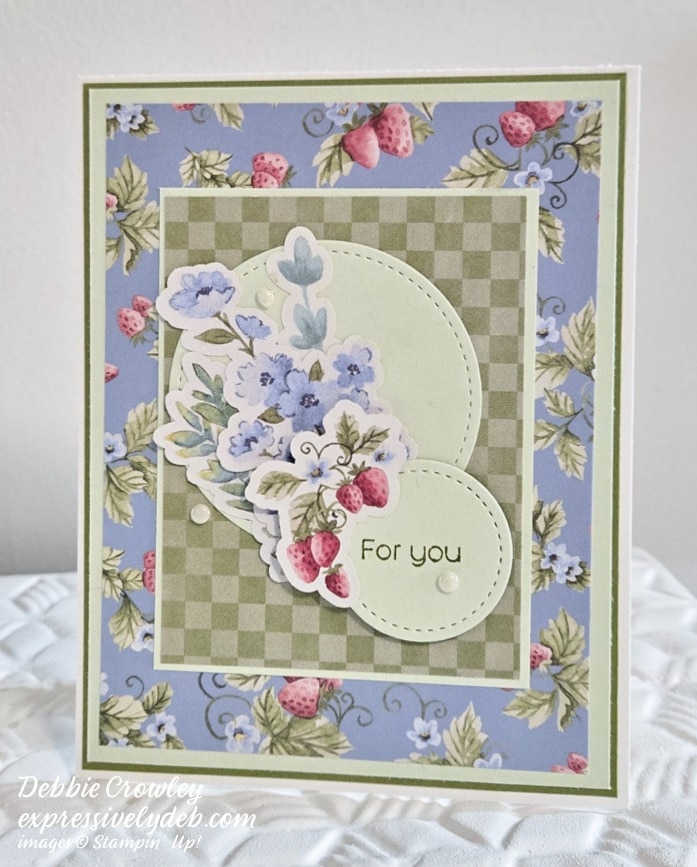
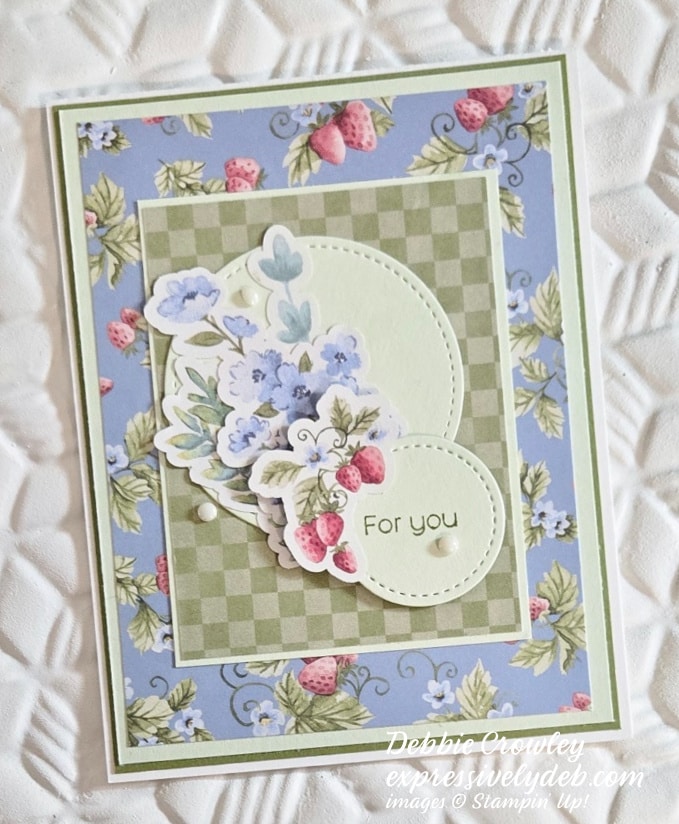
I wanted to capture the elegant simplicity of the strawberry pattern from the Storybook Moments Designer Series Paper. This card came together so quickly for me. I decided I wanted to cut the strawverry pattern, and the rest fell into place.
My design is simple – just layers and a large Focal Point element cluster. I used circles to soften the focal point, and keep in line with the (curcular) swirly lines in the strawberry paper. The die cut elements are from one of the sheets in the Specialty Paper Pack. They’re laser cut punch-outs. I enjoyed picking the elements I thought would work together. In this card, the Storybook Moments Designer Series Paper does all the work.
Have fun with this card design by switching up some of your favotire patterns and elements.
So, let’s make a card!
Parts & Pieces
The Basic White card base is 4 1/4″ x 11″, scored at 5 1/2″.
The Old Olive mat layer is 4 1/8″ x 5 3/8″.
The Soft Seafoam mat layer is 4″ x 5 1/4″.
The patterned paper layer is 3 3/4″ x 5″.
The center Soft Sea Foam cardstock layer is 2 7/8″ x 3 3/4″
The gingham patterned paper layer is 2 3/4″ x 3 5/8″.
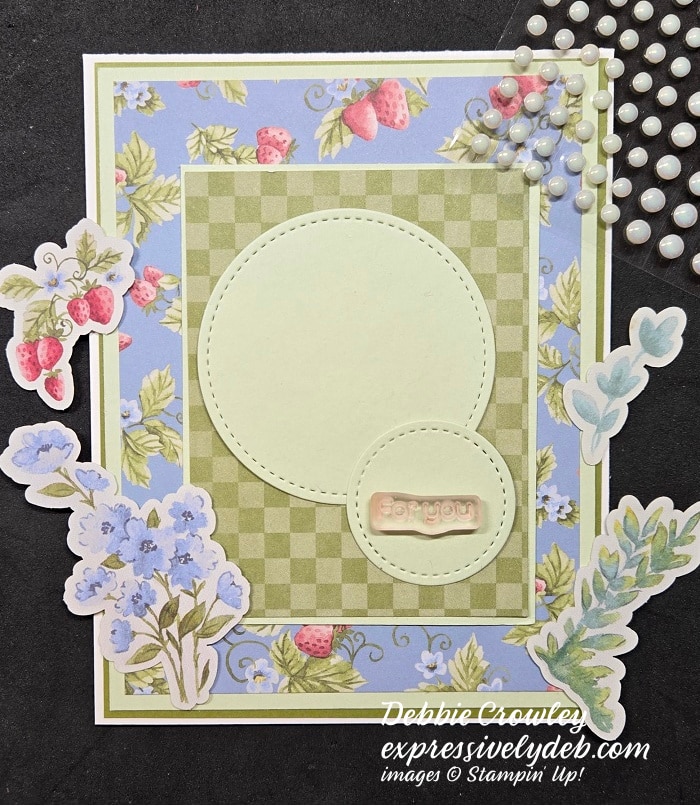
I die cut the circles. The larger circle is 2 1/4″ in diameter, and the smaller circle is about 1 1/2″ in diameter.
The elements are all punch-outs from one of the DSP Specialty sheets.
I used one of the sentiments from my Hooray For Surprises Stamp Set.
Once you adhere the layers to the card front, and attach the circles, you can arrange the elements as shown. I added a few Antique Pearls to embellish.
I hope you enjoy putting this card together as much as I did.
I thought it would be fun to create a card showcasing the products from the Linked Together Bundle. It’s in the new Mini Catalog on pages 48 and 49.
Although, I didn’t use every stamped image and die included in the Bundle, There’s a selection from each crafting category in the Bundle. I used two stamped images, five of the seven dies, and three of the five Decorative Masks in my card design.
So, let’s make a card!
Parts & Pieces
The Crumb Cake card base is 5 1/2″ x 8 1/2″, scored at 4 1/4″.
I cut a Crumb Cake cardstock layer 4 1/4″ x 5 1/2″ to ink a stenciled pattern. The pattern is subtle, but adds dimension to the card. The inked stencil layer also creates a “pattern repeat” with the lattice die cut layer.
I completed the inked pattern, then trimmed the cardstock layer to 3 3/4″ x 5″.
This will be the top layer for the card front.
The wood patterned paper mat layer is 4 1/8″ x 5 3/8″.
I used the large lattice die in the Linked Together Dies, to cut two panels – one from Early Espresso cardstock, and the second uses the wood patterned paper.
I glued the patterned paper die cut lattice to the Early Espresso lattice die cut.
This process adds dimension to the lattice layer without Dimensionals.
The sentiment layer, flowers and leaf vines are die cuts from the Dies.
I stamped a sentiment on the inside of the card and decorated it with die cut flowers.
I love, love, love the font in the Linked Together stamp set. It’s a sentiment builder stamp set with clean, large sentiments.
Once I chose my paterned paper and color palette, putting this card together was fun. Using the bright colors against a neutral background is somehting I haven’t done in a while. And the perfect match for a sentiment layer is Basic Beige – another versatile “Neutral”.
So, take a look at the Linked Together Bundle, imagine what you can do with it, and add it to your craft room shelf. This Bundle is one that has amazing possibilities.
The cards are showcasing the Regal Flora Designer Series Paper. One is a popular Fun Fold design, and the second is a quick and easy design you can use for any occasion.
Below are the Kit details:
This card kit will be available through January 31st, 2025.
You will receive everything you need to put the cards together as I’ve designed them except for adhesives.
The Kit will include the card bases, layers, die cuts, embellishments, sentiment layers, and envelopes.
I cannot send stamped images, but you will have a sentiment layer you can customize to a stamp you have.
You will also receive a printed PDF Tutorial, along with a video link so you can put the cards together with me.
You will automatically receive this Kit with a minimum product purchase of $50.00 through my online store.
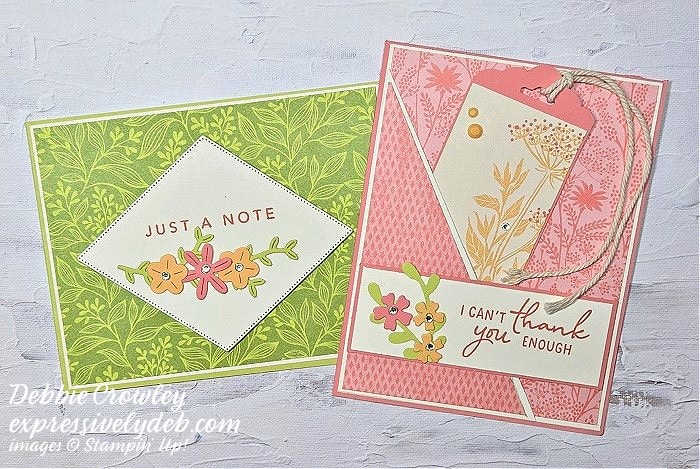
Here’s a sweet birthday card I put together using the Happy Hibiscus Buncle. The background Designer Series Papeer is fron Sale-A-Bration. It’s called “Fruit Salad”, and is fun, bright and adorable. (Check in tomorrow to see more fruit Salad in action). A “ready to go” sentiment from the new January-April 2025 Mini Catalog, makes it quick and easy to share your sentiment. Although these products are from different areas of Stampin’ Up!’s product releases, they work together well. It’s always fun to take a look at what you have, think about how you can use the products, and create something unique to your style.
The Happy Hibiscus Buncle
The Happy Hibiscus Bundle is available in the Online Exclusives. It’s a “Hybrid” Bundle that includes a stamp set, coordinating dies, and a 3-D embossing folder. There’s a large die that fits into the embossing folder that allows you to die cut and emboss the flowers at the same time.
The Happy Hibiscus Stamp Set is a two-step set. You can stamp the outline image, and use the “fill” stamp to add color to the flower. In today’s sample, I chose to stamp the flowers without the fill stamp.
The Fruit Salad Designer Series Paper
This is one of the FREE Sale-A-Bration patterned paper packs with a $60 product purchase. There are 48 sheets of 6″ x 6″ double-sided patterned paper. One side is fruit-themed, and the other side has simple designs in fun colors you can use for backgrounds or layers.
Greetings For All Mix & Match Ephemera Pack
As soon as I saw this Ephemera Pack in the upcoming January-April Mini Catalog, I put it at the top of my list. There are six sheets of punch out sentiments, four black lettering on white, and two white lettering on black. You can see, I used the white on black in my card and love the look!
Let’s Make A Card!
I cut a Thick Basic White card base 5 1/2″ x 8 1/2″ and scored it at 4 1/4″.
The Basic Black cardstock layer is 4″ x 5 1/4″.
The patterned paper layer is 3 7/8″ x 5 1/8″.
The Basic Black cardstock circle is die cut from one of the Spotlight on Nature Dies. It measures about 3″ in diameter.
I adhered the layers to the card base, and attached the element cluster using Dimensionals.
Get Ready To Sale-A-Brate
Sale-A-Bration has always been Stampin’ Up!’s biggest sale of the year. You will be able to earn FREE products from the Sale-A-Bration Brochure with a qualifying purchase. The event begins tomorrow, and runs through February 28th.
Best Time To Join Stampin’ Up!
Sale-A-Bration is also a great time to join in the fun at Stampin’ Up!. Become a Stampin’ Up! Demonstrator.
During Sale-A-Bration 2025, you can join Stampin’ Up! for $99 plus FREE Shipping. You can make the choice between two options when you join.
Option 1: For $99, you can get $125 in product (that you choose), PLUS a choice of two Stampin’ Write Marker Assortments AND the Handmade Designs Cling Stamp Set, an exclusive stamp set designed to work with the markers. That’s a $216 value.
Option 2: For $99, you can get $125 in product (that you choose), PLUS an additional $30 in products you choose. That’s a $155 value.
I’ll have more details on the Join Promotion next week.
Two New Kits
On January 7th, Stampin’ Up! will be launching two new kits in the Kits Collection. The Kits contain everything you need to create amaing projects. More details to follow.
Two New Catalogs
Along with the Sale-A-Bration Brochure, two new catalogs will launch – The January-April 2025 Mini Catalog, and the new January, 2025 Scrapbooking Brochure. I’ve seen both and the products are amazing.
New Online Exclusives
Once again, Stampin’ Up! is adding new products to the Online Exclusives. These will also launch on January 7th. You’re going to simply love them! Check in tomorrow. I’ll have more details on these products.
So, I think I’ve covered just about everything you need to know to get ready for tomorrow. Please reach out to me with any questions you may have. My email address is expressivelydeb@gmail.com.
Enjoy the rest of your day!
… the only limitation is your imagination!
January. 2025 Customer Mini Card Kit
The cards are showcasing the Regal Flora Designer Series Paper. One is a popular Fun Fold design, and the second is a quick and easy design you can use for any occasion.
Below are the Kit details:
This card kit will be available through January 31st, 2025.
You will receive everything you need to put the cards together as I’ve designed them except for adhesives.
The Kit will include the card bases, layers, die cuts, embellishments, sentiment layers, and envelopes.
I cannot send stamped images, but you will have a sentiment layer you can customize to a stamp you have.
You will also receive a printed PDF Tutorial, along with a video link so you can put the cards together with me.
You will automatically receive this Kit with a minimum product purchase of $50.00 through my online store.
The Hearts of Elegance Bundle and the Marbled Elegande Designer Series Paper are new in my Online Exclusives Shop. I thought it would be fun to take a little break from Holiday cards and cut some of this beautiful Designer Series Paper.
The Heartfelt Elegance Bundle
The Bundle is themed for Valentine’s Day, however there are a few sentiments that are more generic. I featured one of them in this card, which is a birthday card. I stamped the inside with a “Happy Birthday” sentiment.
The Hearts Of Elegance Bundle #164916
The Marbled Elegance Designer Series Paper
The patterned paper pack features habnd-poured marbled designs accented with gold foil. The paper is double-sided, and on the reverse side are subtle generic patterns.
The Marbled Elegance Designer Series Paper – #164919
Are you ready to make a card? Let’s do it!
Pieces & Parts
I cut a Basic White cardstock card base 4 1/4″ x 11″, and scored it at 5 1/2″.
The Melon Mambo patterned paper card front layer is 4″ x 5 1/4″.
The banner strip of coordinating patterned paper is 2″ x 3 1/4″.
I cut two pieces of ribbon 3″ and angle cut the ends.
The gold heart, stamped flowers, and leaves are die cut with the coordinating Hearts of Elegance Dies.
I die cut a Deckled Edge Circle using one of the Dies in the set. It measures about 2 3/8″ in diameter.
The sentiment is samped onto a Basic White cardstock strip 1″ x 2 3/4″. I used my corner round punch to round the ends.
Attach the cicle first, then attach the patterned paper banner onto the left side of the circle.
Adhere the two strips of ribbon over the banner using glue dots.
Attach the sentiment layer, as shown, using Dimensionals.
I angled and placed the gold heart just above and to the left of the sentiment. I attached it with Dimensionals.
Adhere the flowers and leaves as shown using glue and Dimensionals.
Embellish with a few of the Adhesive Backed Heart Sequins.
You can download and print the PDF Tutorial for this card by clicking the blue button below.
Here’s a look at the inside of my card.
You can also take a look at the Video Tutorial here.
So, you know what to do! Find that fabulous Bundle, add some gold foiled Designer Series Paper, create an element cluster, add your sentiment and send someone special a pretty birthday wish!
You will receive everything you need to put the cards together as I’ve designed them except for adhesives. You will receive Dimensionals, if used.
The Kit will include the card bases, layers, die cuts, embellishments, sentiment layers, and envelopes.
I cannot send stamped images, but you will have a sentiment layer you can customize to a stamp you already own, or you can purchase the Reindeer Funb Stamp Set. It’s on page 27 in the September-December, 2024 Mini Catalog.
You will also receive a printed PDF Tutorial, along with a video link so you can put the cards together with me.
You will automatically receive this kit with a minimum product purchase of $50.00 through my online store.
This card kit will be available through November 30th, 2024.
In my last post, I showcased the August, 2024 Time For Cake Paper Pumpkin Kit. I assembled those cards according to the Kit directions. The cards in this post are “Out-Of-The Box” Paper Pumpkin Alternatives. I used all of the supplies in the Kit and created “alternate” card designs. I put together six of the 9 cards in the Kit plus the three I’m showcasing today. There are easily enough supplies to make an additional four to five cards.
As you can see, I substituted the card bases using Night of Navy cardstock, added a Basic White cardstock layer to the top card and “shadowed” the sentiment with Basic White cardstock. Except for the addition of embellishments, all other supplies are in the Kit. Remember, if you are a Paper Pumpkin Subscriber, you can get Refill Kits.
Hooray It’s Your Birthday
This design is a popular Book Binding Fun Fold. It’s quick and easy.
I cut a Night of Navy cardstock card base 5 1/2″ x 8 1/2″, and scored it at 3 1/4″ and 4 1/4″ on the long side.
Fold the card base in half on the 4 1/4″ score line, then fold the front flap back on the 3 1/4″ score line. Adhere the left edge of the card front by placing glue n the 1″ scored space.
The floral patterned paper layer is 3 1/8″ x 5 3/8″. I cut it from one of the envelopes in the Kit.
The Night of Navy and Misty Moonlight patterned paper layer is 7/8″ x 5 3/8″. I cut this piece from one of the card layers in the Kit.
The rectangle front candle patterned paper layer is 2 1/4″ x 3 1/4″. I cut this from one of the card layers in the Kit.
The Basic White cardstock layer under the center patterned paper layer is 2 3/8″ x 3 3/8″.
The sentiment is a sticker in the Kit. I attached it to a piece of Basic White cardstock and fussy cut it creating a “shadow layer”. I attached it to the card front with Mini Dimensionals.
I added some embellishments I had in my stash.
Happy Birthday Stripes
The card above turned out to me my favorite!
I cut a Night of Navy cardstock card base 4 1/4″ x 11″, and scored it at 5 1/2″ on the 11″ side.
The pink card front layer is a card base from the Kit. I cut it 4 1/8″ x 5 2/8″.
The center horizontal patterned paper layer is 2 1/4″ x 3 1/2″. I cut it from one of the card front layers in the Kit.
The vertical patterned paper layers are punch-outs from the Kit. I trimmed the flower design layers to measure 2 3/8″ in length. The strips are 1/2″ wide.
The pink vertical strips on the Focal Point are also punch-outs from the Kit. They measure 3/8″ x 2 3/4″,
I attached the five strips to the center horizontal layer with glue, stamped and adhered the sentiment layer, and popped the horizontal layer onto the card front with Dimensionals.
The off-set candle is stamped with one of the Kit stamps. I attached it with glue.
I added embellishments I had in my stash.
Sparkle, Shine, and Make A Wish
The card above is probably the quickest and easiest card I ever put together! I love the sentiment font.
The Night of Navy cardstock card base is 4 1/4″ x 11″, scored at 5 1/2″.
The Moody Mauve and blue striped card front layer is 3 3/4″ x 5″. It’s the back of one of the card bases in the Kit.
The candle patterned layer is 3 1/2″ wide x 3 3/4″ long. I cut it from one of the card layers in the Kit.
The two short candles are cut-outs from the Kit. I stamped them with the candle image and Night of Navy ink.
I stamped the sentiment with Night of Navy ink and added a few embellishments.
So I hope you enjoy this parade of alternative cards from the August Time For Cake Paper Pumpkin Kit. I had so much fun putting them together. I’m looking forward to the September Kit, Autumn Abundance. You can get the Kit details, along with Paper Pumpkin details here.
So, with a few cuts, a little glue, and don’t forget the embellishments, you can expand your Paper Pumpkin Kits, and have lots of fun in your craft space.
… the only limitation is your imagination!
August, 2024 Customer Card Kit
This is a Fall-Themed Kit that features the Autumn Leaves Bundle. You will receive your Kit automaically with a minimum product purchase of $50 through my online store at Stampin’ Up! The Kit will include:
Everything you need to put the cards together as I’ve designed them;
Card bases, layers, die cuts, embellishments, sentiment layers, and envelopes;
I cannot send stamped images, but you will have a sentiment layer you can customize to a stamp you already own, or you can purchase the Autumn Leaves Bundle through my Online Store.
A printed PDF Tutorial, along with a video link so you can put the cards together with me.
This card kit will be available through August 31st.
Redeem Bonus Days Coupons
You have until August 31st to redeem your Bonus Days Coupons. You should have received an email from Stampin’ Up! shortly after you placed your order in July. This email contains a Coupon Code. When you place your order in August, you will be prompted to put in the Coupon Code(s). If you have more than one Coupon Code, enter them in the space provided separated by a comma. The discount will appear when you check out.
I am Debbie Crowley and welcome to my blog. Here you'll find fun projects that are sure to inspire you. I hope you'll stop
by often and leave a comment or two. To contact me, you can email me at: expressivelydeb@gmail.com
Current Catalogs
What are you looking for?
The content of this blog is the sole responsibility of Debra Crowley, expressively deb.com, as an Independent Stampin' Up! Demonstrator. The use of and content of classes, services or products offered is not endorsed by Stampin' Up!