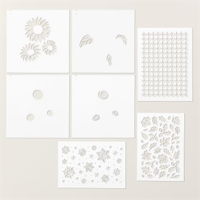
I have so much fun with ink and Masks (Stampin’ Up! refers to stencils as “Decorative Masks”. I created the background designs for each of my featured cards using the same Decoraive Mask, a Sponge Dauber, and/or Blending Brush, and ink.
Keep in mind, it doesn’t have to be perfect! It has to be fun for you. You can truly express your unique creativity by enjoying the ease of matching the already coordinating color palettes in the Stampin’ Up! color family to a Decorative Mask.
And, theer’s A Bonus Involved!
Both of my backgrounds were created using the Autumn leaf Mask from the Abundant Beauty Decorative Masks. They’re in the CLEARANCE RACK! YAY! All of the details are at the end of this post in my PRODUCT DETAILS section.
I also created a simple written PDF Tutorial you can download and file for future reference. The process is so easy, you probably won’t have to refer back to it, but you’ll have it anyway. Enjoy this fun process and I would love to hear about your experience with Masks.
I thought it would be fun to share other cards I created using Decorative Masks.
My card below showcases one of the patterns from the Artistic Mix Decorative Masks. I stenciled a “frame” background using the Mask. You can click on the photo to go to my original post.
I created the Clean And Simple card below using the Lovliest Layers Decorative Masks. You can click on the photo to go to my original post.
And, here’s another card I created using the Abundant Beauty Decorative Masks.
One of my true favporites is the card bwlow. I used the Leaves of Beauty Bundle for this one. The Decorative Masks create the flower focal point. There’s a stamp and die in the Bundle that coordinated with the Masks to stamp the image, then die cut it. It’s quick and easy to create a beautiful card.
So, grab your favorite Decorative Mask, create a beautiful inked background or focal point, and share your project with someone special.
You will receive everything you need to put the cards together as I’ve designed them except for adhesives. You will receive Dimensionals, if used.
The Kit will include the card bases, layers, die cuts, embellishments, sentiment layers, and envelopes.
I cannot send stamped images, but you will have a sentiment layer you can customize to a stamp you already own, or you can purchase the Sentimental Wishes Stamp Set. It’s on page 29 in the September-December, 2024 Mini Catalog.
You will also receive a printed PDF Tutorial, along with a video link so you can put the cards together with me.
You will automatically receive this kit with a minimum product purchase of $50.00 through my online store.
This card kit will be available through October 31st, 2024.
As always, please reach out to me with any quesitons.
STAMPIN’ UP! PROMOTIONS AND NEWS FOR OCTOBER
NEW STARTER KIT SPECIAL – JOIN STAMPIN’ UP!
Thinking of becoming a Stampin’ Up! Demonstrator? You can join during the month of October and get $155.00 worth of products you choose from the Annual Catalog, the September-December, 2024 Mini Catalog, or the Online Exclusives. You will also receive FREE SHIPPING on your Starter Kit order. For more details, click the image above or click here.
ENJOY 30% OFF ALL KITS IN THE KITS COLLECTION NOW THROUGH OCTOBER 31ST.
My post is a little different. You will get card making inspiration and the usual “Parts & Pieces” Tutorials. Along with that, I have a Stampin’ Story. It’s been a while since I shared a Stampin’ Story. I hope you enjoy thes read.
a new stampin’ story
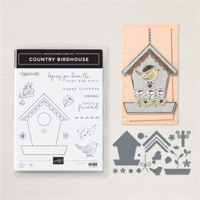
The featured card was created by one of my Team Members, Karen Scaff. Karen has been stamping with me for many years, and recently decided to join my Team. We meet once each month to stamp, share, and learn a new technique or two. Several months ago, we made card templates. Most were Fun Folds.
Yesterday, we had an all day Crop. We put together our 3-D project, and a Fun Fold card that was shared by another Team Member. I’ll have that post up this week. Karen made us each a beautiful Country Birdhouse card (mine is the featured card above), and was excited to share the cards she made using the Simple Zinnias Bundle and the Flowering Zinnias Designer Series Paper. She designed two cards from one of the templates we made a while ago. Take a look at her cards below.
The card above and the card below are the same design using the same cutting dimensions. The one above is a Landscape design (horizontal), and the one below is showcased in Portrait (Vertical).
These cards are so “happy”. Be sure to note the detail in the die cut zinnias. You can see Karen had fun mixing colors, as well.
So, let’s make two cards with one set of mesurements.
parts & pieces
The Petunia Pop cardstock card base is 5 1/2″ x 8 1/2″.
Score the card base at 1 1/2″ and 5 3/4″ on the 8 1/2″ side.
The dimensions above are for both the Landscape and Portrait versions of this card.
The Designer Series Paper card front layers measure 2 1/2″ x 5 1/4″, and 1 1/4″ x 5 1/4″.
The scalloped die cut Basic White cardstock layers measure about 4″ x 3″.
Attach this Basic White layer to the center of the front of the card, placing glue on the back of only one side of the layer. On both cards, the layer is attached to the shorter side of the gate fold card front. It can be attached to either side depending on your preference. (NOTE: If you close both sides of the gate fold, you can easily center the top front layer to the card front).
There is a Basic White cardstock inside writing layer on the inside of each card. It measures 4″ x 5 1/4″.
The Country Birdhouse Bundle
The card above features the Country Birdhouse Bundle and the Country Woods Designer Series Paper. The color palette is clean and simple with lots of white space. Karen die cut the birdhouse using the dies from the Bundle and the Country Woods DSP. She kept the bird simple, and kept the color palette soft with accents of the deepter toned Misty Moonlight and Early Espresso.
Thank you, Karen, for this beautiful gift. We all lolve our special cards!
So, create a simple template from the cutting measurements above, and create two cards to share with your friends.
This is a Fall-Themed Kit that features the Autumn Leaves Bundle. You will receive your Kit automaically with a minimum product purchase of $50 through my online store at Stampin’ Up! The Kit will include:
Everything you need to put the cards together as I’ve designed them;
Card bases, layers, die cuts, embellishments, sentiment layers, and envelopes;
I cannot send stamped images, but you will have a sentiment layer you can customize to a stamp you already own, or you can purchase the Autumn Leaves Bundle through my Online Store.
A printed PDF Tutorial, along with a video link so you can put the cards together with me.
This card kit will be available through August 31st.
Redeem Bonus Days Coupons
You have until August 31st to redeem your Bonus Days Coupons. You should have received an email from Stampin’ Up! shortly after you placed your order in July. This email contains a Coupon Code. When you place your order in August, you will be prompted to put in the Coupon Code(s). If you have more than one Coupon Code, enter them in the space provided separated by a comma. The discount will appear when you check out.
Thre are so many pretty patterns in the Iconic Celebrations Designer Series Paper pack, I had to cut into it again. This is a simple thank you card that can be used at any time of the year. Using the Iconic Inagery Bundle, and the Iconic Celebrations DSP pack, you can easily make this a Thanksgiving or Fall-themed card. There are little leaf stamps and coordinating dies. The Paper Pack has pretty Fall themed designs, as well.
To me, the Moody Mauve and Mossy Meadow color combination is refreshing. Until I saw this design, I didn’t think to pair the two.
You can easily create your version of this card. Download the printable PDF tutorial that includes the cutting dimensions and assembly instructions. You can click on the blue button below to download the PDF.
So, pull out two favorite patterned paper designs, match up your cardstock, and create a card to send gratitude to someone special.
You will receive everything you need to put the cards together as I’ve designed them except for your glue or tape runner. You will receive Dimensionals, if used.
The kit will include the card bases, layers, die cuts, embellishments, sentiment layers, and envelopes.
I cannot send stamped images, but you will have a sentiment layer you can customize to a stamp you already own, or you can purchase the Everyday Details Bundle.
You will also receive a printed PDF Tutorial, along with a video link so you can put the cards together along with me.
You will automatically receive this kit with a minimum product purchase of $50.00 through my online store.
This card kit will be available through July 31st, 2024.
As always, please reach out to me with any quesitons.
Bonus Days Are Back-Get Rewarded Through July 31, 2024
Beginning July 3rd through July 31st, you will earn a $5.00 Bonus Coupon for each $50.00 in product you purchase. Below are the details:
Earn a $5 coupon for each $50 you purchase (befor3e shipping and tax).
The coupon code will be emailed to you at the email address you provide in your order.
If you earn multiple coupons with one order, you will receive one email for that order with multiple codes.
There is no limit to the amount of coupon codes you can earn.
Save your emails. You will need the codes to redeem your $5 credit(s).
The redemption period for the coupon codes is through the month of August, 2024. From August 1st through August 31st.
You can always reach out to me with questions. My email is expressivelydeb@gmail.com.
Get ready. This is a great time to stock up on your crafting ‘basics”.
New Online Exclusives
Click here, or the image above to see all of the new Online Exclusives available for customers now.
I hope your week is off to a great start. The sentiment in today’s card expresses my gratitude for each and every one of you. Thank you for checking in on my blog and for subscribing to receive my latest posts. It truly means a lot to me, and know that if you have any questions or comments, you can always reach out.
Paper crafting is such a wonderful creative outlet, don’t you agree? It’s been with me since the late nineties and I can’t imagine not spending time in my craft room cutting paper! Today, though, I inked paper!
The Layers of Beauty is a stamp and die Bundle with a BONUS! Yes, the Bundle includes a beautiful set of layering masks (stencils). You have options when using this Bundle. The linear images make it easy for you to add color using your Stampin’ Blends, or you can use a Blender Pen and add a touch of ink, or you can easily line up the coordinating masks and add color with ink and a Blending Brush.
So, let’s make a card so you can see how easy it is to create your personal masterpiece.
Parts & Pieces
This is a simple top fold A-2 card. The card base is 11″ x 4 1/4″, scored at 5 1/2″. I cut a Bubble Bath cardstock top layer 4″ x 5 1/4″.
Let’s get to the fun part.
I used Bubble Bath ink for Mask #1;
For Mask #2, Petunia Pop ink made the cut;
Berry Burst is the choice for Mask #3;
Mask #4 is inked with Granny Apple Green;
And, Old Olive finished beautifully for Mask #5.
Grab your ink and Blending Brushes. Each of the stencils are numbered 1 through 5.
Here’s the “How To”
Stamp the large flower image onto a Basic White cardstock layer using Black Memento Ink.
Attach the stamped image to a protected surgace, or grid paper using low tack tape to keep it from moving.
Align Mask #1 over the image. Refer to the photos in the Project Sheet download below.
Using a circular motion and a Blending Brush, add Bubble Bath ink to the exposed areas of the mask.
Remove the mask and set it aside.
Align Mask #2 over the image.
Using Petunia Pop Ink and your Blending Brush, apply ink to the ex[psed areas of the mask.
Remove the Mask.
Repeat this process for Masks #3 through #5.
Die cut the image with the large die in the Bundle.
Attach it to the top Bubble Bath cardstock layer with Dimensionals.
Stamp a sentiment and attach it to the card front.
Yu can esily clean your Masks using water or a little dish soap and water.
Once you create one beautiful flower cluster with the Masks, I promise you will want to create more. Try coorodinating Pool Party, Lost Lagoon, and Pretty Peacock. WOW!
And how about Petal Pink, Flirty Flamingo and Calypso Coral?
What colors would you choose for your beautiful flowers?
So, pick your colors, stamp your image, blend your ink, and create a beautiful tribute for someone special.
… the only limitation is your imagination!
Product Details
Free Shipping Today, May 21st
Get ready for a spectacular limited time offer. Have something on your wish list? Thinking about stocking up on crafting essentials? Shop on May 21st. FREE SHIPPING with an order of $75 or mopre.
May, 2024 Customer Card Kit
My Customer Mini Card Kit for May focuses on products from the Unbounded Beauty Product Suite. I’m showcasing the Unbounded Beauty Designer Series Paper, along with the Flowers of Beauty Dies. The Kit Details are listed below.
You will receive everything you need to put the cards together as I’ve designed them.
The kit will include the card bases, layers, die cuts, embellishments, sentiment layers, and envelopes.
I cannot send stamped images, but you will have a sentiment layer you can customize to a stamp you already own, or you can purchase the Bright Skies Bundle.
You will also receive a printed PDF Tutorial, along with a video link so you can put the cards together along with me.
You will automatically receive this kit with a minimum product purchase of $50.00 through my online store.
Today’s new In Color showcase is a little different. I’m shining the spotlight on two of the new 2024-2026 In Colors. They look so beautiful together, I had to pair them. Summer Splash and Petunia Pop are two deep toned pastels that will add the perfect something to any project you create.
My card design is a little stepped up from yesterday’s showcase. I was inspired by a card I created for a Paper Players Sketch Challenge a few years ago. I thought the design would show off the colors in the Unbounded Beauty Designer Series Paper perfectly.
So, I think we can go ahead and make a card!
Parts & Pieces
I cut a standard A-2 Summer Splash card base 11″ x 4 1/4″, scored at 5 1/2″.
The Basic White mat layer is 4 1/8″ x 5 3/8″.
Cut the floral patterned paper layer 4″ x 5 1/4″.
I added three horizontal patterned paper strips to the top of the floral layer. I cut two strips 3/4″ x 3 1/2″. The center strip is 3 1/8″ x 3/4″.
The Summer Splash mat layer for the sentiment layer is 4 1/8″ x 2 3/8″.
The Basic White sentiment layer is 2 1/4″ x 4″.
I used Petunia Pop ink for the sentiment sentiment.
The flower and leaf elements are die cuts from the Flowers of Beauty Dies.
You can click the button below to download the PDF Tutorial. You can easily duplicate this design with pretty patterned paper and coordinating cardstock you have on hand.
Tomorrow, I’ll be showcasing the last color of the five new 2024-2026 In Colors – Shy Shamrock. Be sure to check back in.
So, match two vibrant, on trend colors, add a neutral, a few patterned paper strips, elements and a sentiment, and create something to share a smile.
… the only limitation is your imagination!
April Customer Mini Card Kit
You will receive everything you need to put the cards together as I’ve designed them.
The kit will include the card bases, layers, die cuts, embellishments, sentiment layers, and envelopes.
I cannot send stamped images, but you will have a sentiment layer you can customize to a stamp you already own, or you can purchase the Bright Skies Bundle.
You will also receive a printed PDF Tutorial, along with a video link so you can put the cards together along with me.
You will automatically receive this kit with a minimum product purchase of $50.00 through my online store.
This card kit will be available through April 30th.
I am Debbie Crowley and welcome to my blog. Here you'll find fun projects that are sure to inspire you. I hope you'll stop
by often and leave a comment or two. To contact me, you can email me at: expressivelydeb@gmail.com
Current Catalogs
What are you looking for?
The content of this blog is the sole responsibility of Debra Crowley, expressively deb.com, as an Independent Stampin' Up! Demonstrator. The use of and content of classes, services or products offered is not endorsed by Stampin' Up!