On this day of gratitude, I want to let you know I am so very grateful for you. For those who are my Blog subscribers, thank you for your continued support. Thank you to those who pop in for a visit. I appreciate your time.
I am grateful for the goodness that reaches me through my family, friends, and my paper crafting community. It’s truly a gift to have the opportunity to do something you love, and to be able to share it.
Have a wonderful and safe Thganksgiving Day!
Thank you always for stopping by.
Debbie
NOVEMBER CUSTOMER CARD KIT
Let’s talk about the Card Kit.
You will receive everything you need to put the cards together as I’ve designed them except for adhesives. You will receive Dimensionals, if used.
The Kit will include the card bases, layers, die cuts, embellishments, sentiment layers, and envelopes.
I cannot send stamped images, but you will have a sentiment layer you can customize to a stamp you already own, or you can purchase the Reindeer Funb Stamp Set. It’s on page 27 in the September-December, 2024 Mini Catalog.
You will also receive a printed PDF Tutorial, along with a video link so you can put the cards together with me.
You will automatically receive this kit with a minimum product purchase of $50.00 through my online store.
This card kit will be available through November 30th, 2024.
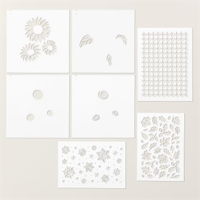
I have so much fun with ink and Masks (Stampin’ Up! refers to stencils as “Decorative Masks”. I created the background designs for each of my featured cards using the same Decoraive Mask, a Sponge Dauber, and/or Blending Brush, and ink.
Keep in mind, it doesn’t have to be perfect! It has to be fun for you. You can truly express your unique creativity by enjoying the ease of matching the already coordinating color palettes in the Stampin’ Up! color family to a Decorative Mask.
And, theer’s A Bonus Involved!
Both of my backgrounds were created using the Autumn leaf Mask from the Abundant Beauty Decorative Masks. They’re in the CLEARANCE RACK! YAY! All of the details are at the end of this post in my PRODUCT DETAILS section.
I also created a simple written PDF Tutorial you can download and file for future reference. The process is so easy, you probably won’t have to refer back to it, but you’ll have it anyway. Enjoy this fun process and I would love to hear about your experience with Masks.
I thought it would be fun to share other cards I created using Decorative Masks.
My card below showcases one of the patterns from the Artistic Mix Decorative Masks. I stenciled a “frame” background using the Mask. You can click on the photo to go to my original post.
I created the Clean And Simple card below using the Lovliest Layers Decorative Masks. You can click on the photo to go to my original post.
And, here’s another card I created using the Abundant Beauty Decorative Masks.
One of my true favporites is the card bwlow. I used the Leaves of Beauty Bundle for this one. The Decorative Masks create the flower focal point. There’s a stamp and die in the Bundle that coordinated with the Masks to stamp the image, then die cut it. It’s quick and easy to create a beautiful card.
So, grab your favorite Decorative Mask, create a beautiful inked background or focal point, and share your project with someone special.
You will receive everything you need to put the cards together as I’ve designed them except for adhesives. You will receive Dimensionals, if used.
The Kit will include the card bases, layers, die cuts, embellishments, sentiment layers, and envelopes.
I cannot send stamped images, but you will have a sentiment layer you can customize to a stamp you already own, or you can purchase the Sentimental Wishes Stamp Set. It’s on page 29 in the September-December, 2024 Mini Catalog.
You will also receive a printed PDF Tutorial, along with a video link so you can put the cards together with me.
You will automatically receive this kit with a minimum product purchase of $50.00 through my online store.
This card kit will be available through October 31st, 2024.
As always, please reach out to me with any quesitons.
STAMPIN’ UP! PROMOTIONS AND NEWS FOR OCTOBER
NEW STARTER KIT SPECIAL – JOIN STAMPIN’ UP!
Thinking of becoming a Stampin’ Up! Demonstrator? You can join during the month of October and get $155.00 worth of products you choose from the Annual Catalog, the September-December, 2024 Mini Catalog, or the Online Exclusives. You will also receive FREE SHIPPING on your Starter Kit order. For more details, click the image above or click here.
ENJOY 30% OFF ALL KITS IN THE KITS COLLECTION NOW THROUGH OCTOBER 31ST.
I recently spent some time in Vermont, so I’m thinking about Autumn. Of course, Vermont is always beautiful. We were there as the leaves were just beginning to change. I saw hints of bright orange, yellow and “Cherry Cobbler” dotting the green mountains. At the foot of beautiful mountain views, there was a small stream at the end of our property. There were horse stables on the other side of the stream. We watched the horses wandering near the stream each morning. They are such beautiful animals.
Anyway, I’m back in New Jersey, and it’s all about Autumn for me. I thought it would be fun to celebrate the Season with another card using the Autumn Expressions Designer Series Paper. It’s a quick and easy card, but the addition of the sentiment layer and gold embossed sentiment makes this card super special.
By the way, I used Stampin’ Up!’s new Embossing Powder. I saw a huge difference in the result. The new Powder is finer in texture and, to me, it melts faster and more evenly.
So, let’s make a card! You can download a PDF Tutoril. There are photos so you can see how I put the sentiment frame together.
Pieces & Parts
I cut a Very Vanilla cardstock card base 5 1/2″ x 8 1/2″, and scored it at 4 1/4″.
The Cajun Craze cardstock card layer is 4 1/8″ x 5 3/8″.
I cut the patterned paper layer 4″ x 5 1/4″.
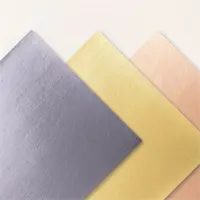
I die cut the sentiment label using gold cardstock.
I die cut a second sentiment layer using Cajun Craze cardstock. This gave me the inside embossed sentiment piece.
The sentiment is embossed using Gold Embossing Powder.
Once I attached the layers to the card base, I adhered two lines of Stampin’ Seal to the right side of the top patterned paper layer.
I folded about 9″ of ribbon in half and attached it to the Stampin’ Seal.
The sentiment layer is attached with Dimensionals over the ribbon.
I created a quick PDF Tutorial with photos that you can download to see how I attached the Cajun Craze sentiment layer to the gold frams.
I thought it would be fun to stamp the inside of the card and add a little stamped image.
This is such a quick and easy design, and I had fun heating up my Embossing Tool.
So, think Autumn! Find a great piece of patterned paper, attach a special sentiment layer and create something shiny to share.
You will receive everything you need to put the cards together as I’ve designed them except for adhesives. You will receive Dimensionals, if used.
The Kit will include the card bases, layers, die cuts, embellishments, sentiment layers, and envelopes.
I cannot send stamped images, but you will have a sentiment layer you can customize to a stamp you already own, or you can purchase the Something Fancy Stamp Set. It’s on page 79 in the current Annual Catalog.
You will also receive a printed PDF Tutorial, along with a video link so you can put the cards together with me.
You will automatically receive this kit with a minimum product purchase of $50.00 through my online store.
This card kit will be available through September 30th, 2024.
As always, please reach out to me with any quesitons.
I hope you’re having fun browsing the new Mini Catalog and the Scrapbooking Brochure. I’m so glad this is not a Sneak Peek. You can get your hands on the More Than Autumn Bundle starting today.
If you love all things warm, cozy, and delicious, you’ll love what you can do with the More than Autumn Stamp Set! It’s about autumn, for sure, but it’s so much more than that. Combine the words to create the sentiment that you want, whether it’s to celebrate autumn, winter, seasonal foods and drinks, or someone in your life. Stamp, then add a personal touch with your favorite colors. You’ll love the possibilities of these stamps!
My card is a simple design. The addition of the large die cut circle in the center gives you a canvas to customize your sentiment and die cut elements. The More Than Autumn Stamp Set has lots of Fall into Winter images, perfect for layeing to create element clusters.
The More Than Autumn Dies coordinate with the image stamps, and include word dies. You can create mixed font sentiments and have fun matching the elements.
So, let’s make a card!
Parts & Pieces
I cut a Pecan Pie cardstock card base 4 1/4″ x 11″ and scored it at 5 1/2″.
The Basic White cardstock top layer is 3 7/8″ x 5 1/2″.
The patterned paper layer is 3 3/4″ x 5 1/2″.
The circle is one of the larger dies from the Deckled Circles Dies. It measures about 3 1/2″ in diameter.
I stamped the inside of the card with a sentiment and image from the More Than Autumn Stamp Set.
Customize Patterned Paper
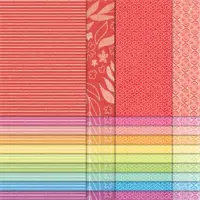
The plaid patterned paper I used for the top layer of my card is Pecan Pie and white. I wanted to mix in Cherry Cobbler to celebrate the apple spiced tea. With a Cherry Cobbler Stampin’ Blend, and my ruler, I drew lines along the Pecan Pie plaid design.
Take a look at the photo below. The bottom, right corner is not lined with the Cherry Cobbler Blend. See the difference? Adding the lines to this DSP is a quick process. Once you start, you’ll see the pattern flow and it’ll go quickly for you.
More Autumn Inspiration
Below is a card I made for a Sneak Peek at the More Than Autumn Bundle. Click on the photo to go to my original post.
So, I hope you enjoy the More Than Autumn Bundle as much as I do. Imagine the leaves changing color, the crisp air, a little apple spiced tea, a pumpkin latte, and of course, some pumpkin pie.
You will receive everything you need to put the cards together as I’ve designed them except for adhesives. You will receive Dimensionals, if used.
The Kit will include the card bases, layers, die cuts, embellishments, sentiment layers, and envelopes.
I cannot send stamped images, but you will have a sentiment layer you can customize to a stamp you already own, or you can purchase the Something Fancy Stamp Set. It’s on page 79 in the current Annual Catalog.
You will also receive a printed PDF Tutorial, along with a video link so you can put the cards together with me.
You will automatically receive this kit with a minimum product purchase of $50.00 through my online store.
This card kit will be available through September 30th, 2024.
As always, please reach out to me with any quesitons.
Celebrate World Card making Day on October 5th
Join Stampin’ Up! for a FREE virtual crafting event to celebrate World Card Making Day.
It’s a one hour virtual event beginning at 2:00 p.m. Mountain Time on October 5th. That’s 4:00 p.m. on the East Coast.
The event is open to all – Demonstrators, Customers, and anyone who loves to paper craft, or wants to see what paper crafting is all about. It’s for all skill levels, as well.
I’m excited about the new products in the upcoming September-December 2024 Mini Catalog. I’ve recently welcomed two of the new Suites. Today, I’m showcasing one of the new Bundles. It’s called “More Than Autumn”, and it certainly is.
The More Than Autumn Bundle
The More Than Autumn Stamp and Die Bundle celebrates lattes, hot cocoa, eggnog, cider, doughnuts, and apple and pumpkin pie. You can also add a little gingerbread, peppermint, and cinnamon to these fun “more than Autumn” delights. The Stamp Set and coordinating Dies are full of images you can easiy cut with a quick run through your die cutting machine. As you can see in my showcase card, there are word dies you can mix with sentiments. You can create your own ephemera pack and use these elements to say hello, show gratitude, and tag a special package of pumpkin spice, or peppermint sticks.
While I was thinking about how to feature this new Bundle as a Sneak Peek, I decided to make my design simple, but full of stamped and die cut images so you can get a visual of how you can use them to customize your Fall, Winter and Holiday projects. Yes, I promise, this Bundle will take you through the upcoming holidays and beyond.
So, I think we should make a card. (I’m thinking about peppermint hot cocoa as I’m writing this). 🙂
Pieces & Parts
I cut a Pecan Pie cardstock card base 5 1/2″ x 8 1/2″, and scored it at 4 1/4″.
I added an Early Espresso mat layer that measures 4 1/8″ x 5 3/8″.
The plaid Designer Series Paper layer is 4″ x 5 1/4″.
The pumpkin latte cup is stamped directly to a piece of Pumpkin Pie patterned paper. I stamped another latte cup on Basic White cardstock and hand cut the cup sleeve. Once I attached the die cut word “Latte” to the white sleeve, I attached it to the patterned paper latte cup.
The whipped cream is stamped with Early Espresso ink. I used the sprinkle stamp to stamp some Pumpkin Pie sprinkles on the whipped cream.
The piece of pumpkin pie is stamped and die cut. I added color using Stampin’ Blends.
The little pumpkin is also stamped, die cut, and shaded with Blends.
As you can see, I decided to use Early Espresso cardstock for the die cut words.
The “grounding layer” for all of the elements is a circle die cut with one ofthe Spotlight On Nature Dies. It measures about 2 1/2″ in diameter.
It’s always fun to stamp the inside.
I have to tell you I totally enjoyed picking out the elements for this design. The More Than Autumn Bundle is most definitely “more” than Autumn, and I think you’ll enjoy creating many unique matches of coffee and pie, or a latte and a doughnut. More Than Autumn is a fun Bundle that will give lots of stamping fun. It will be available to customers on September 4th.
So, die cut a peppermint stick, add it to a cup of hot cocoa, match it with a sprinkled doughnut, and create a fun card to celebrate the warmth of the holiday season.
This is a Fall-Themed Kit that features the Autumn Leaves Bundle. You will receive your Kit automaically with a minimum product purchase of $50 through my online store at Stampin’ Up! The Kit will include:
Everything you need to put the cards together as I’ve designed them;
Card bases, layers, die cuts, embellishments, sentiment layers, and envelopes;
I cannot send stamped images, but you will have a sentiment layer you can customize to a stamp you already own, or you can purchase the Autumn Leaves Bundle through my Online Store.
A printed PDF Tutorial, along with a video link so you can put the cards together with me.
This card kit will be available through August 31st.
Redeem Bonus Days Coupons
You have until August 31st to redeem your Bonus Days Coupons. You should have received an email from Stampin’ Up! shortly after you placed your order in July. This email contains a Coupon Code. When you place your order in August, you will be prompted to put in the Coupon Code(s). If you have more than one Coupon Code, enter them in the space provided separated by a comma. The discount will appear when you check out.
I am Debbie Crowley and welcome to my blog. Here you'll find fun projects that are sure to inspire you. I hope you'll stop
by often and leave a comment or two. To contact me, you can email me at: expressivelydeb@gmail.com
Current Catalogs
What are you looking for?
The content of this blog is the sole responsibility of Debra Crowley, expressively deb.com, as an Independent Stampin' Up! Demonstrator. The use of and content of classes, services or products offered is not endorsed by Stampin' Up!