I recently spent some time in Vermont, so I’m thinking about Autumn. Of course, Vermont is always beautiful. We were there as the leaves were just beginning to change. I saw hints of bright orange, yellow and “Cherry Cobbler” dotting the green mountains. At the foot of beautiful mountain views, there was a small stream at the end of our property. There were horse stables on the other side of the stream. We watched the horses wandering near the stream each morning. They are such beautiful animals.
Anyway, I’m back in New Jersey, and it’s all about Autumn for me. I thought it would be fun to celebrate the Season with another card using the Autumn Expressions Designer Series Paper. It’s a quick and easy card, but the addition of the sentiment layer and gold embossed sentiment makes this card super special.
By the way, I used Stampin’ Up!’s new Embossing Powder. I saw a huge difference in the result. The new Powder is finer in texture and, to me, it melts faster and more evenly.
So, let’s make a card! You can download a PDF Tutoril. There are photos so you can see how I put the sentiment frame together.
Pieces & Parts
I cut a Very Vanilla cardstock card base 5 1/2″ x 8 1/2″, and scored it at 4 1/4″.
The Cajun Craze cardstock card layer is 4 1/8″ x 5 3/8″.
I cut the patterned paper layer 4″ x 5 1/4″.
I die cut the sentiment label using gold cardstock.
I die cut a second sentiment layer using Cajun Craze cardstock. This gave me the inside embossed sentiment piece.
The sentiment is embossed using Gold Embossing Powder.
Once I attached the layers to the card base, I adhered two lines of Stampin’ Seal to the right side of the top patterned paper layer.
I folded about 9″ of ribbon in half and attached it to the Stampin’ Seal.
The sentiment layer is attached with Dimensionals over the ribbon.
I created a quick PDF Tutorial with photos that you can download to see how I attached the Cajun Craze sentiment layer to the gold frams.
I thought it would be fun to stamp the inside of the card and add a little stamped image.
This is such a quick and easy design, and I had fun heating up my Embossing Tool.
So, think Autumn! Find a great piece of patterned paper, attach a special sentiment layer and create something shiny to share.
You will receive everything you need to put the cards together as I’ve designed them except for adhesives. You will receive Dimensionals, if used.
The Kit will include the card bases, layers, die cuts, embellishments, sentiment layers, and envelopes.
I cannot send stamped images, but you will have a sentiment layer you can customize to a stamp you already own, or you can purchase the Something Fancy Stamp Set. It’s on page 79 in the current Annual Catalog.
You will also receive a printed PDF Tutorial, along with a video link so you can put the cards together with me.
You will automatically receive this kit with a minimum product purchase of $50.00 through my online store.
This card kit will be available through September 30th, 2024.
As always, please reach out to me with any quesitons.
I hope you have a fun Labor Day holiday weekend, and can spend a little time in your craft space.
It’s been a bit since I’ve done a CAS inspiration card. I thought it would be a fun way to showcase the Regal Winter Suite. It will be available to customers on September 4th, only a few days away.
The Regal Winter Sutie is at the top of my favorites. I was drawn to the colors in the Regal Winter Designer Series Paper. The Regal Floral Stamp Set is one of Stampin’ Up!’s Distinktive sets. The stamps are cling, red rubber, which allows for greter detail in the stamped images. The stamps also allow you to stamp shades of color with one inked, stamped image to the paper. You can see the shades of color in the focal point flower of my card.
I put together a Project Tutorial you can download with assembly instructions, including pictures. I will share the quick and easy layering dimensions here.
The Thick Basic White cardstock card base is 11″ x 4 1/4″. It’s scored at 5 1/2″.
The Basic White cardstock card front layer is 3 3/4″ x 5″.
The label Focal Point layer is die cut from the Regal Flora Dies. It measures about 1 3/4″ x 3 3/4″.
The flower is stamped with Berry Burst ink.
The leaf image is stamped with Pretty Peacock ink.
I stamped the dotted background with Basic Beige ink.
Click the blue button below to download the Project Tutorial.
I didn’t put a sentiment on the outside of this card, but stamped the inside.
So, be sure to download the free Project Tutorial. You can use it now with supplies you already have, enjoy it with the Regal Winter Suite of products. Remember …
Today is the last day to redeem your Bonus Days Coupons. You should have received an email from Stampin’ Up! shortly after you placed your order in July. This email contains a Coupon Code. When you place your order in August, you will be prompted to put in the Coupon Code(s). If you have more than one Coupon Code, enter them in the space provided separated by a comma. The discount will appear when you check out.
Last Day For August Customer Card Kit
This is a Fall-Themed Kit that features the Autumn Leaves Bundle. You will receive your Kit automaically with a minimum product purchase of $50 through my online store at Stampin’ Up! The Kit will include:
Everything you need to put the cards together as I’ve designed them;
Card bases, layers, die cuts, embellishments, sentiment layers, and envelopes;
I cannot send stamped images, but you will have a sentiment layer you can customize to a stamp you already own, or you can purchase the Autumn Leaves Bundle through my Online Store.
A printed PDF Tutorial, along with a video link so you can put the cards together with me.
This card kit will be available through August 31st.
Hey there! I hope you can spend some weekend time in your craft space. My inspirtion card showcases a Sneak Peek at the new Rgal Winter Suite Collection. It’s in the upcoming September-December, 2024 Mini Catalog. Aren’t the colors in the Regal Winter 12″ x 12″ Designer Series Paper stunning? A “Regal” color palette without a doubt.
I wanted you to see all of the patterns in the DSP pack, so I prepared a swatch card. The designs on the left side of the swatch card are the floral designs, and the patterns on the right are the reverse side of the corresponding design.
A Warm And Regal Color Paette
Below are the coordinating colors in the Regal Winter DSP. Once you see the actual patterned paper, you’ll add your favorite colors.
If you take a closer look at my card below, I included Lost Lagoon and Balmy Blue mixed with Blackberry Bliss. It’s always fun to mix in colors. When I took a look at the floral pattern, I saw Lost Lagoon and Balmy Blue. It wouldn’t surprise me if you come up with other colors you can add.
The Regal Floral Bundle includes a Cling Stamp Set that is “Distinktive”, as well. The shading in the stamped images is beautiful. The Regal Floral Dies include the unique frame die I used today. The Die cuts both the embossed edge sentiment layer, and an embossed edge frame. As you can see, they’re two separate pieces.
Below is a sketch I created. Take a look at some of the supplies you already have and create your version of this card. The cutting dimensions are below.
Are you ready to make a card?
Parts & Pieces
I cut a Blackberry Bliss card base 5 1/2″ x 8 1/2″, and scored it at 4 1/4″.
The white mat layer is 4 1/8″ x 5 3/8″.
The patterned paper layer is 4″ x 5 1/4″.
I die cut a Basic White and Blackberry Bliss sentiment layer using the large frame die from the Regal Floral Dies. It measures about 2″ x 3 1/2″.
Under the right corner of the sentiment layer is a strip of Pretty Peacock DSP. It’s 3 1/2″ x 1/2″. I attached it about an inch up from the bottom and about 1/4″ in from the right edge of the patterned paper layer
I cut the lacy strip with a die from the Regal Floral Dies. It measures about 3 1/2″ x 3/4″. I glued this strip over the Pretty Peacock strip as shown.
I attached the white stamped sentiment layer to the center of the card front, covering part of the Pretty Peacock and White strips, as shown.
Then, I attached the Blackberry Bliss frame around the sentiment layer.
I stamped and die cut two leaf sprays and attached them to the sentiment layer as shown.
I added a Pretty Peacock Regal Foiled Dot to embellish.
To finish the card, I stamped an image from the Regal Floral Stamp Set on the inside and added a sentiment.
A New Catty Filled With Holiday Products
The upcoming September-December, 2024 Mini Catalog is filled with beautiful new products. I know you will be inspired. Those who have placed orders with me over the past six months will automatically receive a catalog. The customer ordering period begins on September 4th.
So, use the Sketch above, find that one beautiful piece of patterned paper, add a large sentiment layer, a few accent strips, and create something to share with someone special.
Until next time, remember …
… the only limitation is your imagination!
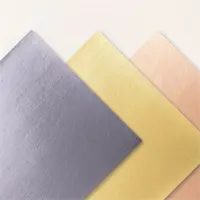
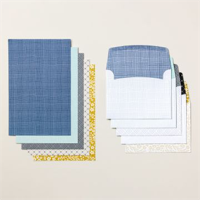
Designer SEries Paper Sale
You can click on the images below for details on the current Designer Series Paper Sale.
This is a Fall-Themed Kit that features the Autumn Leaves Bundle. You will receive your Kit automaically with a minimum product purchase of $50 through my online store at Stampin’ Up! The Kit will include:
Everything you need to put the cards together as I’ve designed them;
Card bases, layers, die cuts, embellishments, sentiment layers, and envelopes;
I cannot send stamped images, but you will have a sentiment layer you can customize to a stamp you already own, or you can purchase the Autumn Leaves Bundle through my Online Store.
A printed PDF Tutorial, along with a video link so you can put the cards together with me.
This card kit will be available through August 31st.
Redeem Bonus Days Coupons
You have until August 31st to redeem your Bonus Days Coupons. You should have received an email from Stampin’ Up! shortly after you placed your order in July. This email contains a Coupon Code. When you place your order in August, you will be prompted to put in the Coupon Code(s). If you have more than one Coupon Code, enter them in the space provided separated by a comma. The discount will appear when you check out.
For some weekend inapiration, I thought you would have fun with the cards I created using the Mix And Match products from the Annual Catalog. You can find them on pages 18 through 21. When I saw them in the Catalog, I thought it would be fun to try them. They are at a great price point, and perfect for you if you are just starting to design cards and papercrafting projects.
I’ve been stamping and cutting paper for many years, and I enjoyed the experience of telling a story on a card front using pre-cut Emperema.
So, let’s make a card!
Pieces & Parts
My first showcased card tells the story of the sun shining behind the rainbow, and the hot air balloon rising up to meet them.
Believe it or not, my inspiration came from the sentiment – “SHINE ON”.
So, starting with the sentiment, I naturally added the sun.
The rainbow was next, but I need something more.
Looking through the Ephemera, I thought the hot air balloon was a perfect finish.
As you can see, each element is attached with Dimensionals, starting with the Sun and working diagonally to the left.
I made sure the top of the sun was the same distance as the top of the card layer.
Similarly, the bottom of the hot air balloon is about the same distance from the bottom of the card layer.
This helped me center the elements.
The woven checked patterned top layer is actually a cut card base from the Calming Creek Cards & Envelopes.
I cut it to 4″ x 5 1/4″, and attached it to a Pool Party cardstock card base.
The card base is 5 1/2″ x 8 1/2″, scored at 4 1/4″.
I embellished with a few clear Opal Rounds.
You can easily duplicate this card design with die cut elements you may already have. It is fun, though, to go through the Ephemera Packs and create a story.
Let’s make a second card!
This is a quick and easy masculine themed card. I kept it simple, as well. The inspiration for this card was the double framed mountain scene.
Pieces & Parts
As I mentioned, my story for this card begn with the double framed mountain scene.
Once I broke apart the frames, I layered the mountain scene using Basic White card stock. The layer measures 1 5/8″ x 2 7/8″.
I attached the layered scene to the smaller frame.
I chose the card base from the Calming Creek Cards & Envelopes.
The Basic Gray layer measures 2 7/8″ x 4 7/8″. I used a triple punch to punch the corners.
I attached the larger frame to the Basic Gray layer, then attached the smaller, layered frame to the center with Dimensionals.
I liked this sentiment for a masculine themed card, and the colors coordinated with the mountain scene.
I used to love to put “grounding banners” under a sentiment and haven’t done it in a while. I found this one in the Ephemera Pack and thought it was just what this design needed.
I embellished with a few Pecan Pie Adhesive Backed Speckled Dots.
Both of these cards were so much fun and very easy to put together. Of course, you would create your own stories as you design with Ep;herema, a caard base and maybe a few cardstock layers. There’s even more inspiration for these Products in the Catalog, so be sure to take a look.
So, what will be your inspiration? … An inspirtional sentiment, or a serene mountain scene? What story would you tell when you sit down to design your card? I know you would enjoy going through all of the choices the Mix & Match Products will give you.
It’s time for a new Customer Card Kit. The June, 2024 Monthly Customer Card Kit celebrates Country Flowers and Country Lace. The Card Kits feature a Fun Fold and an easy layered card design.
Below are additional Kit details.
You will receive everything you need to put the cards together as I’ve designed them.
The kit will include the card bases, layers, die cuts, embellishments, sentiment layers, and envelopes.
I cannot send stamped images, but you will have a sentiment layer you can customize to a stamp you already own, or you can purchase the Country Flowers Bundle.
You will also receive a printed PDF Tutorial, along with a video link so you can put the cards together along with me.
You will automatically receive this kit with a minimum product purchase of $50.00 through my online store.
This card kit will be available through June 30th.
Bundle Savings Are Even Better
Do you love Bundles? I do. It’s rare that I purchase a stamp set without the dies, or dies without the stamp set. Aside from that, there’s ALWAYS a 10% discount on Bundles. Starting today, Wednesday, June 5th, Stampin’ Up! is dicounting Bundles an additional 10%. If there’s a Bundle you’ve had your eyes on, you can save more from June 5th through June 30th with the additional discount.
Even Better! As much as I love Bundles, you absolutely have to have a cutting machine. If you don’t have one, think about investing in one during the month of June. From today, June 5th through June 30th, the Stampin’ Cut And Emboss Machine and the Mini Stampin’ Cut And Emboss Machine will be discounted 10%.
I’m sure you’ve heeard me say that I love my “Mini”. I do! Its smaller size makes it easy for me to keep it on my work surface when I’m making a card or project. The dies run through the machine smoothly and it cuts evenly.
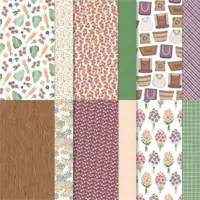
The Country Flowers Bundle and Country Lace Designer Series Paper are part of the beautiful Country Woods Product Suite. I thought it would be fun to create a Catalog CASE (Copy And Selectively Edit) today. My inspiration is on page 48 in the Annual Catalog. I kept my design simple to showcase the beautiful Designer Series Paper and adorable Dies.
The Country Lace Designer Series Paper
I’ve been busy getting my card kits ready to go and decided to cut some of my new Designer Series Paper. The Country Lace Designer Series Paper is truly timeless. The soft color palette and hand drawn patterns are perfect backgrounds for cards and scrapbook layouts. This paper pack will work for any occasion and is a good “go to” for a masculine design.
The Country Flowers Stamp And Die Bundle
The Country Flowers Stamp Set has pretty flower pots you can mix and match with the flower and leaf clusters. These linear images are great if you love to color. Use Stampin’ Blends, markers to shade, and a Blender Pen to add dimension. The mixed font sentiments are simple and sweet.
The coordinating Country Flowers Dies have a die for all of the stamped images. They also make great stand-alone dies.
This Bundle is one that will certainly work for all levels of paper crafting.
So, let’s make a card!
Parts & Pieces
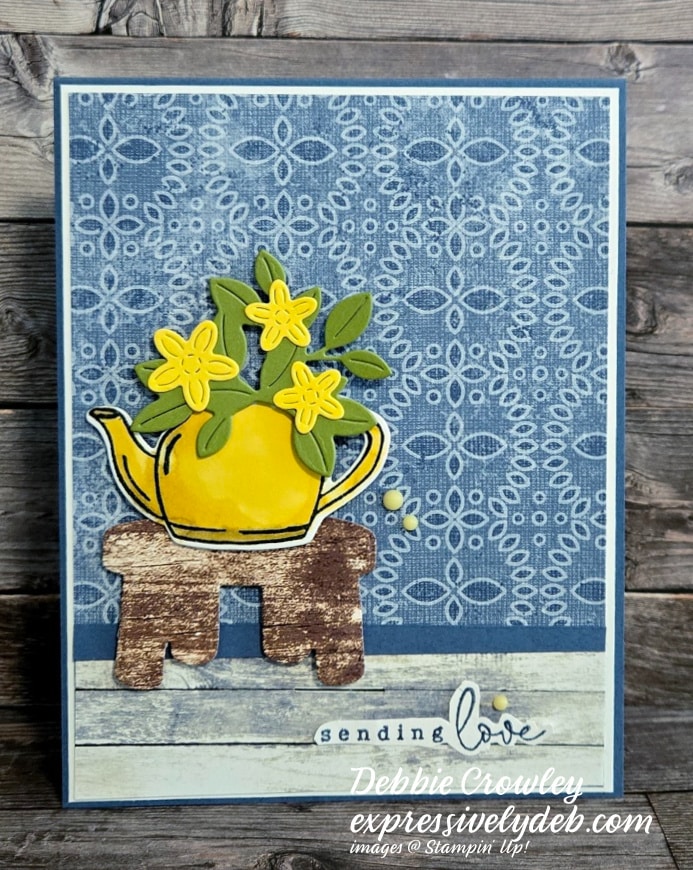
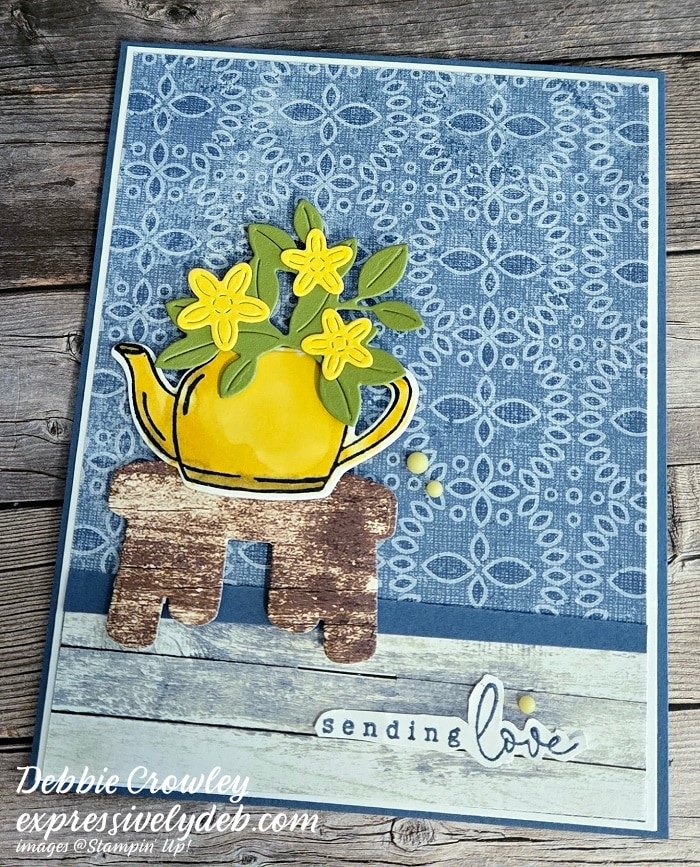
I cut a Misty Moonlight cardstock card base 4 1/4″ x 11″, and scored it at 5 1/2″.
The Basic White cardstock mat layer is 4 1/8″ x 5 3/8″.
I cut the Misty Moonlight patterned paper layer 4″ x 5 1/4″.
The Country Woods DSP layet at the bottom of the card front is 1 1/4″ x 4″.
I cut a Misty Moonlight cardstock strip 1/4″ x 4″.
The little stool is die cut using a pattern from the Country Woods DSP and one of the Dies in the Country Flowers Dies.
I stamped the tea pot using Memento Black ink and added color with Stampin’ Blends.
The tea pot, leaves and flowers are die cut using dies from the Die Set.
I stamped and fussy cut the sentiment from the Stamp Set.
The elements are attached with Dimensionals.
My card came together very quickly. I spent a little time coloring the tea pot and fussy cutting the sentiment, but it was easy. All of the die cut elements went through my cutting machine in one sweep. It was fun to get ink on my new stamps and cut my new paper pack. I’m sure you’ll be seeing another tea pot or two in future posts.
So, cut some layers, die cut a few elements, fussy cut a sentiment, and create a handmade card to send love.
… the only limitation is your imagination!
pRODUCT dETAILS
May, 2024 Customer Card Kit
My Customer Mini Card Kit for May focuses on products from the Unbounded Beauty Product Suite. I’m showcasing the Unbounded Beauty Designer Series Paper, along with the Flowers of Beauty Dies. The Kit Details are listed below.
You will receive everything you need to put the cards together as I’ve designed them.
The kit will include the card bases, layers, die cuts, embellishments, sentiment layers, and envelopes.
I cannot send stamped images, but you will have a sentiment layer you can customize to a stamp you already own, or you can purchase the Bright Skies Bundle.
You will also receive a printed PDF Tutorial, along with a video link so you can put the cards together along with me.
You will automatically receive this kit with a minimum product purchase of $50.00 through my online store.
I am Debbie Crowley and welcome to my blog. Here you'll find fun projects that are sure to inspire you. I hope you'll stop
by often and leave a comment or two. To contact me, you can email me at: expressivelydeb@gmail.com
Current Catalogs
What are you looking for?
The content of this blog is the sole responsibility of Debra Crowley, expressively deb.com, as an Independent Stampin' Up! Demonstrator. The use of and content of classes, services or products offered is not endorsed by Stampin' Up!