There’s a lot going on over at Stampin’ Up! this week. Tomorrow starts the Last Chance Sale. That means the products you may have wanted, and didn’t add to your personal innentory, will be available for a last chance purchase. I’ll have more details in tomorrow’s post.
Let’s talk about today’s card.
This is the first card I made using a large background stamp. The Sketched Plaid stamp is in the current Annual Catalog, and it’s being carried over to the new Annual Catalog. So, if you like what I have to say, you can reach for it now, but it will be around for a while.
The stamp measures about 4 1/2″ x 5 3/4″. I used my stamp positioning tool and Tuxedo Black Memento ink to stamp the background onto a Basic White cardstock layer. Wanting to add some color, I chose a few Stampin’ Blends and a ruler. I simply added lines of color along the stamped lines. This was an easy process. As I was adding the colored lines, I noticed a pattern in the plaid. My first color choice was Light Poppy Parade. Once I had that color down, I decided to go with a little more color in the same color family, so I went with Light Calypso Coral, and then Light Real Red. I added the colored lines both horizontally and vertically on the stamped image.
I liked the result, but I thought a little yellow would finish my new “patterned paper” layer nicely. My Light Daffodil Delight Blend added just the right amount of color pop.
So, let’s make a card with some original Designer Series Paper!
Parts And Pieces
I cut a Flirty Flamingo cardstock card base 4 1/4″ x 11″, and scored it at 5 1/2″.
The Basic White mat layer is 3 3/4″ x 5″.
I trimmed the plaid patterned paper to 3 1/2″ x 4 3/4″.
I attached the layers as shown with glue.
I stamped and die cut the flower elements from the Hooray For Surprises Bundle and attached them with glue.
The Granny Apple Green leaves are from a leaf punch.
The sentiment is from the Hooray For Surprises Stamp Set.
I embellished with a few Black Classic Matte Dots.
So, I think I’ll be using the Sketched Plaid stamp for lots of future projects. While this was my first try, and black ink seemed to be the logical choice for my first “creating plaid” experience, I’m sure I’ll branch out with lots of other fun color combinationa. What colors would you choose for your custom plaid patterned paper?
… the only limitation is your imagination!
Product Details
April Customer Mini Card Kit
You will receive everything you need to put the cards together as I’ve designed them.
The kit will include the card bases, layers, die cuts, embellishments, sentiment layers, and envelopes.
I cannot send stamped images, but you will have a sentiment layer you can customize to a stamp you already own, or you can purchase the Bright Skies Bundle.
You will also receive a printed PDF Tutorial, along with a video link so you can put the cards together along with me.
You will automatically receive this kit with a minimum product purchase of $50.00 through my online store.
This card kit will be available through April 30th.
You are incredible, and thank you for checking in today!
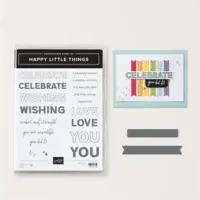
I designed this card using the Happy Little Things Bundle. It’s new and is part of the new release for the Online Exclusives. You can click here to take a look at all of the Online Exclusives. Just as an aside, the Online Exclusives are Stampin’ Up! products released for online ordering only. They don’t retire. There was a large release recently, so there’s lots of new and fun products there.
Do you love large sentiments? I do. There are so many ways you can use them. One way is to grab your scrap stash and design your own creative masterpiece. That’s what I did for today’s project. I customized my sentiment with the help of the Happy Little Things stamp set.
So, let’s make a card!
Parts & Pieces
The Basic White cardstock card base is 4 1/4″ x 11″, and scored at 5 1/2″.
I attached a Basic Black cardstock layer that measures 3 3/4″ x 5″.
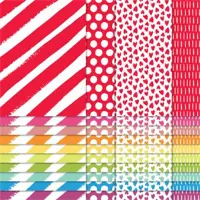
I used the Brights 6″ x 6″ Designer Series Paper to die cut the layers, and cut a Basic Black cardstock mat layer for them.
The Granny Apple Green and Daffodil Delight patterned paper layers are 1 1/4″ x 2″. The Basic Black mat layers for these measures 1 1/2″ x 2 1/4″.
The Real Red square patterned paper layer is about 1 7/8″, and the Basic Black mat square is 2″.
I stamped the large “YOU” sentiment with Daffodil Delight ink onto a 1 1/2″ x 2 1/2″ die cut layer.
I stamped the outline “YOU” stamp using Black Memento ink.
The “are incredible” stamp is from the Happy Little Things stamp set. I covered the word “you”, inked the rest of the sentiment, removed the low tack tape cover, and stamped the “are incredible” image onto a 3/4″ x 1 3/4″ strip of Basic White cardstock.
All of the layers are attached to the card front with Dimensionals.
This was a quick and easy card to put toether. There’s one little hint I should mention… I used my stamp positioning tool to stamp the outline image over the Daffodil Delight “YOU”. Because these stamps are photopolymer, it probably would have been easy to use a clear block, but I chose the stamp positioning tool. I was happy with the result.
So, get that great large sentiment stamp set, cut some bright patterned paper layers, scatter them on a card front, and create a fun card to let someone know how incredible they are.
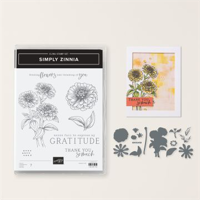
Here’s a preview of the Flowering Zinnia Suite. Wow! If you like bright, happy colors, this one’s for you. Zinnia’s are beautiful, hardy flowers that attract both bees and butterflies. We need them, right? The Simply Zinnia stamp and die Bundle focuses on gratitude and beautiful bold zinnias!
The Flowering Zinnias Designer Series Paper is, as we’ve come to expect, outstanding! The color palette lights up any project you create with it.
I thought the Z-Fold Fun Fold design would be a perfect canvas to showcase the Designer Series Paper. You can download the PDF Tutorial by clicking the blue button below.
I created my card using a Basic White cardstock card base. I wanted to show off the colors, and I think the white showcases them nicely. The focal point Zinnias are fussy cut directly from the Flowering Zinnias Designer Series Paper.
The “Z-Fold Fun Fold design is so easy to create. I think it’s the perfect Fun Fold for this amazing patterned paper.
So, pull out your Paper Trimmer, cut and score a simple card base, add beautiful patterned paper layers, a sweet sentiment, and create something to brighten someone’s day.
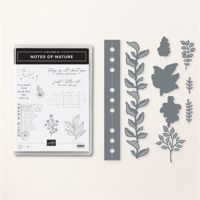
Here’s a quick and easy card template you can use with your favorite patterned paper, some coordinating cardstock, and a pretty stamp and die Bundle. I chose the Nature’s Sweetness Designer Series Paper and the coordinating Notes of Nature Bundle to use with this card design. It’s quick and easy.
If you want to spend some time in your craft space , and need some inspiration, here it is. Just do it, right? Look through your patterned paper and choose two coordinating patterns. Match up some cardstock. Now go into your die inventory and pick out a die that has some length, add a few smaller filler dies, and decide on a sentiment layer.
Now that you have everything you need, let’s make a card!
Parts & Pieces
The cardstock card base is 4 1/4″ x 11″, scored at 5 1/2″.
On the 11″ side of the card base, cut off 1 1/2″, then cut off 2 1/2″.
Cut a patterned paper layer 4 1/8″ x 5 3/8″ for the inside of the card base.
Cut a coordinating patterned paper layer 2 3/8″ x 4 1/8″. This is for the 2 1/2″ cardstock layer you cut off the card base. This wioll be the vertical front panel.
Cut two patterned paper layers 1 3/8″ x 4 1/8″. These are for the top and bottom front horozontal panels.
Adhere the patterned paper layers to the card front as shown.
Attach the vertical panel to the top of the card base about 5/8″ dpwm from the top of the card base.
Add adhesive to the back of the bottom of the vertical layer, place the horizontal layer along the bottom of the card base and attach the bottom of the vertical layer to the top of the bottom horizontal layer.
Attach your die cut elements and sentiment as shown.
I cut a Basic White cardstock writing layer 2 1/4″ x 4″ and carefully attached it to the inside of the card making sure it is under the vertical card front panel.
Once you make one of these, I promise you’ll see how easy it is. It’s a fun one to put together.
The February cards are showcasing the Everyday Details Dies along with the Delightfuly Eclectic Designer Series Paper.
You will receive everything you need to put the cards together as I’ve designed them.
The kit will include the card bases, layers, die cuts, embellishments, sentiment layers, and envelopes.
I cannot send stamped images, but you will have a sentiment layer you can customize to stamps you already owm.
You will also receive a printed PDF Tutorial, along with a video link so you can put the cards together along with me.
You will automatically receive the kit with a minimum product purchase of $50.00 through my online store. When completing your purchase, you MUST use the Monthly Host Code that I provide in every blog post. (Feel free to reach out to me with any questions you may have).
If your order is more than $150.00, plese don’t use the Host Code. You will receive rewards directly from Stampin’ Up!, and you will also receive the mini kit from me.
It’s a good day to have a good day! Isn’t this a fun sentiment? I paired the stamp from the Filled With Happiness stamp set with the Sunny Days Designer Series Paper.
The stamp set is one of those that you have to have on your shelf. It’s refreshing! Combine it with the Modern Oval Punch and you have a match made in heaven. The stamp set also has two large font stamps that can easily be fussy cut to create another layering element for your card design.
So, let’s make a card!
Parts & Pieces
The Crushed Curry cardstock card base is 4 1/4″ x 11″, scored at 5 1/2″.
I cut the Basic White mat layer 4″ x 5 1/4″.
The Sunny Days Designer Series Paper layer is 3 3/4″ x 5″.
The Basic White sentiment layer is 3 3/4″ x 2 3/4″.
With my corner round punch, I punched the corners of the mat and patterned paper layers for a little pattern repeat in the card design.
I stamped the sentiment with Memento Black Ink and added color with Blends.
I punched the center of the sentiment with the Modern Oval Punch.
The negative of the punched layer is adhered to the card front with liquied glue.
The stamped center of the punched layer is attached with Dimensionals.
The “sun” pattern in the Designer Series Paper is subtle enough to let the sentiment shine. The sentiment font is bold. This makes it easy to add color with Blends. I enjoued putting this card together and I’m sure you will, as well.
So, stamp a sentiment “filled with happiness”, add a little color, attach it to your card layers, and send wishes for a good day!
During the month of Januaryr, with a minimum product purchse of $50.00 from my Online Store, you will receive all of the supplies to create these two cards as I’ve designed them, along with a PDF Tutorial and video tutorial to make the cards along with me.
You will need your favorite adhesive and sentiment stamp.
To receive this FREE Card Kit, you must use the Host Code above when placing your order.
If your order is $150.00 or more, please don’t use the Host Code. You will receive Stampin’ Rewards directly from Stampin’ Up!, and you will also receive the FREE Card Kit from me.
I am Debbie Crowley and welcome to my blog. Here you'll find fun projects that are sure to inspire you. I hope you'll stop
by often and leave a comment or two. To contact me, you can email me at: expressivelydeb@gmail.com
Current Catalogs
What are you looking for?
The content of this blog is the sole responsibility of Debra Crowley, expressively deb.com, as an Independent Stampin' Up! Demonstrator. The use of and content of classes, services or products offered is not endorsed by Stampin' Up!