

For some weekend inapiration, I thought you would have fun with the cards I created using the Mix And Match products from the Annual Catalog. You can find them on pages 18 through 21. When I saw them in the Catalog, I thought it would be fun to try them. They are at a great price point, and perfect for you if you are just starting to design cards and papercrafting projects.
I’ve been stamping and cutting paper for many years, and I enjoyed the experience of telling a story on a card front using pre-cut Emperema.
So, let’s make a card!
Pieces & Parts

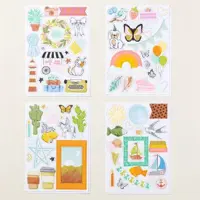
- My first showcased card tells the story of the sun shining behind the rainbow, and the hot air balloon rising up to meet them.
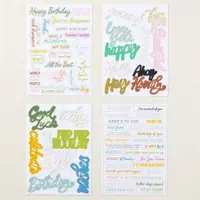
- Believe it or not, my inspiration came from the sentiment – “SHINE ON”.
- So, starting with the sentiment, I naturally added the sun.
- The rainbow was next, but I need something more.
- Looking through the Ephemera, I thought the hot air balloon was a perfect finish.
- As you can see, each element is attached with Dimensionals, starting with the Sun and working diagonally to the left.
- I made sure the top of the sun was the same distance as the top of the card layer.
- Similarly, the bottom of the hot air balloon is about the same distance from the bottom of the card layer.
- This helped me center the elements.
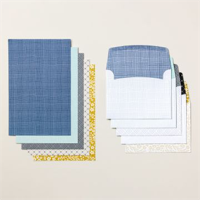
- The woven checked patterned top layer is actually a cut card base from the Calming Creek Cards & Envelopes.
- I cut it to 4″ x 5 1/4″, and attached it to a Pool Party cardstock card base.
- The card base is 5 1/2″ x 8 1/2″, scored at 4 1/4″.
- I embellished with a few clear Opal Rounds.
You can easily duplicate this card design with die cut elements you may already have. It is fun, though, to go through the Ephemera Packs and create a story.
Let’s make a second card!

This is a quick and easy masculine themed card. I kept it simple, as well. The inspiration for this card was the double framed mountain scene.
Pieces & Parts

- As I mentioned, my story for this card begn with the double framed mountain scene.
- Once I broke apart the frames, I layered the mountain scene using Basic White card stock. The layer measures 1 5/8″ x 2 7/8″.
- I attached the layered scene to the smaller frame.
- I chose the card base from the Calming Creek Cards & Envelopes.
- The Basic Gray layer measures 2 7/8″ x 4 7/8″. I used a triple punch to punch the corners.
- I attached the larger frame to the Basic Gray layer, then attached the smaller, layered frame to the center with Dimensionals.
- I liked this sentiment for a masculine themed card, and the colors coordinated with the mountain scene.
- I used to love to put “grounding banners” under a sentiment and haven’t done it in a while. I found this one in the Ephemera Pack and thought it was just what this design needed.
- I embellished with a few Pecan Pie Adhesive Backed Speckled Dots.
Both of these cards were so much fun and very easy to put together. Of course, you would create your own stories as you design with Ep;herema, a caard base and maybe a few cardstock layers. There’s even more inspiration for these Products in the Catalog, so be sure to take a look.
So, what will be your inspiration? … An inspirtional sentiment, or a serene mountain scene? What story would you tell when you sit down to design your card? I know you would enjoy going through all of the choices the Mix & Match Products will give you.
As always, have fun creating your unique design.
… the only limitation is your imagination!

Product Details


June Customer Mini Card Kit

It’s time for a new Customer Card Kit. The June, 2024 Monthly Customer Card Kit celebrates Country Flowers and Country Lace. The Card Kits feature a Fun Fold and an easy layered card design.
Below are additional Kit details.
- You will receive everything you need to put the cards together as I’ve designed them.
- The kit will include the card bases, layers, die cuts, embellishments, sentiment layers, and envelopes.
- I cannot send stamped images, but you will have a sentiment layer you can customize to a stamp you already own, or you can purchase the Country Flowers Bundle.
- You will also receive a printed PDF Tutorial, along with a video link so you can put the cards together along with me.
- You will automatically receive this kit with a minimum product purchase of $50.00 through my online store.
- This card kit will be available through June 30th.
Bundle Savings Are Even Better

- Do you love Bundles? I do. It’s rare that I purchase a stamp set without the dies, or dies without the stamp set. Aside from that, there’s ALWAYS a 10% discount on Bundles. Starting today, Wednesday, June 5th, Stampin’ Up! is dicounting Bundles an additional 10%. If there’s a Bundle you’ve had your eyes on, you can save more from June 5th through June 30th with the additional discount.
- Even Better! As much as I love Bundles, you absolutely have to have a cutting machine. If you don’t have one, think about investing in one during the month of June. From today, June 5th through June 30th, the Stampin’ Cut And Emboss Machine and the Mini Stampin’ Cut And Emboss Machine will be discounted 10%.
- I’m sure you’ve heeard me say that I love my “Mini”. I do! Its smaller size makes it easy for me to keep it on my work surface when I’m making a card or project. The dies run through the machine smoothly and it cuts evenly.
SHOP WITH ME


Love the cards Deb
Especially the holiday cards ❤️
Hi Karen, thank you so much for taking the time to comment. These Mix & match products are fun.