I thought it would be fun to share this Fun Fold card design with you. It’s an easy to put together design that is sure to “WOW” your recipient.
I saw a version of this on Pinterest using a large die cut flower as a focal point layer. The card didn’t use patterned paper. The large floral Focal Point was beautiful standing alone. (More inspiration for yourversion of this design). I enjoy using layers in my cards, and adore mixing patterns with Designer Series Paper. There’s no doubt, though, that I will try a large image focal point on a future card.
I hadn’t seen a tucked front flap, so I thought it would be fun to try it. Once I got the cutting dimensions in place, I cut some Designer Series Paper, mixed and matched patterns, and created a few cards. This is a “FUN” Fun Fold, for sure. I decided to call it a “Tucked Flap Fun Fold”.
So, get comfortable, and enjoy the Video. There’s a few tips and tricks for quick and easy assembly.
Last week, we had out October Team gathering. I created the projects for us, but I always love to share what my stamping friends are doing in their craft room. Barbara created several cards using the Trusted Toolbox Designer Series Paper. She shows that you don’t need much more than a fun DSP pack to create beautiful cards. Trusted Toolbox is in the current Clearance Rack for as long as supplies last.
A Wide Focal P9ont Layer Strip
The card above has a simple mat layer to highlight the top card layer. Barbara cut a wide strip of patterned paper, added cardstock borders to the top and bottom, and attached the layer to the card front over a top and bottom strip of coordinating patterned paper. She used just a few elements. I love the simplicity of this card, not to mention Lost Lagoon!
Sit back and enjoy the inspiration. Think about what patterned paper you have that would work with some of these card front design layouts. Maybe yuo can create a set of handmade cards for gifting!
Embossing and a Side Panel
The card above has an embossed card front background layer. Barbara added a patterned paper side layer to the right card front. The elements were cut directly from the Designer Series Paper. A sentiment wasn’t added to this card, Barbara usually makes the cards and adds a sentiment when she needs it.
Truly A Trusted Toolbox!
What a perfect masculine birthday card.
Another simple card front layout. The Smoky Slate card base is a neutral anchor for the Lost Lagoon and Crushed Curry color palette. I love the pop of Poppy Parade right in the center of the card design.
Measurements Are Important
Aolthough this card is a quick and easy design, the Crushed Curry mat layer really shows off the Pecan Pie embossed layer. This is a fun card, for sure.
Wow!
The focal point element cluster on this card makes me smile. A cluster of tucked tools behind the anchor of a saw blade is so fun! Here’s some inspiration for a few background layers, a circle tucked under a sentiment strip, and some flowers or Christmas holly! I think I’m going to CASE this one.
Thank you so much, Barbara, for inspiring us with your creativity.
I hope you enjoyed this little parade of card designs. So, find that perfect patterned paper, cut a few layers, add element clusters, and create your unique “parade of cards”.
You will receive everything you need to put the cards together as I’ve designed them except for adhesives. You will receive Dimensionals, if used.
The Kit will include the card bases, layers, die cuts, embellishments, sentiment layers, and envelopes.
I cannot send stamped images, but you will have a sentiment layer you can customize to a stamp you already own, or you can purchase the Sentimental Wishes Stamp Set. It’s on page 29 in the September-December, 2024 Mini Catalog.
You will also receive a printed PDF Tutorial, along with a video link so you can put the cards together with me.
You will automatically receive this kit with a minimum product purchase of $50.00 through my online store.
This card kit will be available through October 31st, 2024.
As always, please reach out to me with any quesitons.
STAMPIN’ UP! PROMOTIONS AND NEWS FOR OCTOBER
NEW STARTER KIT SPECIAL – JOIN STAMPIN’ UP!
Thinking of becoming a Stampin’ Up! Demonstrator? You can join during the month of October and get $155.00 worth of products you choose from the Annual Catalog, the September-December, 2024 Mini Catalog, or the Online Exclusives. You will also receive FREE SHIPPING on your Starter Kit order. For more details, click the image above or click here.
ENJOY 30% OFF ALL KITS IN THE KITS COLLECTION NOW THROUGH OCTOBER 31ST.
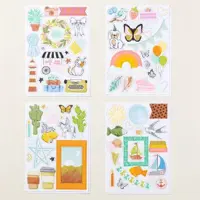
For some weekend inapiration, I thought you would have fun with the cards I created using the Mix And Match products from the Annual Catalog. You can find them on pages 18 through 21. When I saw them in the Catalog, I thought it would be fun to try them. They are at a great price point, and perfect for you if you are just starting to design cards and papercrafting projects.
I’ve been stamping and cutting paper for many years, and I enjoyed the experience of telling a story on a card front using pre-cut Emperema.
So, let’s make a card!
Pieces & Parts
My first showcased card tells the story of the sun shining behind the rainbow, and the hot air balloon rising up to meet them.
Believe it or not, my inspiration came from the sentiment – “SHINE ON”.
So, starting with the sentiment, I naturally added the sun.
The rainbow was next, but I need something more.
Looking through the Ephemera, I thought the hot air balloon was a perfect finish.
As you can see, each element is attached with Dimensionals, starting with the Sun and working diagonally to the left.
I made sure the top of the sun was the same distance as the top of the card layer.
Similarly, the bottom of the hot air balloon is about the same distance from the bottom of the card layer.
This helped me center the elements.
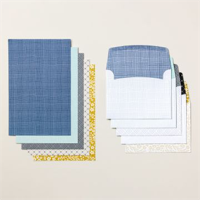
The woven checked patterned top layer is actually a cut card base from the Calming Creek Cards & Envelopes.
I cut it to 4″ x 5 1/4″, and attached it to a Pool Party cardstock card base.
The card base is 5 1/2″ x 8 1/2″, scored at 4 1/4″.
I embellished with a few clear Opal Rounds.
You can easily duplicate this card design with die cut elements you may already have. It is fun, though, to go through the Ephemera Packs and create a story.
Let’s make a second card!
This is a quick and easy masculine themed card. I kept it simple, as well. The inspiration for this card was the double framed mountain scene.
Pieces & Parts
As I mentioned, my story for this card begn with the double framed mountain scene.
Once I broke apart the frames, I layered the mountain scene using Basic White card stock. The layer measures 1 5/8″ x 2 7/8″.
I attached the layered scene to the smaller frame.
I chose the card base from the Calming Creek Cards & Envelopes.
The Basic Gray layer measures 2 7/8″ x 4 7/8″. I used a triple punch to punch the corners.
I attached the larger frame to the Basic Gray layer, then attached the smaller, layered frame to the center with Dimensionals.
I liked this sentiment for a masculine themed card, and the colors coordinated with the mountain scene.
I used to love to put “grounding banners” under a sentiment and haven’t done it in a while. I found this one in the Ephemera Pack and thought it was just what this design needed.
I embellished with a few Pecan Pie Adhesive Backed Speckled Dots.
Both of these cards were so much fun and very easy to put together. Of course, you would create your own stories as you design with Ep;herema, a caard base and maybe a few cardstock layers. There’s even more inspiration for these Products in the Catalog, so be sure to take a look.
So, what will be your inspiration? … An inspirtional sentiment, or a serene mountain scene? What story would you tell when you sit down to design your card? I know you would enjoy going through all of the choices the Mix & Match Products will give you.
It’s time for a new Customer Card Kit. The June, 2024 Monthly Customer Card Kit celebrates Country Flowers and Country Lace. The Card Kits feature a Fun Fold and an easy layered card design.
Below are additional Kit details.
You will receive everything you need to put the cards together as I’ve designed them.
The kit will include the card bases, layers, die cuts, embellishments, sentiment layers, and envelopes.
I cannot send stamped images, but you will have a sentiment layer you can customize to a stamp you already own, or you can purchase the Country Flowers Bundle.
You will also receive a printed PDF Tutorial, along with a video link so you can put the cards together along with me.
You will automatically receive this kit with a minimum product purchase of $50.00 through my online store.
This card kit will be available through June 30th.
Bundle Savings Are Even Better
Do you love Bundles? I do. It’s rare that I purchase a stamp set without the dies, or dies without the stamp set. Aside from that, there’s ALWAYS a 10% discount on Bundles. Starting today, Wednesday, June 5th, Stampin’ Up! is dicounting Bundles an additional 10%. If there’s a Bundle you’ve had your eyes on, you can save more from June 5th through June 30th with the additional discount.
Even Better! As much as I love Bundles, you absolutely have to have a cutting machine. If you don’t have one, think about investing in one during the month of June. From today, June 5th through June 30th, the Stampin’ Cut And Emboss Machine and the Mini Stampin’ Cut And Emboss Machine will be discounted 10%.
I’m sure you’ve heeard me say that I love my “Mini”. I do! Its smaller size makes it easy for me to keep it on my work surface when I’m making a card or project. The dies run through the machine smoothly and it cuts evenly.
Do you believe this card is quick and easy? Once I made the decision to have my paint brush strokes laid out vertically on my card front, the rest was a breeze. It is fun to duplicate the colors of the rainbow. It made me smile.
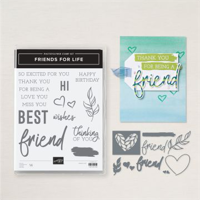
My inspiration for this card came from the paint brush-stroke die in the Friends For Life Dies. I was deterined to find a way to use this die. Taking another look at the Ful Of Life Designer Series Paper helped me make the decision to go with the colors of the rainbow on a Basic White background.
So, let’s make a card!
Parts & Pieces
I cut a Thick Basic White cardstock card base 8 1/2″ x 5 1/2″ and scored it at 4 1/4″ on the 8 1/2″ side,
The Basic Black cardstock mat layer is 4 1/8″ x 5 3/8″.
The Basic White top layer is 4″ x 5 1/4″.
I used the patterned paper design pictured above, along with the die from the Friends For Life Dies. (You can click on the product details at the end of this post).
As you can see in the photo above, I simply placed the die vertically over the color I wanted to cut.
Once I had my rainbow colors, I attached them to the Basic White top layer of the card.
Note that the left edge of the “red paint strip” is about 1/2″ in from the left side of the Basic White layer.
Similarly, the right edge of the “purple paint strip” is about 1/2″ in from the right side of the Basic White layer.
I attached those colors first, then filled in the center strips evenly placed.
The “friend” sentiment is die cut from the Dies and attached with Dimensionals.
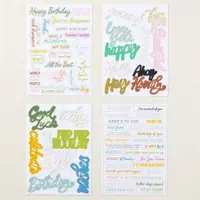
I stamped and fussy cut the Happy Birthday sentiment.
I attached the fussy cut sentiment to Basic Black cardstock and fussy cut it again.
For a little sparkle, I added a few of the Iridescent Faceted Gems from the Full of Life Product Suite.
So, what do you think? Quick and easy, right? Pick your special cololrs, add your custom “paint” and create a fun, quick and easy card to share.
My Customer Mini Card Kit for May focuses on products from the Unbounded Beauty Product Suite. I’m showcasing the Unbounded Beauty Designer Series Paper, along with the Flowers of Beauty Dies. The Kit Details are listed below.
You will receive everything you need to put the cards together as I’ve designed them.
The kit will include the card bases, layers, die cuts, embellishments, sentiment layers, and envelopes.
I cannot send stamped images, but you will have a sentiment layer you can customize to a stamp you already own, or you can purchase the Bright Skies Bundle.
You will also receive a printed PDF Tutorial, along with a video link so you can put the cards together along with me.
You will automatically receive this kit with a minimum product purchase of $50.00 through my online store.
I enjoy creating with Pebbled Path. It’s a wonderful “Neutral”. Most of the colors I tried with it looked great. I chose to go with Pool Party and a splash of Melon Mambo. I think these colors work well for this design, and the “mood” I want for this card. It could easily be a masculine happy birthday card!
The Notes of Nature Bundle and Nature’s Sweetness Designer Series Paper are all on the current Last Chance List. The Designer Series Paper, the Notes of Nature Stamp Set and the Notes Of Nature Dies will no longer be available after April 30th. Take note that the Notes of Nature Dies are available now and discounted 20%. If you purchase the stamp set and dies separately, it’s a better price than the Bundled pricing. It’s a good deal!
The Dies are perfect for those little clustered filler pieces we all love to add to our projects. This Die Set also includes a notebook edge die which is a great accent for a top layer for your card design. The product details are at the end of this post.
So, let’s make a card!
Parts & Pieces
I cut a Pebbled Path cardstock card base 4 1/4″ x 11″, and scored it at 5 1/2″.
The “grid” patterned paper layer covers the card front. It’s 4 1/4″ x 5 1/2″.
The Pool Party cardstock mat layer is 3 1/4″ x 4 1/2″.
The Basic White top layer is 3 1/8″ x 4 3/8″.
I stamped the larger image with Pebbled Path ink – stamped off once, or as some call it, “second generation” stamping.
I stamped the leaf image with Granny Apple Green ink, also stamped off once.
Second Generation Stamping or “stamped off once” stamping is inking your stamp, stamping it off once onto a scrap piece of cardstock, then stamping it onto your final design. You can stamp off your image as many times as you like to get your desired color. It’s fun to play with the color shades stamping off provides.
The sentiment is stamped with Pebbled Path ink directly to the top layer.
I punched a little Melon Mambo heart with a heart punch I had in my stash.
The cardstock curring dimensions I used for today’s card can be duplicated with just about any stamped image and sentiment you might have. Just match up some patterned paper and create your unique design.
So, cut your layers, stamp a large image off once, add a sentiment, punch a heart, and create your unique Stamps, Ink and Paper card.
… the only limitation is your imagination!
Product Details
April Customer Mini Card Kit
You will receive everything you need to put the cards together as I’ve designed them.
The kit will include the card bases, layers, die cuts, embellishments, sentiment layers, and envelopes.
I cannot send stamped images, but you will have a sentiment layer you can customize to a stamp you already own, or you can purchase the Bright Skies Bundle.
You will also receive a printed PDF Tutorial, along with a video link so you can put the cards together along with me.
You will automatically receive this kit with a minimum product purchase of $50.00 through my online store.
This card kit will be available through April 30th.
I am Debbie Crowley and welcome to my blog. Here you'll find fun projects that are sure to inspire you. I hope you'll stop
by often and leave a comment or two. To contact me, you can email me at: expressivelydeb@gmail.com
Current Catalogs
What are you looking for?
The content of this blog is the sole responsibility of Debra Crowley, expressively deb.com, as an Independent Stampin' Up! Demonstrator. The use of and content of classes, services or products offered is not endorsed by Stampin' Up!


 alt=”165196″ />