I hope you’re having fun browsing the new Mini Catalog and the Scrapbooking Brochure. I’m so glad this is not a Sneak Peek. You can get your hands on the More Than Autumn Bundle starting today.
If you love all things warm, cozy, and delicious, you’ll love what you can do with the More than Autumn Stamp Set! It’s about autumn, for sure, but it’s so much more than that. Combine the words to create the sentiment that you want, whether it’s to celebrate autumn, winter, seasonal foods and drinks, or someone in your life. Stamp, then add a personal touch with your favorite colors. You’ll love the possibilities of these stamps!
My card is a simple design. The addition of the large die cut circle in the center gives you a canvas to customize your sentiment and die cut elements. The More Than Autumn Stamp Set has lots of Fall into Winter images, perfect for layeing to create element clusters.
The More Than Autumn Dies coordinate with the image stamps, and include word dies. You can create mixed font sentiments and have fun matching the elements.
So, let’s make a card!
Parts & Pieces
I cut a Pecan Pie cardstock card base 4 1/4″ x 11″ and scored it at 5 1/2″.
The Basic White cardstock top layer is 3 7/8″ x 5 1/2″.
The patterned paper layer is 3 3/4″ x 5 1/2″.
The circle is one of the larger dies from the Deckled Circles Dies. It measures about 3 1/2″ in diameter.
I stamped the inside of the card with a sentiment and image from the More Than Autumn Stamp Set.
Customize Patterned Paper
The plaid patterned paper I used for the top layer of my card is Pecan Pie and white. I wanted to mix in Cherry Cobbler to celebrate the apple spiced tea. With a Cherry Cobbler Stampin’ Blend, and my ruler, I drew lines along the Pecan Pie plaid design.
Take a look at the photo below. The bottom, right corner is not lined with the Cherry Cobbler Blend. See the difference? Adding the lines to this DSP is a quick process. Once you start, you’ll see the pattern flow and it’ll go quickly for you.
More Autumn Inspiration
Below is a card I made for a Sneak Peek at the More Than Autumn Bundle. Click on the photo to go to my original post.
So, I hope you enjoy the More Than Autumn Bundle as much as I do. Imagine the leaves changing color, the crisp air, a little apple spiced tea, a pumpkin latte, and of course, some pumpkin pie.
You will receive everything you need to put the cards together as I’ve designed them except for adhesives. You will receive Dimensionals, if used.
The Kit will include the card bases, layers, die cuts, embellishments, sentiment layers, and envelopes.
I cannot send stamped images, but you will have a sentiment layer you can customize to a stamp you already own, or you can purchase the Something Fancy Stamp Set. It’s on page 79 in the current Annual Catalog.
You will also receive a printed PDF Tutorial, along with a video link so you can put the cards together with me.
You will automatically receive this kit with a minimum product purchase of $50.00 through my online store.
This card kit will be available through September 30th, 2024.
As always, please reach out to me with any quesitons.
Celebrate World Card making Day on October 5th
Join Stampin’ Up! for a FREE virtual crafting event to celebrate World Card Making Day.
It’s a one hour virtual event beginning at 2:00 p.m. Mountain Time on October 5th. That’s 4:00 p.m. on the East Coast.
The event is open to all – Demonstrators, Customers, and anyone who loves to paper craft, or wants to see what paper crafting is all about. It’s for all skill levels, as well.
I hope you have a fun Labor Day holiday weekend, and can spend a little time in your craft space.
It’s been a bit since I’ve done a CAS inspiration card. I thought it would be a fun way to showcase the Regal Winter Suite. It will be available to customers on September 4th, only a few days away.
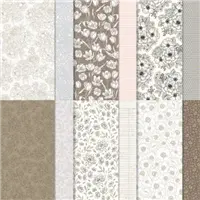
The Regal Winter Sutie is at the top of my favorites. I was drawn to the colors in the Regal Winter Designer Series Paper. The Regal Floral Stamp Set is one of Stampin’ Up!’s Distinktive sets. The stamps are cling, red rubber, which allows for greter detail in the stamped images. The stamps also allow you to stamp shades of color with one inked, stamped image to the paper. You can see the shades of color in the focal point flower of my card.
I put together a Project Tutorial you can download with assembly instructions, including pictures. I will share the quick and easy layering dimensions here.
The Thick Basic White cardstock card base is 11″ x 4 1/4″. It’s scored at 5 1/2″.
The Basic White cardstock card front layer is 3 3/4″ x 5″.
The label Focal Point layer is die cut from the Regal Flora Dies. It measures about 1 3/4″ x 3 3/4″.
The flower is stamped with Berry Burst ink.
The leaf image is stamped with Pretty Peacock ink.
I stamped the dotted background with Basic Beige ink.
Click the blue button below to download the Project Tutorial.
I didn’t put a sentiment on the outside of this card, but stamped the inside.
So, be sure to download the free Project Tutorial. You can use it now with supplies you already have, enjoy it with the Regal Winter Suite of products. Remember …
Today is the last day to redeem your Bonus Days Coupons. You should have received an email from Stampin’ Up! shortly after you placed your order in July. This email contains a Coupon Code. When you place your order in August, you will be prompted to put in the Coupon Code(s). If you have more than one Coupon Code, enter them in the space provided separated by a comma. The discount will appear when you check out.
Last Day For August Customer Card Kit
This is a Fall-Themed Kit that features the Autumn Leaves Bundle. You will receive your Kit automaically with a minimum product purchase of $50 through my online store at Stampin’ Up! The Kit will include:
Everything you need to put the cards together as I’ve designed them;
Card bases, layers, die cuts, embellishments, sentiment layers, and envelopes;
I cannot send stamped images, but you will have a sentiment layer you can customize to a stamp you already own, or you can purchase the Autumn Leaves Bundle through my Online Store.
A printed PDF Tutorial, along with a video link so you can put the cards together with me.
This card kit will be available through August 31st.
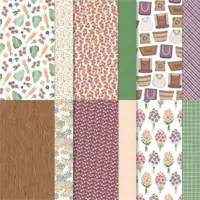
It’s been a while since I used the Countryside Inn Designer Series Paper in a card. This paper pack is in the current Annual Catalog and is not on the Last Chance List. As the name states, the Countryside Inn paper pack includes monochromatic blues that were inspired by fine china and wallpaper patterns. It includes gorgeous florals, woodland animals, nature, and ceramic designs. It’s a perfect “all occasion” paper pack.
So, let’s make a card!
Parts & Pieces
The Night of Navy cardstock card base is 4 1/4″ x 11″, and scored at 5 1/2″ on the long side.
I cut the patterned paper layer 4″ x 5 1/4″.
The notebook edged layer is about 2 3/4″ x 4″.
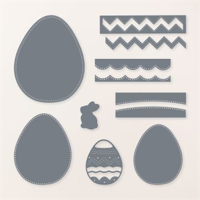
I die cut the zig-zag strips from the Excellent Eggs Dies. (They are retiring on April 30th, and are on the Last Chance List).
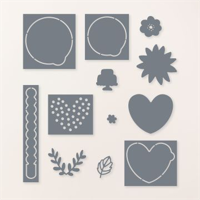
The flowers are die cut using dies from the Hooray For Surprises Dies. (They’re in the current Mini Catalog and are also in the upcoming 2024-2025 Annual Catalog… “Hooray!!). I use them so much, I didn’t want to see them go.
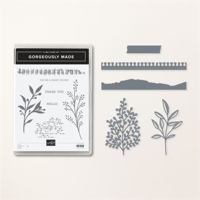
I stamped the sentiment from a stamp in the Gorgeously Made Stamp Set, and die cut it with the coordinating die.
I added a little white pigment ink to the top of the layer with a sponge dauber.
The embellishments are a few of the 2022-2024 In Color Matte Dots.
This is one of those card designs you can use with just about any supplies you have on hand. Pick a pretty patterned paper, find a few coordinating elements, add a large focal point layer, and a sweet sentiment, and create something special.
A new month and a lot of new Stampin’ Up! Notes and News. That’ll all be at the end of this post. Let’s talk about today’s card.
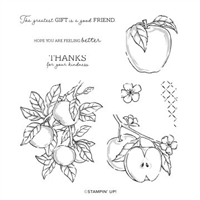
This is a CASE of Stampin’ Up!’s flyer for the Apple Harvest Bundle. The Apple Harvest stamp set featured in the July-December Mini Catalog (page 54), now has companion dies. If you’ve purchased the Apple Harvest stamp set, you can purchase the coordinating Apple Blossom dies. If you haven’t, and you really want to add a sweet refresh to your stamp and die bundles, the Apple Harvest Bundle is for you. As with all Bundles, the 10% off retail for bundle pricing applies.
Today’s Card Pieces And Parts
The Apple Harvest Bundle is beautiful. The stamps are “open” making them perfect for ink blending and coloring.
I stamped the apple images onto Soft Sea Foam cardstock with Soft Suede ink and die cut them with the coordinating die.
A Blender Pen and some Soft Sea Foam ink let me spread some color shading onto the edges of my stamped apples. I followed the lines in the stamp, because an artist I am not!
I also used Soft Sea Foam ink and my Blender Pen to add color to the apple leaves.
The only other stamped image is the sentiment. It’s stamped with Soft Suede ink onto a Sahara Sand die cut sentiment label. The sentiment die is one of the Apple Blossom Dies.
Today’s card is soft and subtle.
Assembling The Card
My Very Vanilla card base is 4 1/4″ x 11″, scored at 5 1/2″.
The Abigail Rose DSP striped layer is 5 1/2″ x 3″.
The delicate scalloped edges, apple tree branches and apple blossoms are all die cut using the Apple Blossom Dies.
Before assembling my card elements, I attached the scalloped borders to each side of the DSP layer.
I ran a thin line of glue along the back edges of the layer and carefully attached the scalloped edge using my Take Your Pick Tool to guide the scallops to the glue line.
This prevented me from having glue on my fingers.
You will have about 1/2″ of the scalloped edge longer than the card layer. Just trim it off.
I attached the decorated scalloped layer to the card front.
I assembled the die cut tree branches, glued them in place, then attached the apple blossoms as shown.
The blossoms and sentiment layer are attached with Dimensionals.
I added a small pearl to the center of the apple blossoms.
So, stamp some green apples, add a delicate scalloped edge layer and a few apple blossoms and create something soft and pretty to make someone smile.
Stampin’ Up! created six new dies that coordinate with stamp sets in the 2022–2023 Annual Catalog and the July–December 2022 Mini Catalog. These coordinating dies will only be available during this promotion. These stamp sets and dies are available separately or as a bundle.
You can download the flyer for all the details. Click the image above or you can click here.
Weekly Deals
Stampin’ Up! is bringing back Weekly Deals.
Each week during the month of September there will be a “featured weekly deal”.
Way back when they’ve always been great deals, so keep watching.
Stampin’ Up! will announce each Weekly Deal on September 1st, 8th, 15th and 22nd.
The Weekly Deal Promotion ends September 28th.
World Card Making Day Craft Along Event
Join Stampin’ Up! on October 1st to celebrate World Card Making Day. During this free virtual event we will come together as a crafting community to do what we all love—make cards!
Here are the details:
Anyone can register.
The FREE event will be on October 1, 2022 from 4:00om – 6:00 pm ET
This is an online event, and it’s FREE.
Registration Dates are from August 11, 2022 through October 1st, 2022
You don’t have to register for this event, but registering will keep you in the loop as the event approaches.
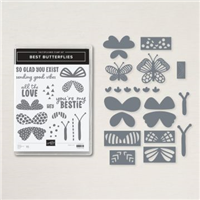
I had so much fun creating this card. I literally built a butterfly with the Best Butterflies Bundle. It’s in the Annual Catalog on pages 36 and 37. The bold, bright, happy mix of colors caught my eye. I dohave another butterfly stamp and die set, but it’s very different from this one. This bundle has a more whimsical look.
After I stamped and attached the “sending good vibes” sentiment, I realized this design could work beautifully with a bold “Happy Birthday” sentiment/ That would be a fun birthday card.
Let’s talk about this card!
Card Pieces & Parts
The card base is an A-2 tent fold cut from Parakeet Party cardstock.
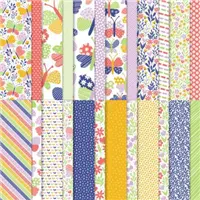
I cut the patterned paper layers from the Butterfly Kisses Designer Series Paper pack.
A scalloped die from the Scalloped Contour Dies gave me the scalloped edge border.
The Starry Sky die cut edge and the stamped butterfly are from the Build-A-Butterfly dies.
The butterfly, stamped with Starry Sky, Parakeet Party and Crushed Cutty ink, are stamps in the Best Butterflies stamp set.
“sending good vibes” is stamped with Crushed Curry ink.
Click the button below for a printable PDF Tutorial.
So, download the tutorial, build a butterfly and create something full of good vibes.
IT’S ALMOST CHRISTMAS IN JULY! TIME TO SALE-A-BRATE!
Amazing new products are coming your way in the July – December 2022 Mini Catalog. The catalog goes live on July 1st, 2022 and runs through January 4, 2023. Sale-A-Bration is back on July 1st with more fabulous products.
For those who placed an order with me over the past 6 months, you will automatically get the catalogs sent to you as a thank you for your business support! You should receive the new Mini Catalog by June 30th. If you don’t receive it, please email me.
I am Debbie Crowley and welcome to my blog. Here you'll find fun projects that are sure to inspire you. I hope you'll stop
by often and leave a comment or two. To contact me, you can email me at: expressivelydeb@gmail.com
Current Catalogs
What are you looking for?
The content of this blog is the sole responsibility of Debra Crowley, expressively deb.com, as an Independent Stampin' Up! Demonstrator. The use of and content of classes, services or products offered is not endorsed by Stampin' Up!