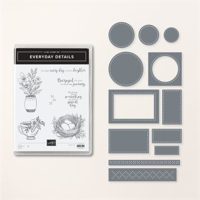
I think it’s time for a CAS card! CAS is an acronym for Clean And Simple. This means the design has lots of white space, few layers, and little or no embellishments.
I usually focus on patterned paper and color, so I forget about creating a CAS design. The dies in the Everyday Details Bundle are perfect for simple texture. Background texture works well in a CAS design. Embossing folders also create beautiful background texture.
I channeled my inner artist :), and used Watercolor Pencils and Stampin’ Blends to add color to my robin’s nest. I colored the eggs with a Light Balmy Blue Blend, and then used the Color Lifter to get creative and remove some of the color.
So, let’s make a card!
Parts & Pieces
I cut a Thick Basic White cardstock card base 4 1/4″ x 11″ and scored it at 5 1/2″.
The Basic White cardstock card layer is 4″ x 5 1/4″.
I used the long die from the Everyday Details Dies to die cut a “textured” side panel on the layer.
I stamped the bird’s nst with Crumb Cake ink and used Watercolor Pencils to add a little color to it.
The robin’s eggs are shaded with my Light Balmy Blue Stampin’ Blend, and I used the Color Lifter to add a little interest.
The bird’s nest is die cut with the largest circle die in the Die Set.
I stamped the sentiment with Crumb Cake ink and die cut it, as well.
A few Iridescent Pasterl Gems add a little sparkle.
So, cut your white cardstock, add some texture on the side, stamp a peaceful image, and create a Clean and Simple card design.
The February cards are showcasing the Everyday Details Dies along with the Delightfuly Eclectic Designer Series Paper.
You will receive everything you need to put the cards together as I’ve designed them.
The kit will include the card bases, layers, die cuts, embellishments, sentiment layers, and envelopes.
I cannot send stamped images, but you will have a sentiment layer you can customize to stamps you already owm.
You will also receive a printed PDF Tutorial, along with a video link so you can put the cards together along with me.
You will automatically receive the kit with a minimum product purchase of $50.00 through my online store. When completing your purchase, you MUST use the Monthly Host Code that I provide in every blog post. (Feel free to reach out to me with any questions you may have).
If your order is more than $150.00, plese don’t use the Host Code. You will receive rewards directly from Stampin’ Up!, and you will also receive the mini kit from me.
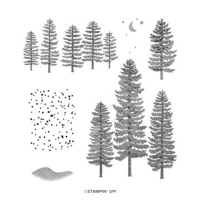
This time of the year brings me thoughts of gratitude. It’s also time for another Clean and Simple card. I combined my ideas, stamped some trees from the Forever Forest Stamp Set (which, by the way, has become a favorite), and used lots of Basic White cardstock.
Wanting to draw attention to the trees, I framed them with the large frame die from the Garden Meadow Dies. I also added “Crystal Detail” to the trees. Some of you may remember Crystal Detail. Here’s my story…
… There’s a “snow” stamp in the Forever Forest Stamp Set. I wanted to add some white embossed falling snow over the stamped trees. (Wouldn’t that have been pretty?) It turned out that my VersaMark stamp pad was a little dry. I looked for my refill and couldn’t find it. Instead, I pulled the Crystal Detail from my refill drawer. That was a nice surprise! It’s been a while since I’ve used it, but I enjoyed scattering this amazing “liquid glitter” on the trees. It’s hard to see in the photo, but the tree branches do sparkle!
I will definitely add the VersaMark Refill to my next order, or maybe just treat myself to a new pad. I’m happy to have made this little discovery. I’m sure I have many more surprises in my craft room. It’s probably time to get into some of the nooks and crannies I have in here to see what other source of amazement I can find.
So, go into that drawer you haven’t opened in a while. There may be a sparkled surprise or two in there for you!
ENJOY FREE SHIPPING THURSDAY, DECEMBER 14TH. GET READY FOR THIS ONE-DAY SPECIAL.
December Host Code – UGVBTBBE
December Monthly Free Customer Card Kit
During the month of December, with a minimum product purchse of $50.00 from my Online Store, you will receive all of the supplies to create these two cards as I’ve designed them, along with a PDF Tutorial.
You will need your favorite adhesive and sentiment stamp.
To receive this FREE Card Kit, you must use the Host Code above when placing your order.
If your order is $150.00 or more, please don’t use the Host Code. You will receive Stampin’ Rewards directly from Stampin’ Up!, and you will also receive the FREE Card Kit.
Last Chance Product List
September – December Catalog Product Carty Over List
You can easily access all of the products by going to my Online Stors and clicking “Last Chance Products”. There, you will see the products, a description, and the discounted price, if applicable.
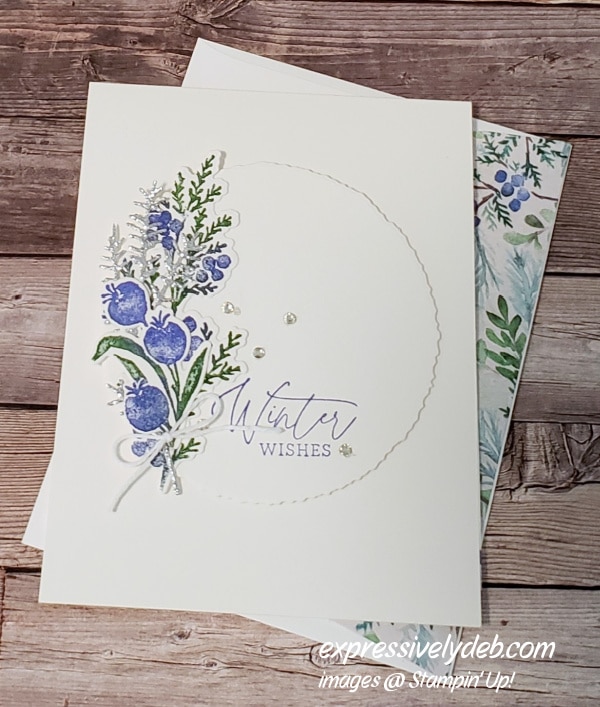
My subtle CAS card was inspired by a pattern from the Winter Meadow Designer Series Paper pack. The Winter Meadow Suite is on page 36 in the September-December 2023 Mini Catalog. It sparkles with elegance.
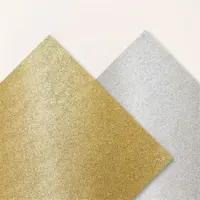
In this design, I wanted the stamped and die cut focal point cluster to get the attantion. For this reason, I kept the design clean. When I looked at the patterned paper color combination, I saw Orchid Oasis, so I went with it. The Orchid Oasis/Garden Green combination works well together. I added some silver sparkle to the element cluster with a die cut and the Silver Adnesive Backed Glimmer Paper. Some scattered Rhinestone Basic Jewels added even more sparkle!
Parts & Pieces
The Basic White thick cardstock card base is 4 1/4″ x 11″, scored at 5 1/2″.
I used the 3 1/2″ diameter Deckled Circle die and Basic White cardstock to createt the Focal Point layer.
Mini Glue Dots made is easy to attach the stamped and die cut elements to the circle.
The Silver Glimmer Paper die cut had its own adhesive on the back. This made it very easy to attach this ultra fine die to the focal point cluster.
I used a sponge dauber and ink to add both colors to the stamped elements.
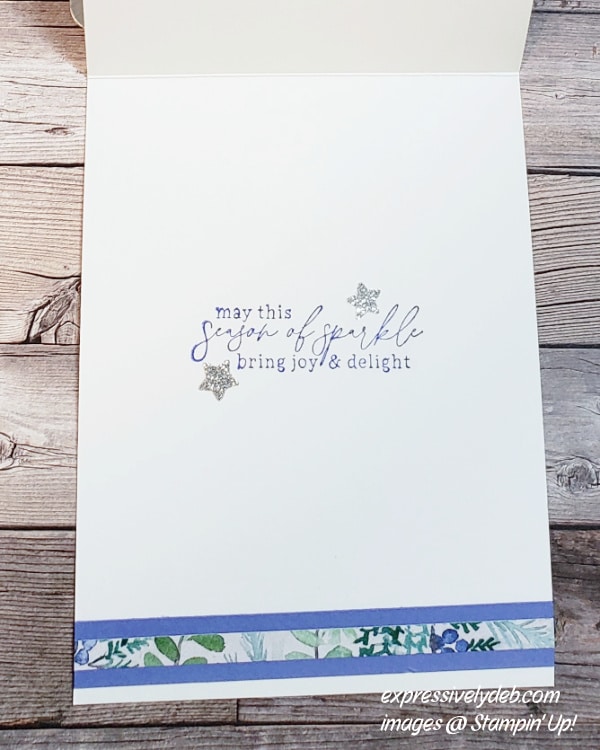
I stamped the sentiment with Orchid Oasis ink.
The circle is attached to the card front with Dimensionals.
A simple white Baker’s Twine bow finished this design.
I added a stamped sentiment, a few Glimmer Paper punched stars, and a cardstock and patterned paper strip to the inside of the card.
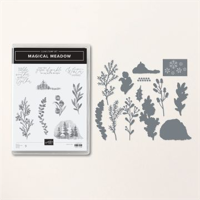
What I loved most about putting this card together was building the floral cluster. The Magical Meadow stamp set is “Distinktive”, making the etched images so realistic.
So, let some pretty patterned paper be your inspiration, coordinate a few elements, add some sparkle and create a “Winter Wishes” card to share!
Beginning tomorrow, October 9th through Wednesday, October 11th, you will receive FREE SHIPPING on all orders of $75 or more. This incredible deal lasts for three days only, so don’t miss out!
October Mini Customer Card Kit
oCTOBER hOST cODE CFWTTJ6D
The Ocrober Mini Card Kit features “Autumn Leaves”. You will receive the Kits with a minimum product purchase of $35.00 from my online store using the Host Code CFWTTJ6D. Each Mini Kit includes:
The cut cardstock and patterned paper to complete both cards, sentiment layers, embellishments, envelopes, a printed and emailed PDF Tutorial. A video link will be emailed to you so you can complete these designs along with me at your leisure.
Hello! I wish you a happy day! I’m truly thankful you stopped by. Today’s card is my second Sneak Peek of the Autumn Leaves Dies. They’re part of the All About Autumn Product Suite I showcased in my last post. You can see the entire Suite Collection here.
In the Autumn Leaves Dies, there are two dies that I refer to as “filler dies”. These dies will give you a cut embossed look and add amazing texture to the simplest of projects. I thought I would show you how I used them in today’s post.
Today’s Card Pieces & Parts
There isn’t much to this CAS card. (CAS is an acronym for Clean And Simple). There’s lots of white space on this design, and few layers and embellishments. It meets all of the “CAS” qualifications.
Take a look at the left side of the Very Vanilla layer in the photo above.
I created a textured design using two of he dies from the Augumn Leaves Dies.
I placed the longer die along the left edge of the card layer, then placed the smaller die along the right edge of the long die about an inch down from the top. With both dies secured to the layer using low tack tape, I ran it through my die cutting machine.
Next, using the smaller die, I repeated the same process as above, making sure the bottom of the die was about an inch from the bottom of the longer die cut edge.
I wanted a little more texture in the center of my layer, so I placed the smaller die on the edge of the last “row” and centered it.
I created a pattern of texture that would anchor the die cut leaves.
You can come up with your own design for these dies, and know that they are fun to use and will surely spark your creativity.
The leaves are die cut using the small leaf dies. I used the All About Autumn foiled Designer Series Paper to die cut the leaves.
All of the product I used to make this card are from the All About Autumn Suite. It will be available for customers on September 6th with the launch of the new September-December, 2023 Mini Catalog.
So, cut a card base layer, add some amazing texture, a few elements and an embellishment or two, and create something Clean and Simple.
From August 1st through August 31st, you can take advantage of up to 30% off Stampin’ Up!’s Kit Collection.
August Free Card Kit
You will receive the supplies to assemble these cards above. Along with the cardstock, Designer Series Paper, elements, and embellishments, you will receive a PDF Tutorial with detailed instructions, and a video link to assemble the cards along with me.
For the month of August, there’s no minimum purchase required. You will receive this gift from me with any order you place. Remember, August is the time to redeem your Bonus Days Coupons!
Here’s some Clean & Simple weekend inspiration for you.
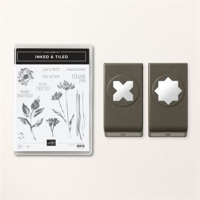
The Inked & Tiled Bundle was still on my craft table when I sat down to make a card for my weekend post. I decided to create a CAS card (Clean And Simple) with the images from the stamp set. Of course, Wild Wheat had to be in the mix. I imagined it with the leaf spray image. It’s an amazing color. I paired it with Moody Mauve and Gray Granite.
Gray Granite softened the look of the card and I wanted a clean look.
Today’s Card Pieces & Parts
Take a look at the image above. I punched the sentiment banner using the Inked & Tiled Punch. The sentiment is stamped with Gray Granite ink. Once stamped, I cut the ends off the punched image and created the sentiment banner. It’s size worked so well for a Clean and Simple sentiment.
I cut a Basic White top fold card base 4 1/4″ x 11″, scored at 5 1/2″.
The offset Wild Wheat cardstock layer is 3 1/4″ x 5 1/4″.
I cut the top Basic White stamped layer 3 3/4″ x 5″.
The ssentiment is attached with Mini Dimensionals.
I formed a bow using Gray Granite Baker’s Twine.
A few 2023-2025 In Color Dots finished the card.
A CAS card is Clean And Simple – It has lots of white space, minimal or no layers and minimal embellishments. I love to create with layers, and love to add lots of elements to my cards, but to me, a CAS card is always eye=catching. This quick and easy design can take you to many of the stamps you already have. So, remember…
From now through May 16th, with a minimum product purchase of $50.00 (before shipping and tax), you will receive a FREE pack of the Tinsel Gems Four Pack. You must use the Host Code below. You will also receive your Creative Coins for each $50 order increment before shipping and tax.
Tinsel Gems Four Pack
May, 2023 HOST CODE IS QCYTPDXD
If your order is under $150.00, please use the Host Code above when prompted. You will receive Rewards from me (for oreders of $50.00 or more before shipping and tax), along with your gift from me featured this month. If your order is over $150.00 (before shipping and tax), please do not use the Host Code. You will receive Stampin’ Rewards directly from Stampin’ Up!. You will also receive Creative Coins and the featured FREE gift from me. You can get all of my Customer Rewards Program details by clicking here.
I am Debbie Crowley and welcome to my blog. Here you'll find fun projects that are sure to inspire you. I hope you'll stop
by often and leave a comment or two. To contact me, you can email me at: expressivelydeb@gmail.com
Current Catalogs
What are you looking for?
The content of this blog is the sole responsibility of Debra Crowley, expressively deb.com, as an Independent Stampin' Up! Demonstrator. The use of and content of classes, services or products offered is not endorsed by Stampin' Up!