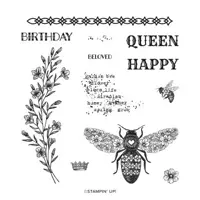
Today’s card is a CAS/SIP Card! CAS is an acronym for Clean and Simple, and SIP is an acronym for Stamps, Ink and Paper. A Clean and Simple card is one that has lots of white space, minimal layers, and little or no embellishments. I created this design with nothing more than ink stamped onto cardstock. Of course, the beautiful images in the Queen Bee stamp set helped a lot!
Today’s Card Parts & Pieces
I cut a Basic White card base 11″ x 4 1/4″‘ and scored at 5 1/2″.
I die cut the top Basic White layer using one of my Deckled Rectangle Dies. The layer measures about 3″ x 4 1/4″.
On the die cut layer, I stamped the images as follows:
With Crumb Cake ink and the “type print” image, I stamped off once onto the bottom right of the card layer, then stamped off once directly in the center of the card layer, then stamped again onto the top left corner of the layer.
I stamped the large Mango Melody flower image directly over the Crumb Cake images.
Then I stamped the bee image with Starry Sky ink as shown over the Crumb Cake and Mango Melody images.
Next, I stamped the crown with Rich Razzleberry ink at the top left of the bee.
Then, I stamped the Parakeet Party flower on the right side of the bee.
I stamped the sentiment with Crumb Cake ink.
For a little interest and to highlight the deckled edge on the layer, I added a little Starry Sky ink to the edges with a Sponge Dauber.
Finally, I shaded the bee’s heart with a Light Parakeet Party Blend.
The top layer is adhered to the card base with Dimensionals.
This is such a quick and easy card to create, and it was refreshing to just stamp ink to paper.
So, our Queen Bee is back. Get your stamps, stamp the images on a cardstock layer and create a Clean Vintage card just to say “Hello”.
March Mini Card Kit With Bonus Insert Fun Fold Card (Center)
From now through March 31st, with a product purchase of $50.00 (before shipping and tax), you will receive a FREE Mini Card Kit along with a Video Tutorial link and Project Sheet so you can assemble the cards with me. The card bases, layers and elements are all included. You add your sentiment, and supply your favorite adhesive. This Mini Card Kit uses the Dandy Designs DSP. There’s a Fun Fold Bomus this month. I added a third card (in the center of the photo). It’s a quick and easy insert card. You can wtire your message and attach a gift card to the insert. They’re all quick, easy and fun to put together.
March HOST CODE – NTRWBBCT
If your order is $50.00 (before shipping and tax), please use the Host Code above when prompted. You will receive Rewards from me along with the Mini Card Kit featured this month. If your order is over $150.00 (before shipping and tax), please do not use the Host Code. You will receive Stampin’ Rewards. You will also receive Creative Coins and the FREE Mini Card Kit from me.
Online Exclusives
Don’t forget to check in on the current Online Exclusives. You can click the images below to see the new products.
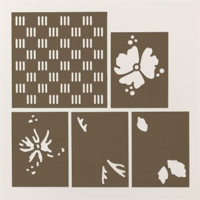
Today’s post is about using layering color to create beautiful images. This “masking technique” is done with the Loveliest Layers Decorative Masks. I thought the “masked” flower would be a perfect focal point for a Mini Slimline card. I put together a PDF Tutorial you can print to help you navigate this technique. You can find the Tutorial at the end of this post.
By the way, the Loveliest Layers Decorative Masks are FEEE for the month of February with a $50 product purchase.
You would be surprised at how quick and easy it is to create this pretty masked flower, and highlight it with the stenciled background. You can get the product details for these masks in the product description below.
Today’s Card Pieces And Parts
I cut a 7″ square using Thick Basic White cardstock, and scored at 3 1/2″.
This size card fits perfectly into a Monarch envelope. I got mine on Amazon.
I used the basket weave stencil (positioned horizontally), Pool Party ink, and a Blending Brush to create the background on the front of the card base.
On a separate piece of Basic White cardstock, I used the flower base mask, Petal Pink ink, and a Blending Brush.
The shading in the flower is done using the top flower mask, Calypso Coral ink, and a Blending Brush.
On a second piece of Basic White cardstock, I masked the leaves using Soft Sea Foam and Old Olive ink.
I fussy cut the flower and leaves.
I attached some Pool Party 3/8″ Grosgrain Ribbon to the right side of the card front, then adhered the flower with Dimensionals.
The leaves are attached with glue and tucked under the flower.
I stamped the sentiment with Calypso Coral ink onto a 1/2″ x 3 1/2″ strip of white cardstock and turked it under the flower on top of the ribbon.
The Inside Story
The sentiment (from the Something Fancy stamp set) is stamped with Calypso Coral ink.
The strip across the bottom is 1/2″ x 6″.
The little heart is punched and attached with glue.
You can download the PDF Tutorial for this card by clicking the button below.
From now through February 28th, with a product purchase of $50.00 (before shipping and tax), you will receive a FREE Mini Card Kit along with a Video Tutorial link and Project Sheet to help you assemble the cards. The card bases, layers and elements are all included. You add your sentiments and assemble.
February Host Code YPA4DXBJ
If your order is $50.00 (before shipping and tax), please use the Host Code above when prompted. You will receive Rewards from me along with the Mini Card Kit featured above. If your order is over $150.00 (before shipping and tax), please do not use the Host Code. You will receive Stampin’ Rewards. You will also receive Creative Coins and the FREE Mini Card Kit from me.
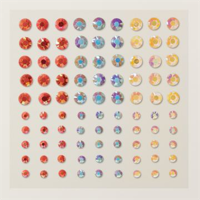
“CAS” is an acronym for Clean And Simple. A clean and simple card design has certain criteria – lots of white space, few or no layers, and little or no embellishments. I may hvae gone a little over the top with my sparkling sequins, but don’t you think a pretty rainbow in the clouds should sparkle and shine?
I’m showcasing the Covered In Sunshine stamp set. I’ve never posted a “favorites” list here, though I must tell you that this stamp set was absolutely at the top of my favorites. And, it was Stampin’ Up!’s version of this card that caught my eye. My CASE (an acronym for “copy and selectively edit”) is on page 37 in the January-April Mini Catalog.
Today’s Card Parts & Pieces
I cut a Basic White card base 5 1/2″ x 8 /2″ and scored at 4 1/4″.
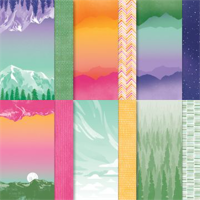
The cloud pattern Designer Series Paper layer is from the Enjoy The Journey DSP pack.
I cut the patterned paper layer 4 3/4″ x 3 1/2″.
The rainbow sentiment is stamped with Tuxedo Black Memento ink.
Using the brush tip on my Stampin’ Blends, I shaded over each of the sentiment lines.
I stamped the sun with Pumpkin Pie ink and shaded the inside with a Dark So Saffron Blend.
Originally, I didn’t add a layer under the top layer.
To give the top layer a little lifr, I added a thin Coastal Cabana mat leyer. This also draws attention to the Coastal Cabana sky.
The Coastal Cabana mat layer is a “smidgen” larger than 4 3/4″ x 3 1/2″.
“Smoidgen” means “just a little”.
I scattered a few of the white sequins from my Adhesive Backed Seasonal Sequins for some subtle sparkle.
So, take a look at the Covered In Sunshine stamp set, put it on your Wish List and think about what colors your rainbow would be.
From now until January 31st, for a minimum product purchase of $50.00 (before shipping and tas), , you will receive a FREE Mini Card Kit along with a Video Tutorial link and Project Sheet to help you assemble the cards. The card bases, layers and elements are all included. You add your sentiments and assemble.
FREE Mini Card Kit
January Host Code: YZ7RBPBF
If your order is $50.00 (before shipping and tax), please use the Host Code above when prompted. You will receive Rewards from me along with the Mini Card Kit featured above. If your order is over $150.00 (before shipping and tax), please do not use the Host Code. You will receive Stampin’ Rewards. You will also receive Creative Coins and the FREE Mini Card Kit from me.
This past week, I took time to finish my holiday cards and get my home ready for the holidays. This is always a fun time of year for me. It feels good to be caught up with everything on my list. I’m looking forward to sharing the holidays with my family and friends.
Today’s card is on its way to a special friend who gave me an opportunity to attend a weekend crop, and host card making classes at the event. It’s in January, so I’ll be able to have fun with some of the new products coming out on January 5th. Yay!
Today’s Card Pieces And Parts
I cut a Basic White card base 4 1/4″ x 11″ and scored it at 5 1/2″.
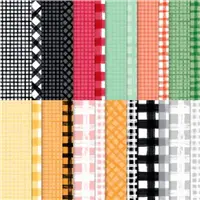
The Gingham Cottage DSP layer is 4 1/4″ x 5 1/2″ and covers the card front.
The die cut Basic White center layer is 3 1/2″ x 4 3/4″.
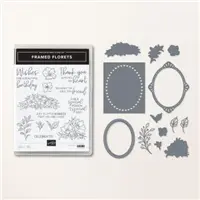
I used one of the Framed Florets oval dies to die cut the center of this layer. It’s attached to the center of the card front.
I die cut two oval frames, glued them together and attached the frame around the die cut oval.
The Evening Evergreen and Basic White die cut leaf sprays are attached to the oval frame with glue.
I stamped the sentiment with Evening Evergreen ink onto a Basic White 2 1/2″ x 7/8″ strip of cardstock.
The silver Glimmer Paper strip is 2″ x 1/2″. It’s glued under the sentiment strip.
I used a small circle and a small heart punch to punch the embellishments.
So, find some clean and simple patterned paper, add an oval frame, a few leaf sprays, and create a special thank you for a special friend.
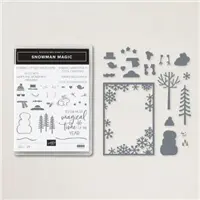
Today’s card has lots of clean texture made possible with the Snowman Magic Bundle. One pass through my due cutting machine gave me this beautiful, snowflake edged frame. I added a few “snowdrifts” to the back of the frame, die cut two trees, and stamped a little house (from the Ringed With Nature stamp set).
It’s that time of year when I enjoy mixing and matching my dies and stamp sets. This habit helps me create unique card designs that I love to share. I hope this inspires you to take a look at your holiday stamps, paper and dies and mix and match elements. Iguarantee you’ll be pleasantly surprised with your outcome.
Today’s Card Pieces And Parts
This is a simple card to put together and looks as though it isn’t!
I cut a Basic White card base 5 1/2″ x 8 1/2″ and scored it at 4 1/4″. I call this a “tent fold” card.
With a more Basic White cardstock, I cut two “snow drifts”, making sure the bottom edges were straight edges and they are a little longer than the width of the snowflake frame. The frame is about 4 1/2″ wide. I also cut one deeper than the other.
The snowflake frame is die cut with Basic White Thick cardstock.
I die cut one tree using Basic White cardstock and another with Mossy Meadow cardstock.
I stamped the house with Crumb Cake and Cherry Cobbler ink and fussy cut it.
Turning the frame on the reverse side, adhere the narrow snow drift to the bottom of the frame, then adhere the deeper one to the back of the narrow snow drift. Be sure to glue only the bottom of the snow drifts.
Adhere the house behind the snow drift as shown, then attach the trees in between the snow drifts as shown.
I added some Wink of Stella to the snowdrifts, and a few Rhinestone Bassic Jewels for more sparkle.
I stamped the inside with a sentiment from the Snowman Magic stamp set and Cherry Cobbler ink.
So, pull out your Snowflake Magic Bundle, cut a frame and a few trees, add a stamped house, a couple of snow drifts, and create a clean and simple hand made gift with lots of texture!
I am Debbie Crowley and welcome to my blog. Here you'll find fun projects that are sure to inspire you. I hope you'll stop
by often and leave a comment or two. To contact me, you can email me at: expressivelydeb@gmail.com
Current Catalogs
What are you looking for?
The content of this blog is the sole responsibility of Debra Crowley, expressively deb.com, as an Independent Stampin' Up! Demonstrator. The use of and content of classes, services or products offered is not endorsed by Stampin' Up!