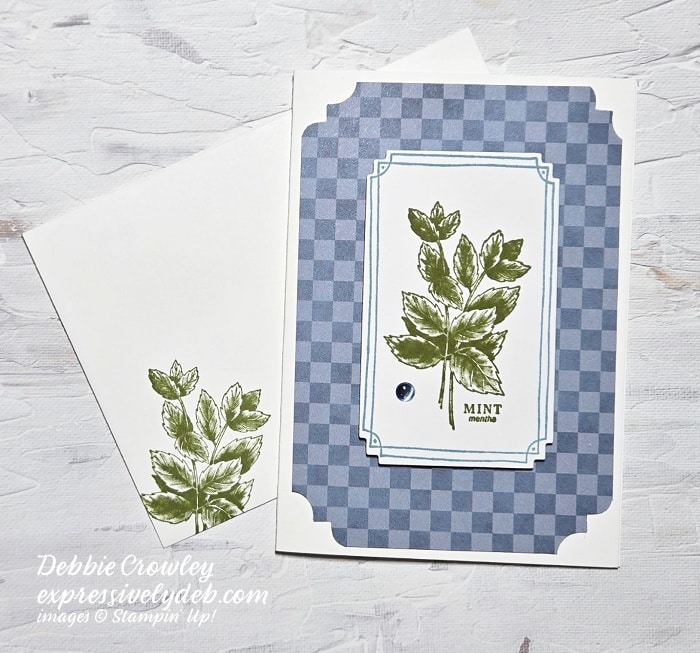
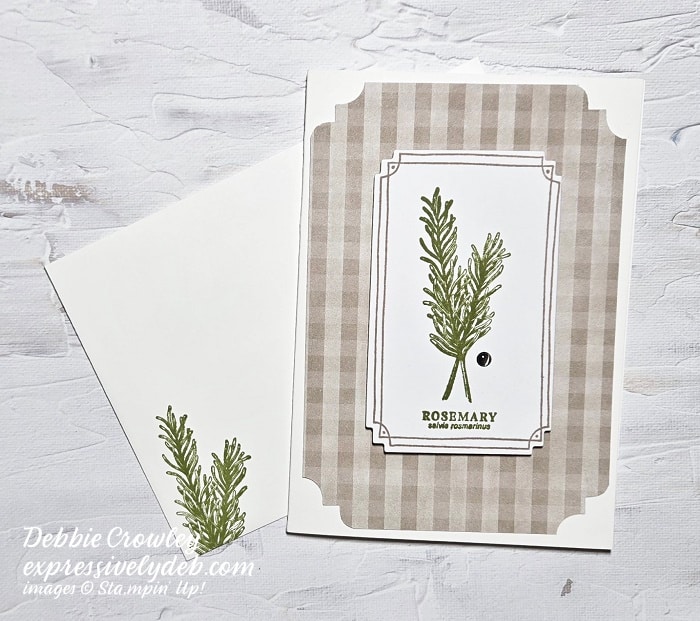
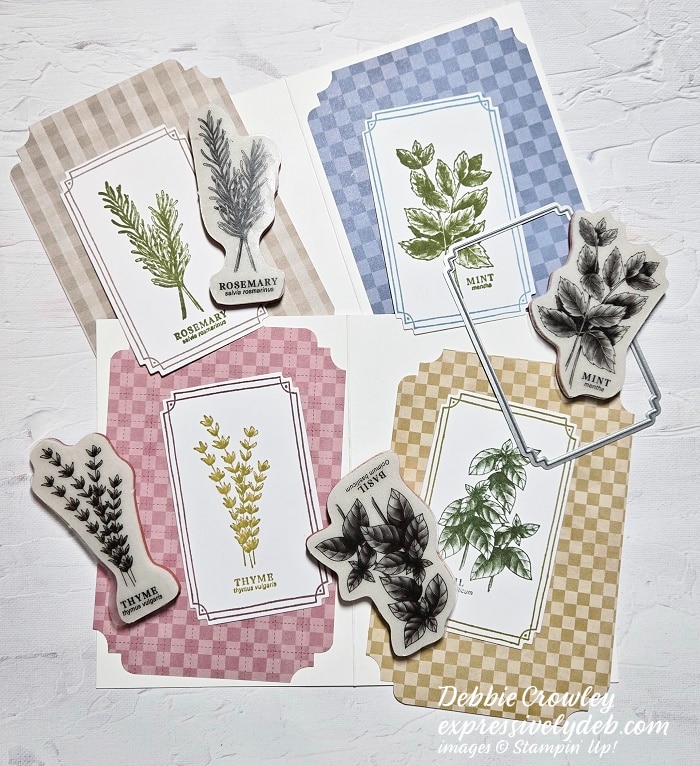
I put together a quick and easy set of four note cards using the new Grow With Love Bundle. It’s one of the new Bundles featured in the Online Exclusives. There’s so much you can do with these pretty herb-themed stamped images. While my first thought was to create a simple note card, one little card turned into a set of four. Once you start stamping these pretty images, you will want to keep going.
Notice the stamped frame that outlines each image. It’s one of the stamps. The Grow With Love Dies has a coordinating die that cuts the entire layer.
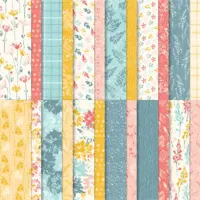
Having four cards is a great way to showcase the beautifully detailed images in the stamp set, as well as the classic checked paterned paper from the Timeless Plaid 6″ x 6″ Designer Series Paper. It’s in the new Spring Mini Catalog on page 25. This one’s a definite “must have”.
As you can see, I added a little sentiment to the card above, and stamped coordinating images on each of the envelopes.
Let’s Make Some Note Cards
I used the Basic White 3 1/2″ x 5″ Note Cards & Envelopes.
Each of the patterned paper layers is 3 1/4″ x 4 3/4″.
I used one of my Trio Punches to punch the corners of the patterned paper.
The herb images and frames are stamped on Basic White cardstock and cut with the coordinating frame die.
I attached the stamped layer to the card front with Dimensionals.
I know you will enjoy creating these Note Cards. They would make a thoughtful gift to someone special.
You can click on the image below to see Stampin’ Up!’s entire Kits Collection.
January. 2025 Customer Mini Card Kit
The cards are showcasing the Regal Flora Designer Series Paper. One is a popular Fun Fold design, and the second is a quick and easy design you can use for any occasion.
Below are the Kit details:
This card kit will be available through January 31st, 2025.
You will receive everything you need to put the cards together as I’ve designed them except for adhesives.
The Kit will include the card bases, layers, die cuts, embellishments, sentiment layers, and envelopes.
I cannot send stamped images, but you will have a sentiment layer you can customize to a stamp you have.
You will also receive a printed PDF Tutorial, along with a video link so you can put the cards together with me.
You will automatically receive this Kit with a minimum product purchase of $50.00 through my online store.
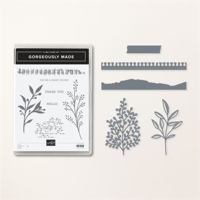
One of my favorite Bundles is on the Last Chance List. The Gorgeously Made Bundle will be off the shelf as of Ap;ril 30th. It has everything you need to create beautiful cards and projects. There are large element dies, a notebook edged die, and you can even get a torn paper look with a special die. There’s only one sentiment layer die, but it’s sized for most sentiments.
The Gorgeously Made stamp set includes two background stamps, large floral focal point stamps, and three clean and simple sentiments.
If the Gorgeously Made Bundle has been on your radar, add it to your wish list. It’s available until April 30th or while supplies last.
So, let’s make a card!
Parts & Pieces
The Parakeet Party (retiring color as of April 30th), cardstock card base is 4 1/4″ x 11″, scored at 5 1/2″ on the long side.
The Masterfully Made Designer Series Paper layer is 4″ x 5 1/4″. (It’s retiring as of April 30th).
I marked the top of the DSP layer at 1 1/4″ from the left side, and put a pencil mark at 1 3/4″ down from the top on the right side.
Align the two pencil marks in the paper trimmer and score on the diagonal from pencil mark to pencil mark.
I folded the corner down toward the center of the card and adhered the folded corner to the layer.
I cut a Parakeet Party cardstock layer 1 1/2″ x 2 3/4″.
To create the triangle, I cut the cardstock layer on the diagonal from point to point. (This piece should fit into the folded triangle at the top of your patterned paper layer).
Attach the patterned paper layer to the card base.
Stamp and attach your sentiment as shown.
Die cut a Parakeet Party cardstock element from the Gorgeously Made Dies, snip it to the size you want and attach it under the sentiment layer.
Embellish your beautiful card.
So, pick out a beright, bold patterned paper, fold down the corner, attach it to a cardstock card base, and create a Gorgeously Made masterpiece to share with a friend.
I thought I would take a look at the current January – April Mini Catalog to get inspiraion for today’s card. Inspiration came as soon as I saw the card on page 40 of the Mini Catalog.
I changed the base color of the card, but the color combination is what inspired me. Calypso Coral paired with Pebbled Path and Granny Apple Green, along with lots of white space, is striking. I liked it and hope you do, as well.
There are two predominant neutral colors in this card. Adding two bright colors to the neutrals, especially in the card focal point, will always work well.
Take a look at these color combinations, and imagine them on this card design.
So, my alternate color combination for this design is Sweet Sorbet, Pebbled Path, and Pretty Peacock. What’s yours? I think any one of these combinations would be a fun alternative to today’s card.
So, fina some great inspiration, switch up the colors, and create your unique design.
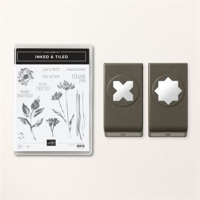
Here’s a simple card design that I used to showcase the Inked & Tiled Bundle and the Inked Botanicals Designer Series Paper.
The plaid background pattern is so subtle, I thought it would work well to cover the entire card front. I mixed the Inked & Tiled Bundle with the Countryside Corners Dies, inked up a Basic White die cut layer and attached the entire frame with Dimensionals. This is quick and easy to put together, and I enjoyed mixing Crushed Curry with Lost Lagoon and Moody Mauve.
Today’s Card Parts &Pieces
The Thick Basic White cardstock card base is cut 5 1/2″ x 8 1/2″ and scored at 4 1/4″.
The plaid Designer Series Paper is 4 1/4″ x 5 1/2″ and covers the card front.
I die cut the Crushed Curry cardstock frame using two of the Countryside Corners Dies. The outside frame dimensions are approximately 2 5/8″ x 4″. You can also create a frame with Rectangle Dies.
The Basic White layer inside the frame is die cut with a die from the Countryside Corners Dies. This layer measures approximately 1 3/4″ x 3 5/8″,
I used Sponge Daubers to add ink to the large botanical stamp from the Inked & Tiled stamp set. You can also use Stampin’ Write Markers to get the same result.
The little background images are stamped off once. This is also a stamp from the stamp set.
The sentiment is stamped with Lost Lagoon ink and punched with the “cross” punch from the Inked & Tiled Bundle. Once I punched the sentiment, I trimmed of the top and bottom of the “cross” shape. It’s also attached with a Dimensional.
I embellished with a few 2023-2025 Moody Mauve In Color Dots.
So, find a subtle Designer Series Paper pattern, die cut a frame, stamp a few pretty botanicals, and create a quick and easy card to send a sweet note!
From July 1st through July 31st, with a minimum product purchase of $40.00 (before shipping and tax), you will receive my festured FREE Mini Card Kit along with a Video Tutorial link and Project Sheet so you can assemble the cards with me. The card bases, layers and elements are all included. You add your sentiment, and supply your favorite adhesive. July’s Mini Card Kit features the Gorgeously Made Designer Series Paper and Dies. I look foreard to creating these cards with you!
New Online Exclusives Are Here!
Click This Image To Download The Flyer
Bonus Days During July
Click the image above for Bonus Days Details.
Clearance Rack Refresh
The Clearance Rack Refresh includes past holiday themed Bundles. Don’t hesitate, they go fast. Take advantage of the Bonus Days Coupons and my FREE Card Kit of the Month.
Click the image abopve to go to the Clearance Rack Refresh
Here’s some Clean & Simple weekend inspiration for you.
The Inked & Tiled Bundle was still on my craft table when I sat down to make a card for my weekend post. I decided to create a CAS card (Clean And Simple) with the images from the stamp set. Of course, Wild Wheat had to be in the mix. I imagined it with the leaf spray image. It’s an amazing color. I paired it with Moody Mauve and Gray Granite.
Gray Granite softened the look of the card and I wanted a clean look.
Today’s Card Pieces & Parts
Take a look at the image above. I punched the sentiment banner using the Inked & Tiled Punch. The sentiment is stamped with Gray Granite ink. Once stamped, I cut the ends off the punched image and created the sentiment banner. It’s size worked so well for a Clean and Simple sentiment.
I cut a Basic White top fold card base 4 1/4″ x 11″, scored at 5 1/2″.
The offset Wild Wheat cardstock layer is 3 1/4″ x 5 1/4″.
I cut the top Basic White stamped layer 3 3/4″ x 5″.
The ssentiment is attached with Mini Dimensionals.
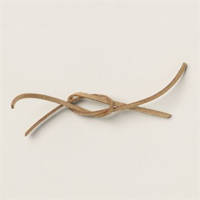
I formed a bow using Gray Granite Baker’s Twine.
A few 2023-2025 In Color Dots finished the card.
A CAS card is Clean And Simple – It has lots of white space, minimal or no layers and minimal embellishments. I love to create with layers, and love to add lots of elements to my cards, but to me, a CAS card is always eye=catching. This quick and easy design can take you to many of the stamps you already have. So, remember…
From now through May 16th, with a minimum product purchase of $50.00 (before shipping and tax), you will receive a FREE pack of the Tinsel Gems Four Pack. You must use the Host Code below. You will also receive your Creative Coins for each $50 order increment before shipping and tax.
Tinsel Gems Four Pack
May, 2023 HOST CODE IS QCYTPDXD
If your order is under $150.00, please use the Host Code above when prompted. You will receive Rewards from me (for oreders of $50.00 or more before shipping and tax), along with your gift from me featured this month. If your order is over $150.00 (before shipping and tax), please do not use the Host Code. You will receive Stampin’ Rewards directly from Stampin’ Up!. You will also receive Creative Coins and the featured FREE gift from me. You can get all of my Customer Rewards Program details by clicking here.
I am Debbie Crowley and welcome to my blog. Here you'll find fun projects that are sure to inspire you. I hope you'll stop
by often and leave a comment or two. To contact me, you can email me at: expressivelydeb@gmail.com
Current Catalogs
What are you looking for?
The content of this blog is the sole responsibility of Debra Crowley, expressively deb.com, as an Independent Stampin' Up! Demonstrator. The use of and content of classes, services or products offered is not endorsed by Stampin' Up!