I’m still unpacking from this past weekend. Having much of my stamps, ink, and paper with me, I now have to put it all back in its place. The silver lining to this is that my craft room will be organized and ready to go. I’ll have lots of fresh inspiration for you. Stay tuned!
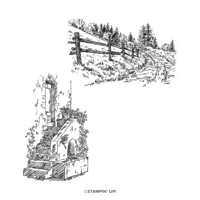
Lisa’s Watercolor Art
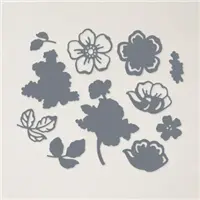
I think we have a watercolor artist in our Group! Lisa brought life to thhese beautiful, stamped country scenes using Watercolor Pencils and a Blender Pen. If you can keep a secret (and I know you can), this is my favorite way to add color to a stamped image. I also enjoy using ink and a Blender Pen. It’s not that I don’t absolutely love Stampin’ Blends (these are Stampin’ Up!’s alcohol markers). If you have a larger, linear stamped image, the Stampin’ Blends are the perfect answer. They provide smooth, even, blendable color to the image.
The “In The Country” stamp set is the perfect choice for watercolor pensils or ink, and a Blender Pen. This is one of the FREE stamp sets you can earn with a qualifying purchase during Sale-A-Bration. The stamped image without color would be beautiful, as well. Add a few mat layers to a white layer samped with black ink and you have a stunning card for a note card set, or add a frame and hang a small grouping on your wall.
Lisa definitely captured the essence of “country” with her warm toned, nature inspired layers and color choices. Both of these cards are beautiful. My favorite is the country hilltop scene. Which is your favorite?
Today’s Card Pieces and Parts
Lisa stamped each image onto Basic White cardstock using Memento Black ink.
The Deckled Rectangle Dies created her mat layers.
These dies are sized to cut a few perfectly spaced layers.
She added color with the Watercolor Pencils and shaded using a Blender Pen.
The Blender Pen contains a special solution that helps move the color (pencil or ink) to add darker or lighter shading, precisely where you want it, on a stamped image.
So, grab your watercolor pencils, a Blender Pen, some white cardstock and a fabulous “country” stamp. Attach a few layers, and create amazing personal art!
From now through January 31st, for a minimum product purchase of $50.00 (before shipping and tas), you will receive a FREE Mini Card Kit along with a Video Tutorial link and Project Sheet to help you assemble the cards. The card bases, layers and elements are all included. You add your sentiments and assemble.
FREE Mini Card Kit
January Host Code: YZ7RBPBF
If your order is $50.00 (before shipping and tax), please use the Host Code above when prompted. You will receive Rewards from me along with the Mini Card Kit featured above. If your order is over $150.00 (before shipping and tax), please do not use the Host Code. You will receive Stampin’ Rewards. You will also receive Creative Coins and the FREE Mini Card Kit from me.
It’s been quite a week. I spent the weekend of World Cardmaking Day on a road trip with my daughter, son, and his significant other. It was wonderful to spend time with them. This past week, I prepared projects for my Team, and hosted a World Cardmaking Day event at my home. Bertter late than not at all, right? Today’s card is one of the projects we put together.
Today’s Card Parts And Pieces
This is without a doubt one of my favotire quick and easy Fun Fold designs. It’s been around for a while. In essence, it turns an A-2 size card into a 4 1/4″ square. You can have loads of fun deciding what to add to your squared design surface. There are so many images and dies that could work beautifully.
The Quick “How-To”
The Real Red card base is 4 1/4″ x 11″, scored at 4 1/4″ and 5 1/2″.
Fold the card base in half at the 5 1/2″ score line.
The front of the card has the second score line. With the scored part of the card base in front of you, fold the flap to the left.
Add Multipurpose Glue to the inside of the 1 1/4″ section to create the “book binding” on the left side.
The front card base flap that opens will be a 4 1/4″ square.
Cut three Basic White layers: One 4 1/8″ square for the card front mat layer, ome 4″ square for the inside writing layer, and one 1 1/8″ x 4 1/8″ layer for the front left side panel mat layer.
The Gingham Cottage Designer Series Paper card front large layer is a 4″ square.
The Designer Series Paper card front left panel layer is 4″ x 1″.
Adhere the layers to the card front as shown.
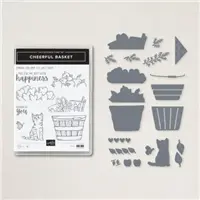
I stamped the basket with Early Espresso ink and shaded the edges with a Blender Pen.
I stamped the apples with Early Espresso ink and colored them with Stampin’ Blends.
The hearts, basket, napkin, bushel handle, and apple are die cuts using the coordinating Full Basket Dies.
They’re attached to the card front with Dimensionals.
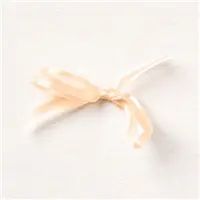
I used the 2022-2024 In Color Baker’s Twine in Sweet Sorbet to add a little something to the card seam.
It’s wrapped around the card three times and tied in a bow in the front.
So, fill an adorable bushel with a mix of apples, add a few hearts and create a simple “just a note” for Fall.
Hey there, happy Wednesday! We finally got a full day of steady rain here in NJ. It was wonderful to see. The trees are standing much taller. They’re happy, as well. At least I think so.
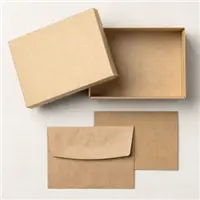
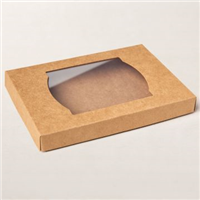
I’m showcasing the Kraft Note Cards and Envelopes today. They’re one of this week’s “Weekly Deals” and today is the last day to get them at the “Deal” discount. There are 20, 3 1/2″ x 5″ note cards and envelopes, along with a coordinating note card (or anything) gift box.
The box is sturdy, easily assembled, and needs no adhesive. The finished size measures 4″ x 5 1/2″. I filled the box with 8 note cards and envelopes, and they fit nicely. You can probably put up to 10 finished cards with the envelopes, add a little tissue paper and you would have a beautiful handmade gift for someone special.
Today’s Cards’ Pieces And Parts
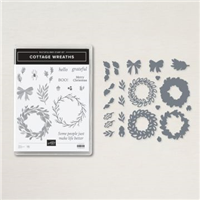
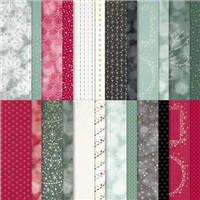
I wanted to make a themed gift box of holiday cards, so I set out to do it with the Kraft Note Cards, Cottage Wreath Bundle and Lights Aglow 6″ x 6″ Designer Series Paper. I’m including two of my card designs in today’s post. The colors I’m using are Cherry Cobbler, Very Vanilla and Evening Evergreen. Each of the cards has the same sentiment and stamped image on the inside. There’s matching Designer Series Paper on the envelope flap and a stamped image on the envelope front.
Each card has a wreath design. I embellished the wreaths with a bow and Basic Pearls that I colored with a Dark Cherry Cobbler Stampin’ Blend. This is a quick process. They dry quickly, but I colored the pearls before I attached the wreath elements to the cards. This assured me the pearls were dry.
I attached the stamped and die cut wreaths with Dimensionals. The sentiments are stamped with Early Espresso ink.
I’m not sure how long I’ve had this ribbon. It’s a Cherry Cobbler 3/8″ ribbon. I thought it looked nice with the Kraft box. Lesson learned… I have to label my ribbon!
So, at the Weekly Deal price, get yourself two or three Kraft Note Card Sets, add a few pretty wreaths, a sentiment or two and create a beautiful and thoughtful gift for the holidays!
In yesterday’s post, I showcased these 3″ x 3″ note cards with the matching gift box and promised a printable PDF tutorial for you today. You can click on the button below to download the tutorial.
This was an easy project that I completed using the new Garden Birdhouses stamp set featuring all of Stampin’ Up!’s new In Colors. I hope you enjoy the tutorial and as always, if you have any questions, please reach out to me.
So, spend some “happy” time in your craft space and create a pretty note card set to give to a special friend.
Hello, welcome to the Stampin’ Pretty Pals’ Blog Hop! This month our Design Team’s theme is “2021-2023 New In-Colors.” We hope you enjoy and will be inspired by them! Don’t forget to leave comments because we love hearing from you. Then, at the end of my post, you will find the full line-up to help you “hop” along from Pal to Pal.
Our new In Colors are amazing and complement our other color groups beautifully. Along with each of the new In Colors, I’m featuring the new Garden Birdhouses stamp set. I’ll have more posts showcasing this stamp set, so be sure to check back.
My project is a 3″ x 3″ note card set with a matching stamped gift box. I did a lot of stamping for today’s post and used my acrylic blocks. The stamps are photoplymer so that made it easy, but I have to say that I haven’t stamped with an acrylic block in a while. I enjoyed it! Did you ever think about how we stamped images and sentiments before we had the Stamparatus? I did use my Stamparatus for the sentiments.
The matching gift box is also stamped. It’s a simple pattern cut with Thick Basic White Card Stock. I think these stamped images are so pretty. They’re stamped with Evening Evergreen ink and the flowers are colored with Polished Pink Blends. The box holds 4 note cards and matching envelopes very nicely.
I colored some White Crinkled Seam Binding with my Dark Polished Pink Blend. It was a quick process using the brush tip of the Blend and the ribbon dries almost immediately. The tags are die cuts from the new Tailor Made Tags Dies. They’re “no frills” and cute and I’m sure you’ll be seeing a lot more of them.
I’m planning to have a full PDF tutorial for you in tomorrow’s post. It’ll include the note card and box dimensions along with pictures. I think you’ll enjoy making this quick and easy box.
Below is an In Color swatch graphic you can save. I keep all of them in a separate file. They help with quick color inspiration for projects.
So, pull out everything In Colors, cut a few layers, add a birdhouse and matching gift box and surprise a special friend!
…the only limitation is your imagination.
More inspiration awaits! Use the Blog Hop Line-up below to visit the rest of this month’s Design Team. My fellow Pals are excited to show you what they’ve created! Mark your calendars for our next blog hop on June 9th with “Fun Ways to Use Your Stampin’ Up! Products.” Participants showcase at least one of their favorite product tips. Don’t miss the fun! Until then, please stay safe and have fun in your craft space.
I am Debbie Crowley and welcome to my blog. Here you'll find fun projects that are sure to inspire you. I hope you'll stop
by often and leave a comment or two. To contact me, you can email me at: expressivelydeb@gmail.com
Current Catalogs
What are you looking for?
The content of this blog is the sole responsibility of Debra Crowley, expressively deb.com, as an Independent Stampin' Up! Demonstrator. The use of and content of classes, services or products offered is not endorsed by Stampin' Up!