

Hello Friends!

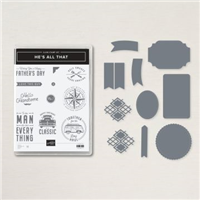
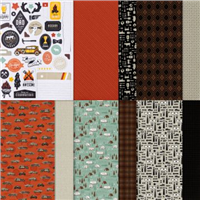
Today’s card is a masculine gift card holder. Designed with the He’s The Man Product Suite, it can be a Masculine Happy Birthday or it’s great for Father’s Day. The He’s The Man Designer Series Paper includes cut outs you can use to decorate your projects. That’s a fun bonus in this Designer Series Paper Pack. The two cut out sheets make it so easy to add that little something to your design.
I decided on a monochrome color scheme today except for a few gold stars.
Today’s Card Pieces And Parts

I will have a PDF Tutorial ready for you in tomorrow’s post. For now, I’ll give you the cutting dimensions and as much information as I can without the pictures. Enjoy!
- The card base doesn’t fold. I centered the gift card portion on the layered card base.
- The card base Thick Basic White layer is 4 1/4″ x 5 1/2″.
- I cut a layer of Sahara Sand cardstock 4 1/8″ x 5 3/8″ and centered it on the Basic White layer.
- The Basic Black and Sahara Sand patterned paper layer is 4″ x 5 1/4″, adhered to the Sahara Sand layer.
- The vertical center Sahara Sand cardstock panel is 2 1/4″ x 5 1/4″.
- The Early Espresso patterned paper center panel layer is 2 1/8″ x 5 1/8″, adhered to the Sahara Sand vertical cardstock layer.
- Adhere the Sahara Sand vertical panel to the center of the layered card base.
Assemble The Gift Card Portion
- Cut a coordinating patterned paper layer 4 1/4″ x 9 3/4″. Score at 3 1/4″ and 6 1/2″ on the longer 9 3/4″ side.
- Fold toward the center. Burnish the score lines with a Bone Folder.
- Open the three-panel piece with the wrong side facing you. With a circle punch (or circle die), punch a half circle at the top center of the left side.
- With liquid glue or Tear & Tape, add a line of adhesive along the right edge and the bottom of the center panel.
- The glue line should look like a backward letter “L”.
- Fold the left (circle punched) panel over the center panel to create the pocket for your gift card.
- Attach a Basic White layer that measures 3 1/8″ x 4 1/8″ to the right side of the gift card layer.
Decorate And Embellish
- For this card, I used Black Baker’s Twine. I ran a line of Stampin’ Seal along the center back of the gift card holder to keep the Baker’s Twine in place.
- Wrap the Baker’s Twine around to the front of the gift card holder. You can put a little Stampin’ Seal in the center of the front to hold the Twine in place.
- I stamped the sentiment from the He’s All That stamp set onto a die cut label from the All That Dies.
- All the decorative elements are from the cut out sheets in the He’s The Man Designer Series Paper.
The “He’s The Man” Suite is surely worth owning. The die set has great label dies, fun banner dies and two layering texture dies. Without a doubt, the die set alone will get plenty of workouts in your craft space.
Don’t forget to check back tomorrow for the PDF for today’s card.
So, pull out some classic patterned paper, add a simple sentiment and a few fun elements and create something masculine!
… the only limitation is your imagination!

Today’s Pro0duct Details


Click To Shop With Me


