
Welcome to the Stampin’ Pretty Pals’ Blog Hop!
This month, our blog hop theme is Sale-A-Bration! We hope you will be inspired by all the beautiful creations the Pals made for you! As you hop from blog to blog, we would love for you to leave a comment. You will find the lineup at the end of my post to help you “hop” along from Pal to Pal.

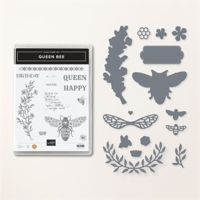
To Sale-A-Brate with the Pals and you, I decided to showcase another Bundle that made it to my “A” list. The Queen Bee Bundle is beautifully Vintage, or can be clean and simple. I wanted to capture both styles in today’s card.
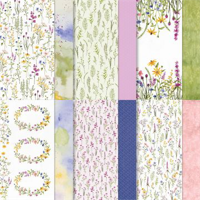
When I saw the ink splatter patterns in the Dainty Flowers Designer Series Paper pack, (the top layer of my card) it screamed “Queen Bee” to me. This is a natural combination and helped make this card quick and easy to put togther. So, let’s make a card!
Today’s Card Parts Ane Pieces

- Cut a Basic White card base 7 1/4″ x 5 1/2″ and score at 3″.
- Cut two Starry Sky cardstock layers: one measuring 4 1/8″ x 5 3/8″ (for the inside), and one measuring 2 7/8′ x 5 3/8″ (for the outside left front panel).
- The top focal point Starry Sky layer is 3 1/2″ x 4″.
- Cut the Starry Sky and white patterned paper front panel layer 2 3/4″ x 5 1/4″.
- I cut a piece of the watercolor washed and ink splattered DSP 3 3/8″ x 3 7/8″.

Stamp And Assemble
- Using your stamp positioning tool, or Stamparatus, position your stamps as shown on the ink splattered DSP layer. (The bee will be in the bottom right corner, “Happy Birthday” will be in the top left corner, and the little bee on the right side near the top right corner).
- Once positioned, stamp the images with Starry Sky ink onto the patterned paper layer.
- That’s it!
- Die cut the flowers, little heart and open honeycomb using the dies from the Bundle.
- Attach the layers as shown and attach the focal point layer to the center ofthe front remembering to put glue only on the back left side of this panel.
The Inside Story

- Stamp and die cut another bee image and adherre it to the inside Starry Sky layer.
- Die cut a second honeycomb and attach it to the bottomof the inside writing layer, as shown.
- All done!
You can take a look at the video tutorial below to watch me put this card together.
Quick and easy, right? Did you notice the little die cut heart on the Queen Bee?
So, cut a few layers, stamp the images with one sweep of ink, add a flower die cut or two, and create a happy birthday wish!
… the only limitationis your imagination!

More inspiration awaits, so use the lineup below to visit the rest of the Design Team. The Pals are excited to show you what they’ve created! Then, please mark your calendars for our next blog hop on February 8th, when we will be creating projects for Random Acts of Kindness Week.
Until then, have fun in your craft space.
Stampin’ Pretty Pals Blog Hop
- Mary Fish at Stampin’ Pretty
- Rae Harper Burnet at Wild West Paper Arts
- Mary Hanson at Up North Stampin’
- Debbie Crowley at expressively deb …
- Stesha Bloodhart at Stampin’ Hoot!
- Beth McCullough at Stamping Mom
- Melissa Seplowitz at The Stamping Ninja
- Su Mohr at Aromas And Art
- Peggy Noe at Pretty Paper Cards
- Debbie Mageed at Secrets to Stamping
- Lisa Ann Bernard at Queen B Creations
- Karen Hallam at Karen’s Stamping Habit
- Tricia Chuba at ButterDish Designs
- Windy Ellard at Windy’s Wonderful Creations
- Lori Webb at Clever Copies
- Jill Loveland at Simple Stamping
- Pamela Sadler at Stampin Pink Rose
- Sue Jackson at Just Peachy Stamping
- Deb Walker at Deb Stamps Life
Today’s Product Details


Free Gift From Me
From now through January 31st, for a minimum product purchase of $50.00 (before shipping and tas), you will receive a FREE Mini Card Kit along with a Video Tutorial link and Project Sheet to help you assemble the cards. The card bases, layers and elements are all included. You add your sentiments and assemble.

January Host Code: YZ7RBPBF
If your order is $50.00 (before shipping and tax), please use the Host Code above when prompted. You will receive Rewards from me along with the Mini Card Kit featured above. If your order is over $150.00 (before shipping and tax), please do not use the Host Code. You will receive Stampin’ Rewards. You will also receive Creative Coins and the FREE Mini Card Kit from me.
Shop With Me


Gorgeous card, Debbie! 🙂
Love this card, and I have to use my Starry Sky more often. Beautiful design!
Fun card…love the water color effect of this Dainty Flowers DSP.
Beautiful combination of products Deb! Great fun to see how you put your own stamp on our Sale A Bration Hop Pal!
A delightful combination of products, Debbie! Great job!
Gorgeous Debbie! I really like your washed and splattered background. It looks great with that bold color and the pretty bee.
Great minds do think alike! Your card is bee-utiful, Deb! Thanks for sharing your creativity with us.
Wow, Deb, this card is beautiful! I’m so glad that this stamp set is on my wish list to order soon. I love the background you created to go with it. Thanks for joining the blog hop this month!
What a fabulous combination of products. I love this DSP, and especially the colors you highlighted with your beautiful card.
Beautiful card, Deb!
Thank you so much, Michelle. Happy New Year.