Hello Saturday…It's the weekend, and here's a great party hat and my Card Design Tip #1.
I've said it before, and I'll say it again…yes, I am a patterned paper addict! I love to look at patterned paper and I love to create with it.
In this card, the adorable party hat is surely a hit, but the patterned paper does all the work. All I did was make the cuts. Stampin' Up!'s Designer Series Paper featured here is "Sent With Love", and the colors featured are Real Red, Pool Party, Island Indigo and Whisper White.
Here's the "How To":
Cut a standard 4 1/4" X 5 1/2" A-2 card from Real Red card stock;
Layer on a Whisper White band across the card measuring 2 3/8" X 5 1/2";
Add a second layer across the card onto the Whisper Shite measuring 5 1/2" X 2 1/4";
The awning (wider) stripe paper is 5/8" X 2 1/4";
The Pool Party center pattern is 2 1/4" X 3";
I hand cropped the banner and stamped it with my sentiment using Island Indigo ink. The Sentiment is from the Henry Says stamp set and Henry is as cute as cute can be!
Punch one "party hat" in Real Red, one "party hat" in Whisper White and one "party hat" in some coordinating patterned paper using the Petite Pennants Builder punch.
I punched holes in the Real Red "party hat" with a 1/4" circle punch to look like polka dots and layered Real Red hat onto the Whisper White hat, then layered both onto the patterned paper, dropping the patterned paper slightly at the bottom.
For the pom-pom on the party hat, I punched one large circle from the Owl Builder Punch from Island Indigo card stock and one from Real Red card stock;
I used my 1/16" circle punch to punch a tiny hole in the center of both circles and slipped in a Whisper White brad;
With my paper snips, I snipped around only the Real Red circle and fanned the edges upward to look like a pom-pom.
(As promised, here is my first of a series of posts with an easy card design tip.)
DESIGN TIP 1: THE GALLON/QUART/PINT RULE. In card designing, any card design will work when you choose a tri-color scheme, but remember to think of each color as "milk" (or whatever your favorite beverage might be). Use a "gallon" of one color, a "quart" of another, and a "pint" of your third color. Remembering this will always give you a color design masterpiece!
Take another look at my card today. My "gallon" is Real Red; my "quart" is Pool Party and my "pint" is Island Indigo. (My neutral in this card is Whisper White and neutrals are for another post). Now try to imagine this card without the Island Indigo…and replace the Island Indigo with, Real Red or Pool Party…go ahead, take another look with the replacement colors…kind of boring, right?
You probably wouldn't even come back to read any more of my posts or look at any of my other cards…but because I added just a "pint" of Island Indigo…the card comes alive!
Try using this Design Rule on your next card and let me know how you do. I'd love to hear from you.
Today my card is for the Pals Paper Arts Color Challenge. I love color challenges and this one has some great colors; Raspberry Ripple, Calypso Coral and Crumb Cake.
It’s my Spring tulip vase. This card takes about 1 minute longer than “Quick & Easy”, but just as easy, and definitely Clean and Simple.
The tulips are punched from the Owl Builder Punch…I saw these a while ago on The Southern Inkerbellies’ blog, and just adored them. Aren’t they cute as anything? I added this close-up so you can see how the tulip is cut from the punch.
Just punch out two owls, snip off his feet, and sort of swirly cut one for the top layer. You can see how it’s done if you look closely at the picture above.
My vase is one of the Oval Framelits with the rounded ends cut off, and the circles on the vase are also from the Owl Builder Punch. I added a little Linen Thread to the vase for some texture and my sentiment is stamped with Soft Suede ink. Easy and fun!
I truly enjoyed creating this card, and hope you get a chance to punch out a few “tulips”. Spring is almost here!
Stampin’ Up! Supplies Used: Cardstock – Crumb Cake, Whisper White, 2012-2014 In Colors DSP Stack Raspberry Ripple Polka Dot, and Sent With Love DSP Calypso Coral Polka Dot. Ink: Soft Suede. Stamp Set – Friendly Phrases. Tools: Owl Builder Punch, Ovals Collection Framelits.
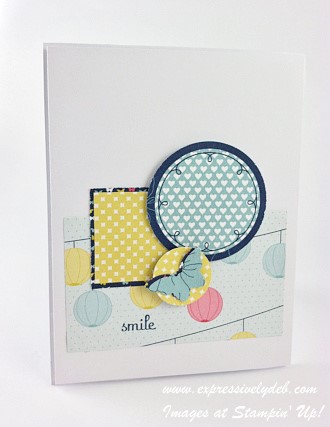
Had a busy few days and had to miss my stampin’ fun yesterday, but I wasn’t going to let that happen again! This is my card for this week’s Mojo Monday Sketch Challenge. I know it’s Wednesday, but I just won’t miss a fun challenge!
This is such a simple sketch, yet I have to admit, it took me a couple of “tries” before I was satisfied enough to declare it a winner!
I think those of you who visit my blog often know that I love to create cards with patterned paper. Here’s another card where the patterned paper is doing triple duty. This is Stampin’ Up!’s Patio Party Designer Series Paper, along with a smidgen from Birds of a Feather. The patterns are all crisp and clean.
I took a little “artistic license” with the butterfly…the lines in the Baja Breeze butterfly are actually part of a flower in the DSP. That little “punch moment” was fun!
I really had to hold myself back from adding some pearls. This time, the butterfly is just fine without them.
I kept the sentiment simple, just because I wanted to showcase the paper.
Stampin’ Up! Supplies Used: Cardstock – Whisper White, Patio Party DSP, Birds of a Feather DSP; Ink – Midnight Muse; Stamp Set – Fabulous Phrases; Tools – 1 3/4″ and 1″ Circle Punches, Bitty Butterfly Punch.
Yesterday, I was looking through one of my card magazines and I came across a card created by Canadian designer, Becky Litz. It was nothing but a die cut ice cream cone, but it was really cute. I don't know Becky, but I liked her card. I needed to figure out how I was going to create my own version.
I don't own a die for an ice cream cone, so I thought about how I was going to get a dimensional ice cream cone (triple dip) onto a card.
Here's the how to:
Punch three cup cake tops from the Cupcake Builder punch. Make sure you get the cherry on top from the cupcake punch also. Here I used Soft Suede, Pretty In Pink, and Very Vanilla Designer Series Paper Stacks from the Neutrals and Subtles Collections.
Punch the small pennant banner from the Petite Pennants Builder punch and run it through your Big Shot using the Perfect Polka Dots Embossing Folder. Here I used Cruumb Cake cardstock.
I hand cropped the flagged end banner, which measures 4" X 1 1/2", from So Saffron Polka Dot Designer Series Paper.
For a little embellishment, I wrapped the banner with Very Vanilla Bakers Twine and Linen Thread.
The birthday sentiment is from the "Henry Says" stamp set. I stamped it with Soft Suede ink.
The three circles under the sentiment are also from the Cupcake Builder Punch.
A pretty cool ice cream cone and a Quick & Easy and Clean and Simple card!
Stampin' Up! Supplies Used: Cardstock – Whisper White, Subtles and Neutrals Collection Designer Series Paper Stack. Ink – Soft Suede. Stamp Set – Henry Says. Tools – Cupcake Builder Punch, Petite Pennants Punch, Perfect Polka Dots Embossing Folder. Embellishments – Linen Thread, Very Vanilla Bakers Twine.
STAMPIN' UP! INTRODUCES IT'S FIRST PHOTOPOLYMER CLEAR STAMP SET!
Mine are already on the way! I've used photopolymer stamps in the past, and they are fantastic. They truly are clear…you can see right through the stamp for perfect image placement every time. The "Designer Typeset" clear stamp set (57 pieces) is $13.95, and I promise you won't be disappointed. Give it a try.
I love the sketch. The clean and simple design and the circles give it a very "soft" look, so I decided to use a floral patterned paper accented with a butterfly and some pearls.
This card incorporates my "very favorites" from Stampin' Up! – My favorite Designer Series Paper, Print Poetry, and my favorite color, Midnight Muse. To add a little interest and help my card frame pop, I added some Crumb Cake matting.
I am Debbie Crowley and welcome to my blog. Here you'll find fun projects that are sure to inspire you. I hope you'll stop
by often and leave a comment or two. To contact me, you can email me at: expressivelydeb@gmail.com
Current Catalogs
What are you looking for?
The content of this blog is the sole responsibility of Debra Crowley, expressively deb.com, as an Independent Stampin' Up! Demonstrator. The use of and content of classes, services or products offered is not endorsed by Stampin' Up!


![6a017744af3aa5970d017c38004116970b-500wi[1]](https://expressivelydeb.com/wp-content/uploads/2013/03/6a017744af3aa5970d017c3807f75a970b.png "6a017744af3aa5970d017c38004116970b-500wi[1]")
![128093S[1]](https://expressivelydeb.com/wp-content/uploads/2013/03/6a017744af3aa5970d017d42373db0970c.jpg "128093S[1]")
![132182T[1]](https://expressivelydeb.com/wp-content/uploads/2013/03/6a017744af3aa5970d017c380804f6970b.jpg "132182T[1]")
![122361T[1]](https://expressivelydeb.com/wp-content/uploads/2013/03/6a017744af3aa5970d017ee9ab3fd4970d.jpg "122361T[1]")


![QWPeAAS5yuqBqgtfejF4qe3Z0ai0LKmzNJMn9DRiUvnpVcHoNkC0RcSd9nMLk3rX6U-nN99xVzPXviQQjsqZHGKqctHHi_S1XiMzJiZH8a37-S9--T8[1]](https://expressivelydeb.com/wp-content/uploads/2013/03/6a017744af3aa5970d017d418e9771970c.png "QWPeAAS5yuqBqgtfejF4qe3Z0ai0LKmzNJMn9DRiUvnpVcHoNkC0RcSd9nMLk3rX6U-nN99xVzPXviQQjsqZHGKqctHHi_S1XiMzJiZH8a37-S9--T8[1]")

![6a017744af3aa5970d017c3757818c970b-500wi[1]](https://expressivelydeb.com/wp-content/uploads/2013/03/6a017744af3aa5970d017d418ea93f970c.png "6a017744af3aa5970d017c3757818c970b-500wi[1]")

![Mojo283Sketch[1]](https://expressivelydeb.com/wp-content/uploads/2013/03/6a017744af3aa5970d017ee8fa7698970d.png "Mojo283Sketch[1]")

![6a017744af3aa5970d017d4178c0c4970c-500wi[1]](https://expressivelydeb.com/wp-content/uploads/2013/03/6a017744af3aa5970d017c3757818c970b.png "6a017744af3aa5970d017d4178c0c4970c-500wi[1]")


![6a017744af3aa5970d017c3732f4d1970b-500wi[1]](https://expressivelydeb.com/wp-content/uploads/2013/03/6a017744af3aa5970d017d41670c85970c.png "6a017744af3aa5970d017c3732f4d1970b-500wi[1]")
![Flyer_photopolymer_Mar0113_US[1]](https://expressivelydeb.com/wp-content/uploads/2013/03/6a017744af3aa5970d017d416a6934970c.jpg "Flyer_photopolymer_Mar0113_US[1]")
![6a00e54f95df928834017ee8d89fb0970d-500wi[1]](https://expressivelydeb.com/wp-content/uploads/2013/03/6a017744af3aa5970d017ee8de0aec970d.jpg "6a00e54f95df928834017ee8d89fb0970d-500wi[1]")


