Here’s some weekend inspiration for you. It comes with another Stampin’ Story and honors a very dear friend, team member and talented paper crafter, Georgia Egan. Georgia passed away this week, losing her battle with bile duct cancer. In the past, I’ve showcased some of Georgia’s work here on my blog. Today, I thought I would use a technique Georgia taught me many years ago. It’s called Iris Folding.
Iris Folding is a detailed technique using folded paper to create concentric patterns. It’s enjoyable and the outsome is amazing and unique only to you. One of my original Iris Folding cards is below. I believe I created this card about eight or nine years ago. The Iris Folding technique is the center of the card.
My card, today, is a scaled down version of Iris Folding using up scraps of DSP, a punch, and glue or your favorite adhesive.
Today’s Card Pieces And Parts
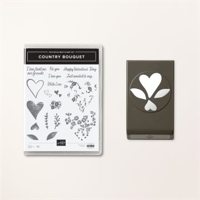
I punched a piece of Basic White cardstock using the Country Bouquet Punch.
Then, I die cut the punched image using one of my Stitched Circle Dies.
The circle measures 3″ in diameter.
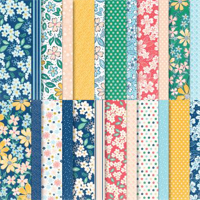
I chose several patterns from the Regency Park Designer Series Paper and cut them into 1/4″ strips.
With the wrong sice of the punched image facing up, I attach the strips to the back of the punched layer to create a pattern.
I checked the front of my design consistently to make sure my pattern was forming the way I wanted it to look.
The image below shows the back of my circle. Lots of overlapping scraps!
I attached the circle to my card front with Dimensionals and added a sentiment.
That’s it!
So, find that amazing punch or die, circle it, cut some paper scraps, and fill your design, and create something unique to you!
March Mini Card Kit With Bonus Insert Fun Fold Card (Center)
From now through March 31st, with a product purchase of $50.00 (before shipping and tax), you will receive a FREE Mini Card Kit along with a Video Tutorial link and Project Sheet so you can assemble the cards with me. The card bases, layers and elements are all included. You add your sentiment, and supply your favorite adhesive. This Mini Card Kit uses the Dandy Designs DSP. There’s a Fun Fold Bomus this month. I added a third card (in the center of the photo). It’s a quick and easy insert card. You can wtire your message and attach a gift card to the insert. They’re all quick, easy and fun to put together.
March HOST CODE – NTRWBBCT
If your order is $50.00 (before shipping and tax), please use the Host Code above when prompted. You will receive Rewards from me along with the Mini Card Kit featured this month. If your order is over $150.00 (before shipping and tax), please do not use the Host Code. You will receive Stampin’ Rewards. You will also receive Creative Coins and the FREE Mini Card Kit from me.
Online Exclusives
Don’t forget to check in on the current Online Exclusives. You can click the images below to see the new products.
The Pals Paper Arts Team is celebrating another Sketch Challenge! Lots of circles for this one. I think it's sort of cool… a simple sketch, but it can take your imagination in many different directions.
So, I went for a concentric circle look with some embossing, dimension, and a little bit of subtle bling.. and I gave my 1" Circle Punch and Circles Collection Framelits a good workout.
Sahara Sand, Soft Sky and just a bit of Lost Lagoon is a very subtle color combination. It's the circles that make the statement. I thought to celebrate the ending of the Thanksgiving Holiday, I would include the "Thanks" sentiment from the new "Banner Blessings" stamp set and I knew when I saw that set, I would use it over and over… it's definitely a keeper.
So, pull out some punches and your circle framelits and create something bold and graphic!
Today's post features a special treat. Last night, our group met for a Card Class. Georgia Egan, who is a Pal, once again created some wonderful projects which she shared with us. I thought it would be fun to post them…
The angel ornament was cropped using Stampin' Up!'s Gift Bow Bigz die and circle framelits with Shimmer White and metallic gold card stock and Designer Basic Pearls…
The snowflake ornament was made using the Festive Flurrry Framelits and Stamps with Smoky Slate and Coastal Cabana ink…
Thank you, Georgia, for sharing your beautiful projects with us.
… and here's a sampling of our group's projects from "Many Merry Stars Simply Created Kit"… which, by the way, was a huge hit!
and, the "Watercolor Winter" Simply Created Card Kit.
So, pull out your favorite dies and framelits and create something wonderful to hang on your tree.
Yesterday, I wrote about the Pals Atlanta Regionals event this past weekend hosted by Pals, Brian King, Pam Berinato Morris and Katy McGloin, and shared my "Swap" card. Today, I'd like to share another of my "Regionals Creations"!
So here's my Stampin' Story -
At the beginning of the program, there was a bag at each table with the instructions, "No Peeking"…well if that didn't make you want to peek, I don't know what would. We didn't peek, though. We sat there all morning wondering what was in the bag! The suspense was killing us….Here's the bag! We had to look at that all morning…
Right smack in the center of the table….with "NO PEEKING" in big, black, bold letters on both sides! We still didn't peek, though.
Finally, Brian came clean…he told us what was in the bag, and this one's a doozey! (I think that's how you spell doozey).
Apparently, Brian watches the cooking show, Chopped. Chopped is a show where four
chefs race against the clock to turn mystery ingredients into amazing meals.
Aha! Now you have it…THE CHOPPED CHALLENGE!
There were crazy Stampin' Up! supplies in the bag that we all had to use to create a "masterpiece". Each "masterpiece" had to meet certain criteria established by Brian, Pam and Katy. Here's the criteria:
Chevron Punch, Island Indigo Chevron Ribbon, Washi Tape, Epic Day Designer Series Paper, Hello Lovely stamp set and AWSOMENESS!!!…
…AND WE HAD 30 MINUTES FROM START TO FINISH…
All rightie then…I needed to go into a zone, and very quickly at that! I started cutting paper and making layers…then I made a complete "swoosh" of the supplies on the table…not sure what I was grabbing or where I was going to put it when I grabbed it, but I grabbed and glued and cropped and punched and somehow I made it in time. (I've written about my "not knowing how it happens, but it does" swoosh stories).
So here's me running to the finish line…that's how I am when I go into my "zone" …chairs, what chairs…I'll run around them! Nothing will stop me…I'm from Jersey!
This Stampin Story has a happy ending ……my card design, by anonymous vote, won the Grand Prize!
How cool is that?
Thank you again, Brian, Pam and Katy…"you make me happy"!
My Atlanta trip is already a happy memory that will be long-remembered and cherished by me.
You, too, can join the fun and be a part of this wonderful group. Starting today, Stampin' Up! is offering a chance to join for $25.00. That's it. You pick your Starter Kit…anything in the current catalog priced between $25.00 and $26.95 with free shipping. You'll get a bundle of catalogs and some business supplies, 30% off your first order of $150.00 or more, and during the month of October, if you place your first order, you will also qualify for $25.00 in extra Hostess Benefits. You don't have to host a workship. All you have to do is enjoy the wonderful products! THERE IS ABSOLUTELY NO OBLIGATION TO STAY ON…but, the best part of all of this is that you get to be part of my team, share in private Facebook chats and galleries, get lots of free tutorials, and just have fun!
Please call me or e-mail me with any questions you might have.
Thanks for stopping by today, and be sure to check in tomorrow when the Pals October Halloween Blog Hop goes live. I'll be giving away some neat Blog Candy….so check back for the details.
It's been really busy here at home. We're coming down the stretch to my daughter's wedding; making final arrangements, tweaking final arrangements, and I'm enjoying the whole process. Lots of emotions are surfacing for me. I can't believe she's a grown woman embarking on a whole new experience. I'm sure the days ahead will be hectic, exciting and a wonderful experience for us both. Just want to say, thanks for being patient with me, and there'll be lots more posts in the days ahead.
I did spend some wonderful quality time in my stamping room and came up with some very pretty Elegant Butterflies to showcase today. My inspiration for this card was my patterned paper, of course. I had to try out some of my new Subtles Designer Series Paper Stack.
How 'bout those polka dots and the mini chevron pattern! So pretty together, right?
The combination of the very cool Pear Pizzazz and the warmth of So Saffron results in a fresh, clean and beautiful summer "Hello" for someone special.
I know I've said this before, but I do think Candy Dots will be my new favorite embellishment. Here they are in Pear Pizzazz and So Saffron.
This project is definitely a "Quick & Easy". Here'e the how to inlcuding all the Stampin' up! supplies you'll need:
A standard 4 1/4" X 5 1/2" card base from Whisper White cardstock;
The Whisper White layer is 4" X 5 1/4" and popped on the base with some Stampin' Dimensionals;
The pretty Pear Pizzazz polka dot layer measures 2 1/2" X 4 7/8" and is attached with some Snail adhesive;
The Whisper White flagged banner is 1 1/4" X 3". I hand cropped the flagged end; stamped "Oh, Hello", from the "Oh, Hello" stamp set, in So Saffron ink, and added the Pear Pizzazz and So Saffron Candy Dots from the Subtles Candy Dots collection. The banner is attached using Stampin' Dimensionals;
The beautiful butterflies were punched from the mini chevron pattern in Pear Pizzazz and So Saffron from the Subtles Designer Series Paper Stack. I embellished them with some small Designer Basic Pearls and attached them using mini glue dots.
This was a fun, fun project with lots of "pizzazz"!!
Stampin' Up! says…Designer Series paper makes it easy to create a card or Designer Series paper makes it easy to create a card or scrapbook page with coordinating background paper, cardstock, and stamped images. * 12" x 12" * 40 sheets per package, 2 each of 2 double-sided designs in 10 colors
Be sure to check back tomorrow for some "Wonderful Washi"!
I am Debbie Crowley and welcome to my blog. Here you'll find fun projects that are sure to inspire you. I hope you'll stop
by often and leave a comment or two. To contact me, you can email me at: expressivelydeb@gmail.com
Current Catalogs
What are you looking for?
The content of this blog is the sole responsibility of Debra Crowley, expressively deb.com, as an Independent Stampin' Up! Demonstrator. The use of and content of classes, services or products offered is not endorsed by Stampin' Up!


![6a00e54f95df92883401b7c70f7201970b-400wi[1]](https://expressivelydeb.com/wp-content/uploads/2014/11/6a017744af3aa5970d01b7c7125e7c970b.jpg "6a00e54f95df92883401b7c70f7201970b-400wi[1]")
![6a017744af3aa5970d01bb07b53e72970d-500wi[1]](https://expressivelydeb.com/wp-content/uploads/2014/11/6a017744af3aa5970d01b8d09c633b970c.png "6a017744af3aa5970d01bb07b53e72970d-500wi[1]")


![993713_384574325005047_1847124286_n[1]](https://expressivelydeb.com/wp-content/uploads/2013/10/6a017744af3aa5970d019affd1f2e9970d.jpg "993713_384574325005047_1847124286_n[1]")
![1382933_648245295208206_1104322703_n[1]](https://expressivelydeb.com/wp-content/uploads/2013/10/6a017744af3aa5970d019affd1a7b5970c.jpg "1382933_648245295208206_1104322703_n[1]")


![6a017744af3aa5970d01901db67af7970b-500wi[1]](https://expressivelydeb.com/wp-content/uploads/2013/06/6a017744af3aa5970d01901e0e35bc970b.png "6a017744af3aa5970d01901db67af7970b-500wi[1]")
![130733L[1]](https://expressivelydeb.com/wp-content/uploads/2013/06/6a017744af3aa5970d0192abcd6371970d-250wi.jpg "130733L[1]")
![130135L[1]](https://expressivelydeb.com/wp-content/uploads/2013/06/6a017744af3aa5970d019104043281970c.jpg "130135L[1]")


