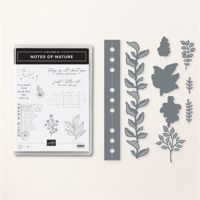
Today’s project is a loose version of a “SIP” card. “SIP” is an acronym for Stamps, Ink, and Paper.
When I first saw the Notes of Nature Bundle, my thought was to create a stamped collage design. Notes of Nature is the perfect stamp set to create a design like this. I kept the colors toned down and just started stamping. Some of the images are stamped off once to create depth. I added texture with the large Basic White die cut and the Wild Wheat Designer Series Paper layer background.
So, let’s make a card!
Pieces And Parts
I cut a Basic White cardstock card base 4 1/4″ x 11″ and scored at 5 1/2″.
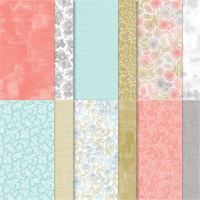
The Wild Wheat patterned paper card front layer is 4 1/4″ x 5 1/2″.
The Basic White cardstock top layer (the finished stamped layer) is 3 3/4″ x 4 3/4″.
I die cut the left edge of the Basic White top layer using the die from the Notes of Nature Dies.
I started stamping in the bottom right corner of the white layer using Wild Wheat ink and the large corner stamp. See below.
I stamped the leaf image next using Old Olive ink. See below.
With Wild Wheat ink, I stamped the grid image on the left side of the layer. See below.
Next came the ink splatter. I love ink splatter! I stamped this image on the right side of the grid image.
I stamped the ink splatter off once with Moody Mauve ink and stamped it to the left of my leaf image. See below.
I trimmed the layer to 3 3/4″ x 4 3/4″, making sure the stamped design would dominate the layer.
I die cut the left edge of the layer and stamped the sentiment.
So, find those great background image stamps, pick your favorite colors, and just have fun creating your own design. Add it to a card front, and send someone a smile.
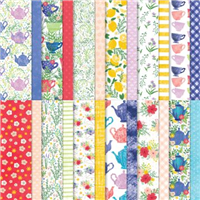
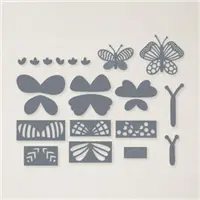
The February cards are showcasing the Everyday Details Dies along with the Delightfuly Eclectic Designer Series Paper.
You will receive everything you need to put the cards together as I’ve designed them.
The kit will include the card bases, layers, die cuts, embellishments, sentiment layers, and envelopes.
I cannot send stamped images, but you will have a sentiment layer you can customize to a stamps you already owm.
You will also receive a printed PDF Tutorial, along with a video link so you can put the cards together along with me.
You will automatically receive the kit with a minimum product purchase of $50.00 through my online store. When completing your purchase, you MUST use the Monthly Host Code that I provide in every blog post. (Feel free to reach out to me with any questions you may have).
If your order is more than $150.00, plese don’t use the Host Code. You will receive rewards directly from Stampin’ Up!, and you will also receive the mini kit from me.
Happy crafty weekend! Here’s some inspiration for you. I think you’ll enjoy creating an envelope full of love. This was so much fun to put toether. Further along in this post, there’s a PDF Tutorial you can print. Below is the same design with different Designer Series Paper and colors. Which is your favorite? Enjoy the rest of this post.
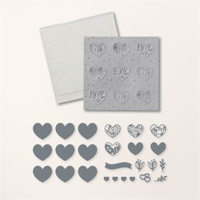
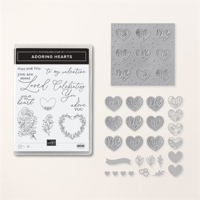
In my crafty travels, I saw a die that created a small envelope. Inside and floating out of the envelope, there were flowers. I thought it would be fun to create an envelope, and add floating hearts.
I’m featuring the Adoring Hearts Dies and the Most Adored Designer Series Paper. The DSP is free during Sale-A-Bration with a $50 product purchase.
So, let’s make a card!
Pieces And Parts
The Flirty Flamingo cardstock card base is 4 1/4″ x 11″, scored at 5 1/2″.
The heart patterned paper layer is 4″ x 5 1/4″.
I cut the envelope layer to a 4″ square.
The hearts are die cuts from the Adoring Hearts Dies.
A few gold embellishments finish the card.
You can download the PDF Tutorial below. It includes detailed assembly instructions and photos.
A Surprise!
As I was cutting my die cut hearts, it occurred to me that I could use the single heart die from the Adoring Hearts Dies to die cut the hearts from the Most Adored Designer Series Paper. Take a look at the photo below. A nice surprise.
The Real Red version of this card was actually my first design. The Flirty Flamingo heart patterned paper inspired me to make a color change using the same design.
So, make a few little envelopes, add some floating elements, a lovable sentiment and create a fun card to share.
During the month of Januaryr, with a minimum product purchse of $50.00 from my Online Store, you will receive all of the supplies to create these two cards as I’ve designed them, along with a PDF Tutorial and video tutorial to make the cards along with me.
You will need your favorite adhesive and sentiment stamp.
To receive this FREE Card Kit, you must use the Host Code above when placing your order.
If your order is $150.00 or more, please don’t use the Host Code. You will receive Stampin’ Rewards directly from Stampin’ Up!, and you will also receive the FREE Card Kit from me.
Here’s a Product Premier card to celebrate the Adoring Hearts Bundle in the new January – April 2024 Mini Catalog. The catalog launched toady, along with the Sale-A-Bration Brochure. You can see the catalog in the virtual download at the end of this post.
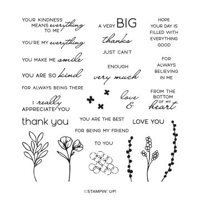
The Adoring Hearts Bundle features a photopolymer stamp set filled with mixed font sentiments and delicate floarl images. It’s pretty. Along with the stamp set, the Adoring Hearts Dies include a Hybrid Embossing Folder. The Embossing Folder can emboss and die cut at the same time. The embossed hearts produced from the folder are stunning. You can see the Adoring Hearts Bundle in use by watching the video below.
Card Parts & Pieces
The Boho Blue cardstock card base is 4 1/4″ x 11″.
The Basic White mat layer is 4 1/8″ x 5 3/8″.
The Flight And Airy Designer Series Paper layer is 4″ x 5 1/4″.
I cut the Vellum strip 1 3/4″ x 4″.
The element cluster inclused die cuts from the Adoring Hearts and Hooray For Surprises dies.
My inspiration for this card came from the new Mini Catalog. The Flight & Airy Designer Series Paper is in the Sale-A-Bration Brochure and is free with a $50 product purchase.
This card design is easy. Once you have your card layers in place, the element cluster is constructed by working from the center of the card. Attach the vellum strip directly across the center of your card, and work from the center to assemble the rest. Try it with some products you already have.
Click the video link below and create this card along with me, and enjoy the Adoring Hearts Bundle.
You can click on the button below to download the PDF Tutorial for this caard. Enjoy your crafty time!
Here’s a look at the inside of the card. The writing layer is 3 3/4″ x 5″, and the patterned paper strip is 1/4″ x 4″. The sentiment is from the Adoring Hearts stamp set.
So, fall in love with the Adoring Hearts Bundle, cut and emboss two beautiful hearts, and send love to someone special.
Now that you’ve seen the amazing new products in the Mini Catalog, take a look at the Sale-A-Bration Brochure and get even more crafty inspiration. All of the products in the Sale-A-Bration Brochure are free with a qualifying product purchase.
Download The Sale-A-Bration Brochure
Now that you’ve had a chance to see both the Mini Catalog and the Sale-A-Bration Brochure, you can plan some of your personal card making projects for birthdays, Valentine’s Day, Easter, Weddings, and much more using inspiration from both catalogs and the products that inspire.
That’s not all!
Join The Stampin’ Up! Comunity of Papercrafters
As I mentioned in yesterday’s post, I think this is most likely the best “join promotion” Stampin’ Up! has made available. If you’re thinking about joining Stampin’ Up! there’s no reason to hesitate. The “no obligation” policy is real! I would love to welcome you to my Team and Stampin’ Up! Click here or on the image above for all the details.
January Host Code – MB9N2AD9
January Monthly Free Customer Card Kit
During the month of Januaryr, with a minimum product purchse of $50.00 from my Online Store, you will receive all of the supplies to create these two cards as I’ve designed them, along with a PDF Tutorial and video tutorial to make the cards along with me.
You will need your favorite adhesive and sentiment stamp.
To receive this FREE Card Kit, you must use the Host Code above when placing your order.
If your order is $150.00 or more, please don’t use the Host Code. You will receive Stampin’ Rewards directly from Stampin’ Up!, and you will also receive the FREE Card Kit from me.
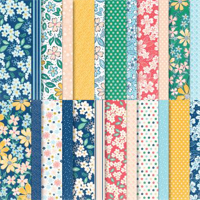
I was doing more otganizing in my craft room yesterday and decided to take a break. The Regency Park Designer Series Paper happened to be on my workspace. I opened it, spread out the patterns, and my eye went to this design. Okay, this would be the start of my card. Because I wanted to showcase the pattern, I needed a simple something for my focal point. The Kind And Sincere stamp set was definitely the one.
The Question Is…
What do I do with these stamps? The font in the large “kind” stamp is so on trend now, I wanted to use it. Of course, the colors in the patterned paper gave me my color palette, so I stamped the images on some Basic White cardstock. Now what? I thought to cut a piece of Mango Melody cardstock and create off-set layers. I laid my design … It looked okay.
Not totally happy with the outsome, I looked at my Stitched Rectangle Dies which were right behind my Deckled Rectangle Dies. I chose the Deckled Rectangle Dies for a little more interest. My card still looked okay.
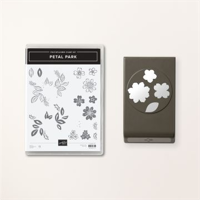
Do I embellish with a few gems, a ribbon, or a few stamped elements. The stamped flowers from the Petal Park stamp set were perfect. They coordinate with the Designer Series Paper beautifully! I should have known that from the start!
I scattered a few stamped Night of Navy and Calypso Coral flowers on my sentiment layers and I was very happy with the outcome.
I’m sharing this story with you today because I’m sure you’ve found yourself in the same situation. You want to stamp and cut paper. You want to create something new. But, sometimes you just don’t know how to get started.
My Advice
Start with one piece of the puzzle. My first piece in today’s card was the Designer Series Paper (which it usually is). Match some cardstock, create a focal point center and go from there.
Find an easy template, and make that your “go to”. The same applies to a fun card sketch. Keep both nearby on your workspace.
Trust me, you’d be amazed at what can evolve from there!
From now through January 31st, for a minimum product purchase of $50.00 (before shipping and tas), you will receive a FREE Mini Card Kit along with a Video Tutorial link and Project Sheet to help you assemble the cards. The card bases, layers and elements are all included. You add your sentiments and assemble.
FREE Mini Card Kit
January Host Code: YZ7RBPBF
If your order is $50.00 (before shipping and tax), please use the Host Code above when prompted. You will receive Rewards from me along with the Mini Card Kit featured above. If your order is over $150.00 (before shipping and tax), please do not use the Host Code. You will receive Stampin’ Rewards. You will also receive Creative Coins and the FREE Mini Card Kit from me.
It’s been one of those weeks! I was finding it hard to get my creative mojo going. When I experience this, I go to the catalog for inspiration. This time, I turned pages. With all the beautiful projects in the catalog, I was feeling nothing. This is unusual, but it happens. I’ve always been a fan of sketches. Over the years, I kept a binder of copied sketches. Rather than going down the internet rabbit hole, I looked through my card sketch binder. I found a sketch that is my inspiration today.
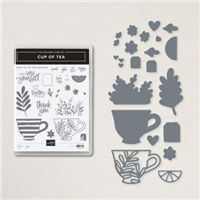
When I first saw the circle focal point, I imagined the teacup from the Tea Boutique Suite inside the circle. This is how it usually begins for me. It’s that little something that takes me exactly where I need to be. The rest of the card came together easily. I hope sharing my lack of inspiration story with you helps if you have one of those “lack of mojo” periods!
Today’s Card Pieces And Parts
There are a lot of pieces and parts that make up today’s card, but don’t let that stop you from trying it. It really is fun to piece it all together.
It starts with a Basic White A-2 card base and ends with a tiny Champagne Rhinestone.
I include everything in between in the PDF Tutorial you can download and print by clicking the button at the end of this post.
I also include a few Design Tips that are illustrated on this card.
So, download the PDF, start from the bottom, add one piece at a time, and create something with lots of layers!
I am Debbie Crowley and welcome to my blog. Here you'll find fun projects that are sure to inspire you. I hope you'll stop
by often and leave a comment or two. To contact me, you can email me at: expressivelydeb@gmail.com
Current Catalogs
What are you looking for?
The content of this blog is the sole responsibility of Debra Crowley, expressively deb.com, as an Independent Stampin' Up! Demonstrator. The use of and content of classes, services or products offered is not endorsed by Stampin' Up!