Dec 29, 2020 | Birthday, Congratulations, Fancy Folds, Tutorials |
I hope you all had a happy Christmas holiday. I took a little time away from my craft room to prepare for our holiday celebration and spend time with family. It was great fun and now it’s time to get back into my craft room with my paper and ink.

The month of January is a big birthday month for me. I have quite a few birthdays to recognize so I decided to get a few cards ready. Today’s post is a cute fun fold generic card that I’m going to use for one of the birthdays. It can also be used as a Happy New Year hello.
The Playing With Patterns Suite on page 100 in the Annual Catalog is one of those simple suite of products that you really should own. You will use it time and again and feel like you’re using new products each time. The Playing With Patterns 6″ X 6″ Designer Series Paper is a mix of stripes and dots in playful colors. It’s a fun paper pack.

Today’s colors are all about Night of Navy, Crushed Curry and Purple Posy. The color combination is literally a “cool” one. Although Crushed Curry is a warm yellow, it accents nicely with the cooler tones of Night of Navy and Purple Posy.
Let’s talk about the “Fun Fold”. This fun fold design is simple and adaptable to just about any sentiment, image or patterned paper.

Below are the cutting measurements for this design.
- The Night of Navy card base is 4 1/4″ X 8 3/4″ and scored at 5 1/2″ on the longer (8 3/4″) side.
- The Purple Posy layer is 4 1/2″ X 3 1/4″.
- The Crushed Curry layer is 8 1/2″ X 3″ and scored at 4 1/4″.
- The patterned paper layer is 3″ X 4″,
- There are two Whisper White layers, both cut at 2 3/4″ X 4″.

Stamping Tip:
When you’re stamping with photopolymer stamps, you can get a clean crisp image using your Stamparatus and its Foam Mat (page 164 in the Annual Catalog). However, if you’re using an acrylic block, it’s a good idea to get yourself an extra Foam Mat to keep on hand for your acrylic block stamping. It gently cushions your stamping surface to get that clean stamped image we all want. You can click here for more details on the Stamparatus and the Foam Mat
You can click the button below to download a FREE PDF tutorial for this project.

So, grab a favorite patterned paper, match up some cardstock, add a few stamped images and create a simple and quick Fun Fold!
…the only limitation is your imagination!

You can click on each picture below to order the products I used today and to get more product details.

Dec 2, 2020 | Encouragemet, Fancy Folds, Gallery, Thinking of You, Tutorials |

Today’s post is a Fun Fold Arrow Flap Gatefold card with lots of fun colors and a FREE PDF tutorial. I very much enjoyed putting this card together AND I was able to practice my fussy cutting! As the card says, “all you need is confidence and lots of coffee”.

The stamped images and sentiment came from the Press On stamp set and today’s color palette was inspired by the Playing With Patterns Designer Series Paper.

Below are the project measurements and a quick “how to”. You can download a printable PDF here or at the end of this post.
- Start with a single layer A-2 card base that measures 4 1/4″ X 5 1/2″. My card base is Night of Navy.
- Cut the gatefold piece using Coastal Cabana card stock at 4″ X 10 1/2″.
- Score at 2 5/8″ and 7 7/8″.
- Fold this piece on the score lines toward the center and crease with your bone folder. This will sit on top of the Night of Navy card base.
- The inside sentiment layer is Whisper White and measures 3 7/8″ X 5 1/8″.
- Stamp the sentiment and attach the sentiment layer to the center panel of the Coastal Cabana gatefold.
- The patterned paper flap is a 6″ X 6″ piece of Playing With Patterns Designer Series Paper cut diagonally from corner to corner.
- Score in on the longest end of the triangle 1/2″. Fold and burnish on the score line.
- Adhere this piece to the back of the center of the Coastal Cabana gatefold and let the flap fall to the center front of your gatefold. Be sure the front patterned paper flap point is centered at the meeting of the two side panels at the front of the gatefold.
- Trim off the excess points of the patterned paper on either side of your gatefold layer.
- Stamp three coffee cups from the Press On stamp set, fussy cut them and attach them to the front flap with dimensionals.
- I added a hand cropped sentiment banner to the bottom and a few white dots from All The Trimmings Embellishments.
There are at least three versions of the arrow flap gatefold card that I’ve seen and my inspiration for this design came from Lisa Curcio.
So, grab your paper trimmer, bone folder, card stock and patterned paper and create a simple fun fold card.
…the only inspiration is your imagination!
Dec 1, 2020 | Christmas, Fancy Folds, Gallery, Holidays, Tutorials |
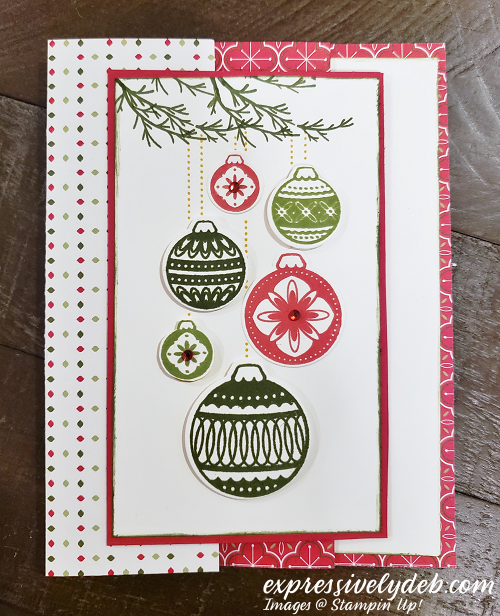
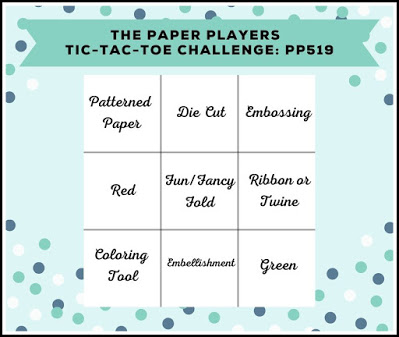
It’s Tuesday and I have a special fancy fold card for this week’s Paper Players Tic-Tac-Toe Challenge #519. Ann Marie created the board below. To participate you have to choose either across, down or diagonally. I chose to go diagonally using patterned paper, a fancy fold design and green.

I’m starting at the top of my card which is the center stamped focal point layer.
- The Whisper White layer for stamping is 2 3/4″ X 4 5/8″.
- Stamp the ornament image from the Ornamental Envelopes stamp set in Crushed Curry ink in the center of the Whisper White layer. Add a few Mossy Meadow pine branches with the image from the Ornamental Envelopes stamp set to the top left of the layer so it appears that the ornaments are hanging from branches.
- I outlined this layer with a little Mossy Meadow ink and my sponge dauber to add a little depth.
- On a scrap of Whisper White card stock, stamp the ornament image three times; once in Mossy Meadow, once in Pear Pizzazz and once in Real Red.
- With the ornament die from the Envelopes Dies run each set of ornaments through your cutting machine. Now you have a variety of ornaments to place over your Crushed Curry base image.
- Have fun placing the ornaments on the base image. Some are popped up on dimensionals and some are glued directly to the stamped image.
- You might want to leave a Crushed Curry ornament uncovered for a little interest.
- Attach your finished focal point layer to a piece of Real Red card stock that measures 2 7/8″ X 4 7/8″.
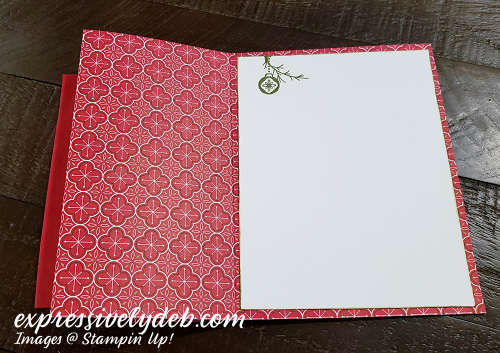
- For this project, I used a piece of Heartwarming Hugs Designer Series Paper for the card base. Its dimensions are 12″ X 5 1/2″ scored on the longer 12″ side at 1 3/4″, 4 3/4″ and 7 3/4″.
- After scoring, and with the outside design facing you, fold the left side first score line in toward the middle. Fold the second score line out toward the back of the base. Fold the third score line in toward the middle. Use your bone folder to burnish your folds.

- Add a Whisper White layer to the last panel of the card base. I stamped a little ornament and pine branch on mine. You can add a sentiment to the Whisper White panel but stamp it more to the left so it doesn’t show when you close the card.
- Fold your card and add your front stamped layer exactly to the center of the card only using adhesive on the left side of the panel.
- Embellish for a little sparkle.

I hope you enjoy today’s project. This design is versatile enough to use with just about any longer stamp image and your favorite patterned paper.
So, grab a long and lean stamp image, cut a few layers, score and fold some patterned paper and create something fancy!
…the only limitation is your imagination!


