Oct 5, 2020 | Fall Themed, Gallery, Pretty Packaging, Thank You, Tutorials |

Happy Monday and hope your week ahead is full of all things good and bright!
I’ve been working on this post for a few days. It’s a 3-D gratitude gift box. Something I don’t ordinarily do, but I thoroughly enjoyed putting it together. This is one of my tutorial posts and they do tend to be a little wordy. I did make every effort to shorten the talking and adding more visual! This was inspired by Sally Byrne who was inspired by Julie DiMatteo. Julie does beautiful packaging for everything she finds. Sally gave Julie’s project a little twist, and I gave mine a little twist. Sally did call her project the “2020 Survival Kit”, and I loved her title so much I am calling mine “My 2020 Survival Kit”.
Sit back, get your coffee and take a look.
Below is the inside of my 2020 Survival Kit – Bath and Body Works Hand Sanitizer, Hand Cream and Chocolate!

I’m not going to waste any additional reading time for you. Below is a quick and easy “how to” to create this beautiful Fall Gratitude Gift.
Project Overview: It’s so easy… really it is!!
- This project involves making card stock cuts, scoring and gluing. I used a piece of Brushed Gold card stock from my years ago Stampin’ Up! stash. It has a beautiful matte gold finish.
- To make the box, cut three pieces of card stock: Cut one 7″ X 9 1/2″ – This is your box base. Cut the second piece 1 1/2″ X 6 5/8″ and the third piece 4 3/4″ X 5″. The second and third pieces are your dividers.
- Score the 7″ X 9 1/2″ piece at 1″ and 6″ on the 7″ side and on the 9 1/2″ side, score at 1″, 4 1/4″, 5 1/4″, 8 1/2″.
- On each 1″ score line, cut and notch only to the first score line on both 9 1/2″ sides.
- See photo below:

- Fold in toward the center on each score line and burnish with your bone folder. See photo below:

- Add your glue or adhesive choice to the outside of each 1″ tab and attach the glued 1″ tab to the inside of the side flaps forming the box lid and bottom. See photos below.
- If you look at the center bottom of the following picture, you can see the glue on the outside 1″ tab. All the 1″ tabs are glued on the outside of the tab and attached on the inside of the corresponding flap. You will see the box start to form.


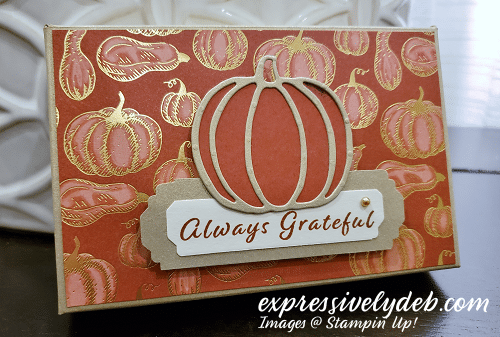
- Below is the finished box. Just about in the center of the top lid I used my 1/2″ circle punch to create a notch to open the box.

- To create the inside dividers, take the 4 3/4″ X 5″ cut card stock and on the 4 3/4″” side score at 1 1/2″, 2 3/8″ and 3 1/4″. Fan fold on the score lines to create the long divider. It will fit right into the box. I added a little glue to mine just to be sure it stays in place. See the next three photographs below.


- To create the second smaller divider, score the 6 5/8″ X 1 1/2″ cut card stock on the longer 6 5/8″ side at 2 3/4″, 3 5/8″ and 4 1/2″. Fan fold this piece and insert it into either side of the divided box.
- See the two photos below:

Here’s a view of the inside of your finished box…

- Put in your 1 fl. oz. hand sanitizer; 1 fl. oz. hand cream, and two Hershey’s Nuggets. As I recall, Sally used four Hershey’s nuggets. They fit nicely on their side.
- To decorate your box top, cut a 3 1/8″ X 4 7/8″ piece of patterned paper. For this project, I used the gold foiled pumpkins from the Gilded Autumn Specialty Designer Series Paper.

Please don’t hesitate to comment or email me with any questions you might have. I’d be happy to help.
A LITTLE NOTE BEFORE I SAY GOODBYE: I’ve used other scoring tools and by far, Stampin’ Up!’s Simply Scored Scoring Tool is the easiest to use. It’s in the Annual Catalog on page 151.
So, pull out your Simply Scored Scoring Tool, grab some card stock, score a few lines, fold, glue, fill and create something sweet for someone special!!
The only limitation is your imagination!


Oct 2, 2020 | Clean and Simple, Fall Themed, Gallery, Holidays, Quick & Easy, Thank You, Thanksgiving, Thinking of You |

Today’s post is clean, simple and designed to show off another pattern in the Plaid Tidings Designer Series Paper.
Take advantage of Stampin’ Up’s Designer Series Paper sale which runs through the end of October. There are so many pretty packs to choose and they’re all 15% off. More details about this promotion are at the end of this post.
I used the Country Home stamp set which is on page 89 in the Annual Catalog. While the stamped images are perfect for the Fall and Holiday Season, the sentiments are thankful and thoughtful for just about anything.
I haven’t done anything in Cinnamon Cider yet and when I was thinking about today’s post, Cinnamon Cider came to mind. It’s a rich cinnamon color with lots of red tones. It works well with this pattern from the Plaid Tidings Designer Series Paper which also features a hint of Shaded Spruce, a warm green, and lots of Rich Razzleberry. I kept this card simple to bring more attention to the patterned paper.
So, grab some warm toned, plaid DSP, add a little Cinnamon Cider sentiment (I can say that three times fast, can you?), and create something thoughtful!
The only limitation is your imagination!
Click on any product below for more details and a larger view.

SHOP MY ONLINE STORE AT STAMPIN’ UP!
Sep 29, 2020 | Clean and Simple, Congratulations, Fall Themed, Gallery |

Happy Tuesday!
A Fall themed card was not in my plan for today, but when inspiration comes you have to run with it. The Celebrate Sunflowers Bundle was on my desk next to some of the Gilded Autumn Specialty Designer Series Paper. When I saw both of them together, there was no turning back.
I was inspired by the Gilded Autumn Specialty DSP. On the backside of this beautiful Mint Macaron and Gold Foil design is an Early Espresso, Cajun Craze and Mint Macaron leaf stem pattern which I duplicated. These delicately detailed leaf stems were cropped using the dies from the Sunflowers Dies. I thought they would frame this sentiment label nicely. I used the Celebration Labels Dies for the sentiment layer.

This card is a perfect example of Stampin’ Up’s product coordination. The Celebrate Sunflowers Bundle is in the Annual Catalog (p. 13), and the Gilded Autumn Specialty DSP is in the current Mini Catalog (p.45), yet they work beautifully together.

This clean and simple card is also quick and easy.
I hope this project inspires you to look for more product coordination in your Stampin’ Up! stash. I’m sure you’ll find a few surprises as I did today.
So, grab a simple gold foiled patterned paper, add a few cropped, delicate leaf sprays, frame a pretty cropped label and create something wonderful!
The only inspiration is your imagination!


Sep 28, 2020 | Encouragemet, Fall Themed, Gallery, Thinking of You |

Happy Monday! I hope you were able to spend some time creating beautiful projects. This weekend was a little hectic for me, but I was able to get some stamping time in.
Today’s post was inspired by one of my favorite color combinations, the blues and oranges. They are complementary on the color wheel which means they naturally work together. The Pretty Peacock, Seaside Spray and Whisper White Plaid Tidings Designer Series Paper was perfect for the card I wanted to design.
Pretty Peacock and Terracotta Tile have a lot of warm tones while Seaside Spray is a cooler blue. I usually try to keep my colors either warm or cool, but combining the tones works in this card because the colors are mixed in the plaid pattern.

I absolutely adore the leaves from the Love of Leaves Bundle. The stamps have beautiful dimension and the Stitched Leaves Dies not only cut the stamped images, they can emboss beautiful stitching into the leaves. For this project, I chose to crop the leaves with no embossing to keep the elements in this design simple and to show more of the dimension in the stamps.

Here are the layer dimensions for this card:
- Standard A-2 Whisper White card base;
- The large plaid layer is 4 1/8″ X 5 3/8″;
- The Seaside Spray layer is 5″ X 3 3/4″;
- The second Whisper White layer is 3 5/8″ X 4 7/8″;
- The inside Seaside Spray layer is 3 7/8″ X 4 1/8″;
- The Pretty Peacock top layer is 2 3/4″ X 4″;
- The strip of plaid on the top layer is 5/8″ X 4″
- My hand cropped sentiment banner is 3/4″ X 2″.

So, grab some Pretty Peacock DSP, add a pop of Terracotta Tile and a pretty Braided Linen Trim bow and crate something striking!
The only limitation is your imagination!


Sep 23, 2020 | Clean and Simple, Fall Themed, Gallery, Thinking of You |

It’s Wednesday, the first full day of Fall. I thought I’d share another Clean and Simple card with a few pumpkins and some leaves.
This card is all about stamping. There are four stamps from the Celebration Tidings stamp set that I used. No Designer Series Paper today, just ink, card stock, a cropped label die and Stampin’ Blends. I couldn’t have done this without my Stamparatus! The best stamping tool you could own. Lining up the stamps was so quick and easy. I stamped all four images with Early Espresso ink.

The Stampin’ Blends alcohol based markers made it easy for me to achieve “coloring perfection”! That’s coloring without any streaky overlay lines. The cropped label from the Celebration Labels Dies is gracefully curved and delicately stitched. Both the Celebration Tidings stamp set and Celebration Labels Dies are from the August-December 2020 Mini Catalog on page 57. You can also “Bundle” the two and save 10%. I truly enjoyed making this card.

So, pull out your Very Vanilla card stock, crop a label, add a few stamped images and some coloring perfection and create something charming.
The only limitation is your imagination!


