“CAS” is an acronym for Clean And Simple. A clean and simple card design has certain criteria – lots of white space, few or no layers, and little or no embellishments. I may hvae gone a little over the top with my sparkling sequins, but don’t you think a pretty rainbow in the clouds should sparkle and shine?
I’m showcasing the Covered In Sunshine stamp set. I’ve never posted a “favorites” list here, though I must tell you that this stamp set was absolutely at the top of my favorites. And, it was Stampin’ Up!’s version of this card that caught my eye. My CASE (an acronym for “copy and selectively edit”) is on page 37 in the January-April Mini Catalog.
Today’s Card Parts & Pieces
I cut a Basic White card base 5 1/2″ x 8 /2″ and scored at 4 1/4″.
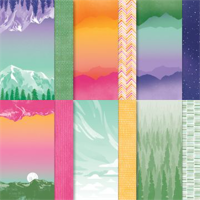
The cloud pattern Designer Series Paper layer is from the Enjoy The Journey DSP pack.
I cut the patterned paper layer 4 3/4″ x 3 1/2″.
The rainbow sentiment is stamped with Tuxedo Black Memento ink.
Using the brush tip on my Stampin’ Blends, I shaded over each of the sentiment lines.
I stamped the sun with Pumpkin Pie ink and shaded the inside with a Dark So Saffron Blend.
Originally, I didn’t add a layer under the top layer.
To give the top layer a little lifr, I added a thin Coastal Cabana mat leyer. This also draws attention to the Coastal Cabana sky.
The Coastal Cabana mat layer is a “smidgen” larger than 4 3/4″ x 3 1/2″.
“Smoidgen” means “just a little”.
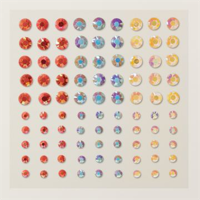
I scattered a few of the white sequins from my Adhesive Backed Seasonal Sequins for some subtle sparkle.
So, take a look at the Covered In Sunshine stamp set, put it on your Wish List and think about what colors your rainbow would be.
From now until January 31st, for a minimum product purchase of $50.00 (before shipping and tas), , you will receive a FREE Mini Card Kit along with a Video Tutorial link and Project Sheet to help you assemble the cards. The card bases, layers and elements are all included. You add your sentiments and assemble.
FREE Mini Card Kit
January Host Code: YZ7RBPBF
If your order is $50.00 (before shipping and tax), please use the Host Code above when prompted. You will receive Rewards from me along with the Mini Card Kit featured above. If your order is over $150.00 (before shipping and tax), please do not use the Host Code. You will receive Stampin’ Rewards. You will also receive Creative Coins and the FREE Mini Card Kit from me.
I am happier than a clam (have you ever heard that phrase?). Balmy Blue, blue and yellow patterned paper, amazing sentiments, and a fun Punch Bundle; all in one card!
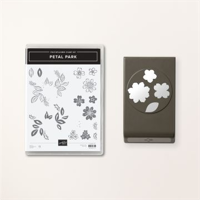
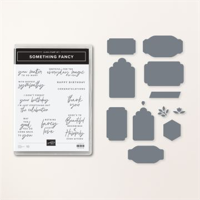
Today, I’m showcasing a favorite card design template featuring the Petal Park Bundle, the Regency Park Designer Series Paper and the Something Fancy Bundle. You can get all of the Bundle and Designer Series Paper details at the end of this post.
Let’s get to today’s card.
Today’s Card Pieces and Parts
The Balmy Blue cardstock base is 4 1/4″ x 11″.
I cut a Basic White mat layer 3 1/8″ x 4 5/8″.
The Balmy Blue patterned paper layer is 3″ x 4 1/2″.
I cut the two patterned paper off set layers 21/2″ x 3 3/4″.
The Mango Melody and Petal Pink cardstock strips Measure 1/2″ x 4 1/2″ and 1/2″ x 4 1/4″ respectively.
Adhere the card layers as shown.
Attach the 1/2″ strips to the back of the right side of the finished focal point layer.
The tag sentiment layer is die cut from the Something Fancy Dies.
I stamped the sentiments from the Something Fancy stamp set with Night of Navy ink.
The Inside Story
If you look closely at the “Parts And Pieces” image above, you’ll see that I was able to punch flowers directly from the Regency Park Designer Series Paper using the Petal Park Builder Punch. I enjoy finding those little surprises Stampin’ Up! creates for us.
The Basic White layer for the inside sentiment is 4″ x 5 1/4″.
Each patterned paper strip along the bottom is cut 1/4″ x 3 1/2″ and 1/4″ x 3 1/4″.
I stacked the DSP strips and attached a punched flower.
This design is simple to duplicate with your favorite patterned paper and elements.
So, pull out your favorite patterned paper, cut a few layers, create a fun Focal Point and create something fun!
… the only limitation is y our imagination!
Thank You From Me
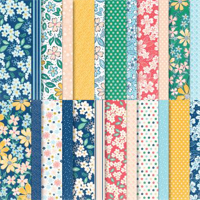
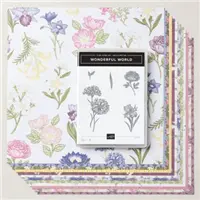
To thank you from me, for each $50 minimuym product order (before shipping and tax), I will send you a Mini Card Kit absolutely FREE! The mini kit featured below will be available through January 31st, 2023. It showcases the Country Bouquet Bundle, the Country Gingham Designer Series Paper and the Country Floral Lane DSP.
If your order is $50.00 (before shipping and tax), please use the Host Code above when prompted. You will receive Rewards from me along with the Mini Card Kit featured above. If your order is over $150.00 (before shipping and tax), please do not use the Host Code. You will receive Stampin’ Rewards. You will, also receive Creative Coins and the FREE Mini Card Kit from me.
Today is the last day of Stampin’ Up!’s Sale-A-Bration. If you haven’t gotten the Amazing Phrasing stamp set, give it a thought or two. It’s a fun set with lots of “phrasing” possibilities. Best of all, it’s FREE with a $100 product purchase, but… it ends today.
Today’s Card Pieces And Parts
This is such a quick and easy card to put together. The sentiment does it all!
There are so many current Designer Series Paper patterns that would work with this design. I kept my pattern simple and bright.
I cut a Basic White Thick cardstock base 8 1/2″ x 5 1/2″ and scored it at 4 1/4″.
There’s a Parakeet Party thin mat layer for the Designer Series Paper that measures 5 1/8″ x 3 7/8″.
The polka dot DSP layer is 3 3/4″ x 5″.
The two sentiment Basic White layers measure 3 1/2″ x 1″ (Woo Hoo!), and 3/4″ x 2 3/8″ (you did it!).
I cut a 1/4″ x 2 3/8″ of Highland Heather cardstock as a bottom layer for the smaller sentiment layer, and a 1/4″ x 3 1/2″ strip of Tahitian Tide cardstock to go under the larger sentiment.
The stars and heart are die cuts from the Cracker & Treat Box Dies (Annual Catalog).
As for the inside, I stamped another phrase and added a scrap strip of DSP along with a die cut heart and star.
So, treat yourself to Amazing Phrasing, add some layers and a few stars and create something fun and amazing!
Today’s post differs slightly from my norm. I’ll explain…
Some time ago, I received a beautiful card from a member of my Stampin’ Up! Team. Georgia Egan created the card. I thought it was so beautiful and posted it. Click here to see the original post. The following day, I created a PDF Tutorial for the card. That original post is here.
The Response
The response to the tutorial was amazing. Views on Pinterest and to my Blog are continuously above average for those posts. The original card is a 5″ x 7″. I received several emails asking if I could scale the Tutorial down to an A-2 card, 4 1/4 x 5 1/2″. So, I designed two different cards in an A-2 size. The Project Sheet with the new measurements will be on my blog tomorrow. Be sure to check back.
I couldn’t decide which card to post, so I’m showcasing both. I still haven’t had enough of the Hues of Happiness Suite. Since I’m getting into fall and holiday creative mode, I thought I would give the design a whirl with the Rustic Harvest Suite. So today, you get two new cards in one post.
Thank you to those who took the time to send me an email and comment. I appreciate you.
Let’s not forget the writing layer. In this design, it’s on the back of the card.
The card fits into our medium size envelopes but may require a little extra postage.
Don’t forget to check back in tomorrow for the complete “how to” and new measurements.
So, find that perfect Designer Series Paper, cut a card base and a few layers, add a pop-up mechanism and create something that truly is a gift.
There’s only a few weeks left to Sale-A-Brate. Today, I’m showcasing the Wonderful World stamp set and the Wonderful World Designer Series Paper. They’re both featured in the Sale-A-Bration Brochure as a Bundle and are FREE with a $100 product purchase.
The simple layout of my card today is quick and easy to cut and put together. You can switch up the design and add your own patterned paper, stamped image and sentiment. So let’s get started!
Today’s Card Pieces And Parts
Cut a standard A-2 Basic White card base cut at 5 1/2″ x 8 1/2″. Score at 4 1/4″.
The large Orchid Oasis mat layer is 4 1/8″ x 5 3/8″.
The patterned paper layer is 4″ x 5 1/4″.
The Orchid Oasis center layer is 4 1/8″ x 2 7/8″.
The Basic White top layer is slightly smaller. It’s 4″ x 2 3/4″.
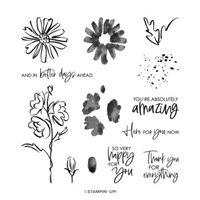
I used the Color & Contour stamp set for all the sentiment and ink splatter image.
I colored the flower with Old Olive and Rich Razzleberry ink, along with two sponge daubers.
This is a quick and easy way to color a stamped image. I “daubed” the flower with Rich Razzleberry ink, and shaded the leaves with another “dauber” and Old Olive ink.
I stamped the sentiment and ink splatter with Orchid Oasis ink.
Attach the cut cardstock layers as shown with your favorite adhesive.
A Few Design Tips
If you cut the bottom offset layer slightly larger than the top, you’ll be able to angle your layers more evenly. It works!
Using a dark, thin layer under the patterned paper layer gives the patterned paper some dimension.
The cardstock color for the original version of this card is Starry Sky. I saw Starry Sky in the Designer Series Paper, as well so I thought that would be a good layer color. You can decide which you prefer. I like both.
So, cut some layers, add a pretty patterned paper layer, stamp an image and a sentiment and create something thoughtful!
I am Debbie Crowley and welcome to my blog. Here you'll find fun projects that are sure to inspire you. I hope you'll stop
by often and leave a comment or two. To contact me, you can email me at: expressivelydeb@gmail.com
Current Catalogs
What are you looking for?
The content of this blog is the sole responsibility of Debra Crowley, expressively deb.com, as an Independent Stampin' Up! Demonstrator. The use of and content of classes, services or products offered is not endorsed by Stampin' Up!