Aug 4, 2022 | Encouragemet, Fall Themed, Gallery, Thinking of You |
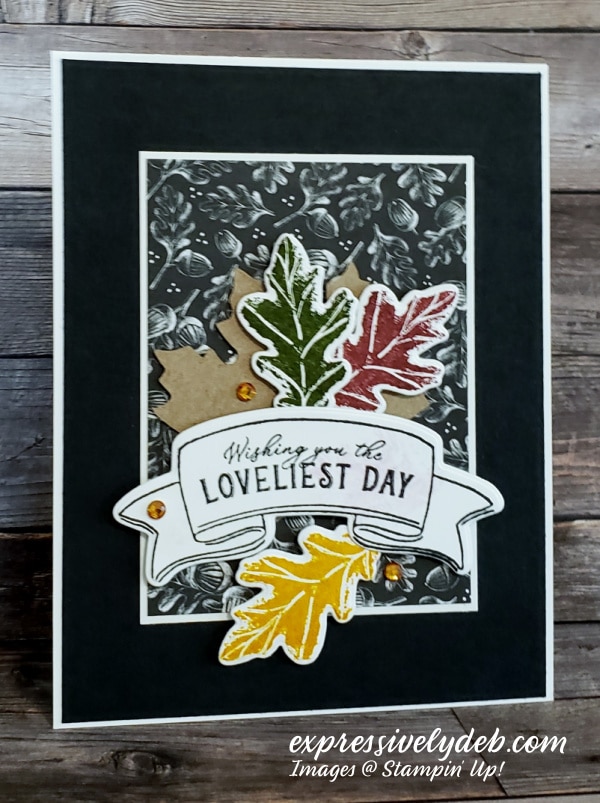
If you look closely at the Designer Series Paper layer in today’s card, you’ll see amazing art. This photo doesn’t do it justice, but the white dots almost sparkle. I created this card with the design term, “pattern repeat”, in mind. The maple and oak leaves repeat in the patterned paper and the card front elements.
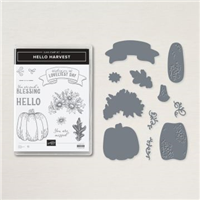
When I first saw the Rustic Harvest Product Suite, this sentiment stamp and banner die spoke to me, not to mentioned the deep toned color palette. So, let’s get right to creating this simple and pretty card.
Today’s Card Pieces And Parts
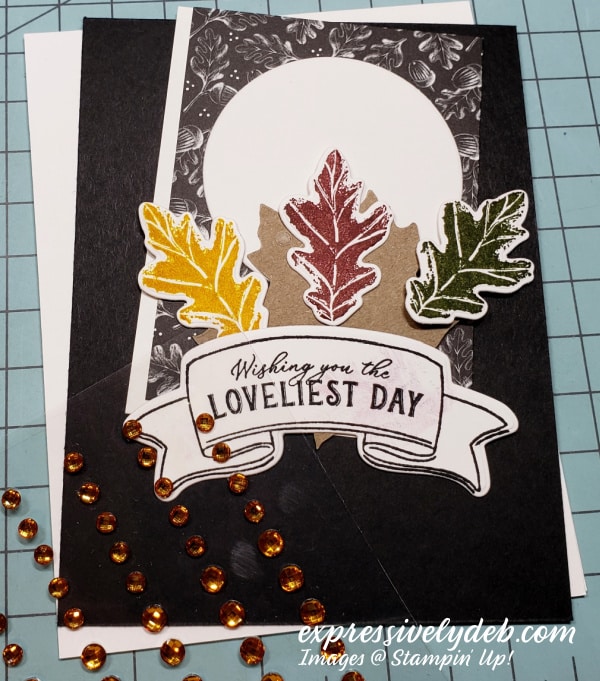
- The die cut circle is in my “pieces and parts” photo because I was going to use it as an element anchor. When I started putting the card together, I thought it covered too much of the patterned paper, so I left it out. I think it looks so much nicer without it. What’s your opinion?
- I cut a standard Basic White card base 4 1/4″ x 11″ and scored at 5 1/2″.
- The large Basic Black layer is 4 1/8″ x 5 3/8″.
- The smaller Basic White layer is 2 7/8″ x 3 7/8″.
- The patterned paper layer is 2 3/4″ x 3 3/4″.
- Stamp the oak leaves with Crushed Curry, Mossy Meadow and Merry Merlot ink and die cut them with the coordinating die.
- Stamp the sentiment with Black Memento ink and die cut it with the coordinating die.
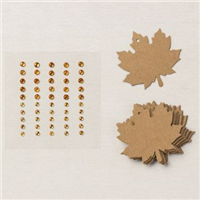
- The Crumb Cake maple leaf is actually a die cut tag from the Leaf Label and Amber Gems Combo Pack. This is the embellishment set that is part of the Rustic Harvest Suite.
- The Amber Gems have an amazing sparkle. It’s hard to see in the photo.
- Assemble and adhere the card layers as shown.
- Adhere the maple leaf to the center of the card front.
- Attach two of the oak leaves with Dimensionals on the maple leaf as shown.
- Attach the sentiment banner with Dimensionals as shown.
- Adhere the third oak leaf with Dimensionals under the sentiment banner, as shown.
- Add a few Amber Gems.
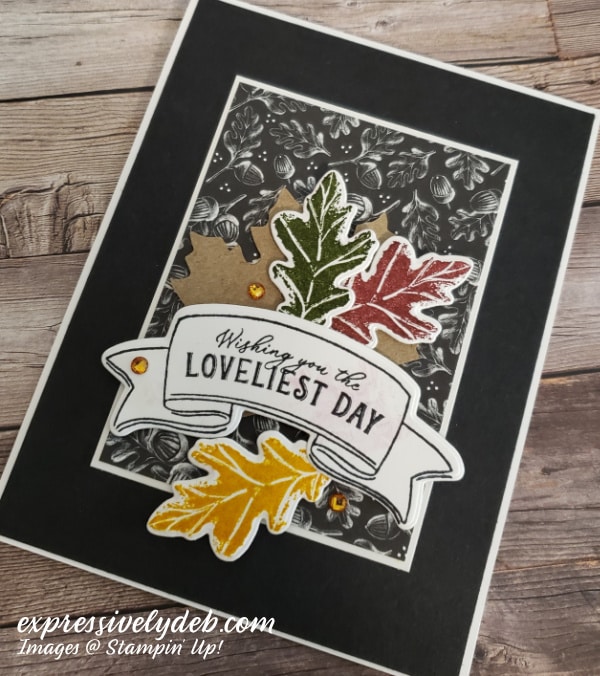
This is such an easy card to put together, and it looks so special. It’s a great way to make someone’s day!
So, think Fall – cut a few layers, add beautiful Fall leaves, and wish someone a lovely day!
… the only limitation is your imagination!

Today’s Product Details
STAMPIN’ UP! NOTES & NEWS
- The Pool Party and Soft Sea Foam Notes And Envelopes and the Tree Lot Dies from the Sale-A-Bration Brochure are no longer available.
- Stampin’ Up! has made more products available for FREE with a qualifying purchase so we all can continue to enjoy the benefits of Sale-A-Bration.
- Click the flyer below for details.

DON’T FORGET TO SALE-A-BRATE NOW THROUGH AUGUST 31ST

A FREE GIFT FROM ME
FESTIVE PEARLS WITH A MINIMUM OF $50.00 PRODUCT PURCHASE


Jul 13, 2022 | Children, Encouragemet, Gallery, Stampin' Up! Specials & News |

Time for another Mini Slimline design. I so enjoy creating a Slimline card. The card measures 7″ x 3 1/2″ and is so easy to create.

The Hippest Hippos stamp set and Hippo Dies are FREE now through August 31st, during Sale-A-Bration. Your total product order has to be $100 to get these adorable products free. You can click the images in the Product Details Section of this post to imagine all the projects you can create with this stamp and die set.

Today’s Card Pieces And Parts


- I love this color combination – Daffodil Delight, Sweet Sorbet and Coastal Cabana. Three vibrant colors that work beautifully together to create a “happy” and fun design.
- The Daffodil Delight card base is a 7″ square, scored at 3 1/2″.
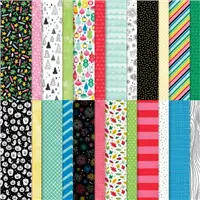
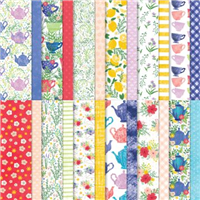
- The plaid patterned paper covers the front of the card base. It measures 3 1/2″ x 7″. It’s from the Celebrate Everything Designer Series Paper pack. There are 48 sheets of amazing Designer Series Paper in the pack with designs for all occasions, including fun holiday patterns.
- Click on the button below to download and print the Tutorial. The measurements and a “how to” are there.

So, download the PDF, pull out your Hippest Hippos stamps and Hippo Dies, and create something fun and “On Pont”!
… the only limitation is your imagination!
Today’s Product Details


- From today through July 31st, 2022, for every minimum order of $50.00 through my online store, you will receive a FREE package of Festive Pearls from me.
- Please use the July Host Code QUHMHEFX.
- Click the shopping bag below and the Host Code will automatically come up.
- If your order is $150.00 or more, do not use the Host Code. You will receive Stampin’ Rewards from Stampin’ Up! and you will also receive the Festive Pearls from me.
A FREE GIFT FROM ME
FESTIVE PEARLS WITH A MINIMUM OF $50.00 PRODUCT PURCHASE
Jul 5, 2022 | Encouragemet, Gallery, Holidays, Stampin' Up! Specials & News, Thinking of You |

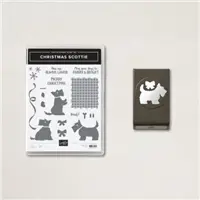
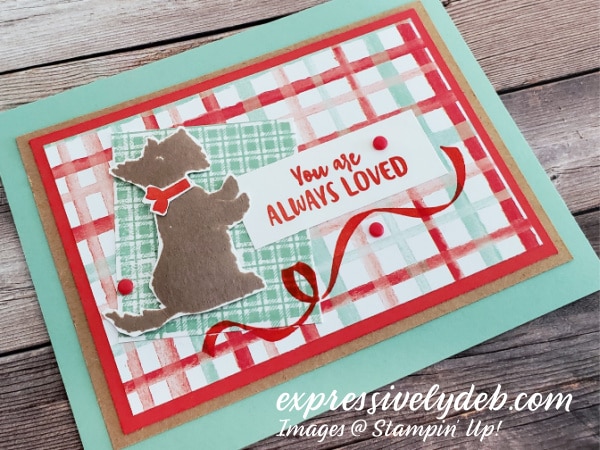
Today, I’m showcasing the Christmas Scottie Bundle, which includes the Christmas Scottie stamp set and the Scottie Dog punch. Along with the Bundle, my inspiration for today’s card is from a card in the Sale-A-Bration Brochure that featured the Ringed With Love Designer Series Paper. The DSP pack is FREE with a $50 product purchase.
Poppy Parade and Ming Macaton is a fun color combination. Paired with the Kraft cardstock and Crumb Cake, I think it’s super cute!
Today’s Card Pieces And Parts

- I cut the Mint Macaron card base 5 1/2″ x 8 1/2″, scored at 4 1/4″.
- I cut a piece of Kraft cardstock 3 3/4″ x 5″. We can replace this with a Crumb Cake layer. I thought the Kraft layer would add a little interest.
- The Poppy Parade layer is 4 3/4″ x 3 1/4″.
- The patterned paper layer is 3″ x 4 1/2″.
- Stamp the images as shown above with Mint Macaron, Crumb Cake and Poppy Parade ink onto a Basic White cardstock scrap.
- Fussy cut the Scottie dog, and the small ribbon bow.
- Punch the large ribbon bow using the Scottie Dog Punch.
- I stamped the ribbon image onto the white cardstock so you can see it. I stamped this image directly to my card top layer once I had my layers and elements in place. It’s a photopolymer stamp that is bendable. You’ll notice, I adjusted it a bit before I inked it.
- Attach the cut layers to the card base.
- Add the card elements as shown.
- I attached the plaid blanket image first with liquid glue, then attached the dot with Dimensionals.
- The sentiment layer measures 3/4″ x 2 1/4″. It’s slipped under the dog paws and attached with glue.
- I stamped the ribbon last with Poppy Parade ink.
- I had some Poppy Parade Resin Dots in my embellishment stash. I thought they worked well for a little embellishment.
- The inside of the card is a Basic White card layer. The patterned paper strip is 1/2″ x 5 1/4″.
- I attached the punched bow to the bottom corner.

So, stamp an adorable Scottie Dog, add some punched and stamped ribbon, a cute plaid blanket and create something lovable!
… the only limitation is your imagination!
Today’s Product Details
You can find the Christmas Scottie Bundle on page 34 in the July-December 2022 Mini Catalog. Click on the Catalog image below to download a virtual copy.

For Ringed With Love DSP inspiration, click on the Sale-A-Brtion Brochure below and turn to pages 6 and 7.
- From today through July 31st, 2022, for every minimum order of $50.00 through my online store, you will receive a FREE package of Festive Pearls from me.
- Please use the July Host Code QUHMHEFX.
- Click the shopping bag below and the Host Code will automatically come up.

- If your order is $150.00 or more, do not use the Host Code. You will receive Stampin’ Rewards from Stampin’ Up! and you will also receive the Festive Pearls from me.
A FREE GIFT FROM ME
FESTIVE PEARLS WITH A MINIMUM OF $50.00 PRODUCT PURCHASE
Jun 18, 2022 | Encouragemet, Fun Folds, Gallery, Thinking of You, Tutorials |

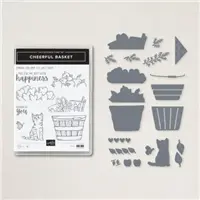
I just received the Cheerful Basket Bundle, and it is adorable. The Cheerful Basket stamp set has 9 stamps, including two mixed font sentiments. As the “Cheerful Basket” title suggests, there’s one large basket you can fill with hearts, apples or craft supplies… all “cheerful”! There’s an adorable kitten that is perfect sitting next to the basket. The Full Basket coordinating dies make it easy to fill your basket with pine tree boughs and leaves. This is an “all season” Bundle you’ll definitely enjoy.

I thought the Book Binding Fun Fold design would make a perfect canvas for the basket. Once you complete the “book binding” part on the left of the card front, the card front becomes a 4″ square. This is a good size for the die cut basket. I had loads of fun with this fun fold and the Cheerful Basket Bundle. I added cutting dimensions and quick instructions below.
Today’s Card Pieces And Parts

- The Starry Sky card base is 4 1/4″ x 11″, scored at 4 1/4″ and 5 1/2″.
- Fold the card base in half at the 5 1/2″ score line.
- The front of the card has the second score line. With the card base in front of you, fold the flap to the left.
- Add Multipurpose Glue to the inside of the 1 1/4″ section to create the “book binding” on the left side.
- The front card base flap that opens will be a 4 1.4″ square.
- Cut three Basic White layers: Two 4″ squares, and one 1″ x 4″ layer. One Basic White square is for the inside and the remaining two are for the card front.
- The Tea Boutique Designer Series Paper card front large layer is a 3 7/8″ square.
- The Designer Series Paper card front small layer is 3 7/8″ x 7/8″.
- Adhere the layers to the card front as shown.
- I stamped the basket with Sahara Sand ink, and the hearts and sentiment with Sweet Sorbet ink.
- The stamped hearts and basket, along with the other card front elements, are all die cuts using the coordinating Full Basket Dies.
- They’re attached to the card front with Dimensionals.
- I used the 2022-2024 In Color Baker’s Twine in Sweet Sorbet to add a little something to the card seam.
- It’s wrapped around the card three times and tied in a bow in the front.

So, get yourself the Cheerful Basket Bundle, add some fun patterned paper, die cut some seasonal elements, and create something cheerful!

… the only limitation is your imagination!
Today’s Product Details
LAST CHANCE PRODUCT SALE


THE KITS COLLECTION – BUY ONE GET ONE HALF OFF


Jun 16, 2022 | Encouragemet, Gallery, Spring, Thinking of You |

I know the flowers are baby cottage roses in today’s card, but the “floating” flowers remind me of a lotus. The Abigail Rose Designer Series Paper has such pretty subtle patterns, I thought I would mix in a little Basic Black. I like the outcome. The Basic Black mat layer gives this design a bit of pizzazz! A Petal Pink or Smoky Slate layer would to the same.
I am, by no stretch of the imagination, an expert with Stampin’ Blends. Today, they worked well for me. Not wanting to sponge or use a Blending Brush to color the flowers, the Blends gave me more defined color. I am happy with the outcome.
This truly is a quick and easy card. The layer dimensions and a brief “how to” are below.
Today’s Card Bits &Pieces

- The Very Vanilla card base is 4 1/4″ x 11″, scored at 5 1/2″.
- I cut the Basic Black layer 4″ x 5 1/4″.
- The Smoky Slate leaf pattern paper layer is 3 3/4″ x 5″.
- I cut the Petal Pink striped layer 3 1/2″ wide x 3 1/4″. long. With the striped pattern facing you, start at the top left corner and gently tear the paper toward you on the diagonal to the right edge.
- Years ago, before we had detailed layering dies, we tore paper often to give our projects visual interest.
- To make this layer look a little more “vintage”, you can lightly sponge a little ink over the torn edge. I chose not to for today’s card.
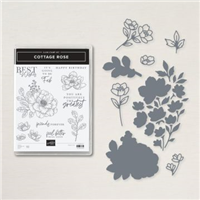
- I used the large die cut from the Cottage Dies and the coordinating Designer Series Paper pattern to cut the flower images.
- Light Calypso Coral and So Saffron Stampin’ Blends gave me the color for the flowers and I used a Light Just Jade Bland for the leaves.
- Overall, it took very little time to “prep” my card pieces.
- I adhered all the layers with Multipurpose Liquid Glue, stamped the sentiment with Memento Tuxedo Black Ink, and attached them all with glue.
- I love how the Champagne Rhinestones look with this suite, so I added a little sparkle to the sentiment.

So, pull out the products from your Abigail Rose Suite, die cut a few flowers, add some color and create something with a little pizazz!
… the only limitation is your imagination!
Today’s Product Details
IT’S ALMOST CHRISTMAS IN JULY! TIME TO SALE-A-BRATE!
Amazing new products are coming your way in the July–December 2022 Mini Catalog. The catalog goes live on July 1st, 2022 and runs through January 4, 2023. Sale-A-Bration is back on July 1st with more fabulous products.
For those who placed an order with me over the past 6 months, you will automatically get the catalogs sent to you as a thank you for your business support! You should receive the new Mini Catalog on June 30th. If you don’t receive it, please email me.
LAST CHANCE PRODUCT SALE
THE KITS COLLECTION – BUY ONE GET ONE HALF OFF