May 31, 2022 | Birthday, Encouragemet, Gallery, Thinking of You |

Hope you all had a happy holiday weekend and spend some time in your craft space. We had a clambake at my sister’s over the weekend. The sea food was amazing. I also organized in my craft room. That was fun, too!!
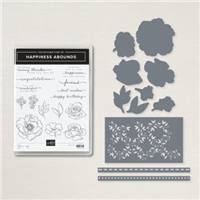
I put this card together yesterday and wanted to share it with you. The Happiness Abounds Bundle and the Hues of Happiness Designer Series Paper make it so easy to create pretty cards and projects. The Happiness Abounds Suite was made for the Deckled Rectangles Dies. I haven’t inked up the edges of my Deckled Rectangles die cuts. That detail may happen soon!
Today’s Card Bits & Pieces
- I went with a Basic Black card base today. I thought Basic White and Petal Pink would be a striking contrast with black.
- My card base is an A-2 cut 4 1/4″ x 11″ and scored at 5 1/2″.
- I die cut three layers using the Deckled Rectangles. One in Petal Pink, and two Basic White.
- I used one Basic White for my card front and one is on the card’s inside.
- The Basic White layer is die cut and embossed with the large pop up die (if you look closely at the die cut layer, you’ll see tiny embossed/cut petals you can pop up to create dimension with the die) from the Blooming Happiness Dies.
- You can see, I offset the rectangle layers, making sure my layer corners are about the same distance from the edges of the card on all sides. This helps me know I center my layers even though they’re offset.
- The flowers are die cuts from the Hues of Happiness Designer Series Paper and attached with Dimensionals.
- The sentiment, stamped with Melon Mambo ink and attached to a die cut label, is also attached with Dimensionals.
- The die cut label for the sentiment is from the All That Dies.
- The All That Dies include versatile label dies. If you haven’t seen them, they’re worth a look.
- I embellished with a few 2022 – 2024 In Color Matte Decorative Dots.

So, find a beautiful flower cluster, attach it to an embossed Deckled Rectangle, add a few Matte Dots and create something “wonderful in every way”!
… the only limitation is your imagination!

Today’s Product Details
Last Day to JOIN STAMPIN’ UP! For the fabulous In Color Starter Kit
Click on the image below for more details.

- If you are thinking about joining Stampin’ Up!, now is the time and I would love to have you on my team!
- We love Hobby Stampers!
- You can select $125.00 in product for $99.00 plus FREE shipping!
- That’s not all! From May 3rd, 2022 to May 31st, 2022 you will get an additional $66.50 worth of 2022-2024 In Color products FREE! This is fabulous!
- The new 2022-2024 In Color Grid Paper
- The new 2022-2024 In Color Classic Ink Pad Collection
- The 2022-2024 In Color Cardstock Collection
- The 2022-2024 In Color 6″ x 6″ Designer Series Paper

Apr 6, 2022 | Encouragemet, Gallery, Spring |

Today, I’m showcasing the Brilliant Wings Dies. And they’re not going away! They are a beautiful set of classic butterfly dies.
It’s been a while since I created a “tag” card. I used the largest tag in the Tailor Made Tags Dies. These are also staying with us. It’s a versatile set of tag dies that can be used as a card or sentiment layer.

Today’s Card Bits And Pieces

- The standard A-2 Highland Heather card base is cut 11″ x 4 1/4″, scored at 5 1/2″.
- I added a Basic White card layer that measures 4 1/8″ x 5 3/8″.
- The Highland Heather patterned paper layer is 4″ x 5 1/4″.
- It’s a pattern from the Flowering Fields DSP pack.
- The Brilliant Wings Die set has a die that resembles ink splatter. I love the texture it creates.
- I used the ink splatter die to die cut texture into the patterned paper layer.
- The Basic White tag is adhered with Dimensionals and stamped with an image from the Lovely You stamp set.
- I scattered three die cut butterflies and a few 2021-2023 In Color Jewels to finish this card.
So, cut a Highland Heather card base, die cut some ink splatter, add a few gorgeous jewels and create something lovely!
… the only limitation is your imagination!
Today’s Product Details

Mar 4, 2022 | Birthday, Clean and Simple, Encouragemet, Gallery, Stampin' Up! Specials & News, Thinking of You |
Happy Friday! Another weekend is in front of us and I hope you can spend some time in your craft space.
Inspiration for today’s card came to me from two different places!
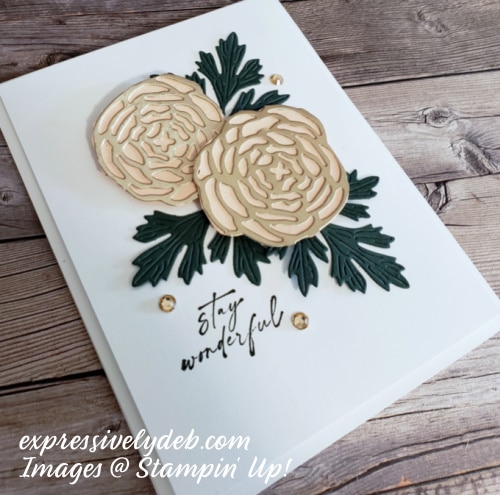
First, I walked past the fresh flower section at my grocery store and saw the beautiful bouquets of Ranunculus Roses! They were pink and what looked like a muted yellow. They were so beautiful. I thought of the Ranunculus Romance stamp set I have. The subtle shade of pink reminded me of my Blushing Bride cardstock! Then, I was going through emails and saw a card that had flowers in the center wrapped in gold foil.
Pieces And Parts of Today’s Card
- I always begin with my card base and layer cuts, then work on everything else.
- Today’s card is a standard A-2 top fold with a Thick Basic White cardstock base. It measures 4 1/4″ x 11″ scored at 5 1/2″.
- The top Basic White layer is 4″ x 5 1/4″.
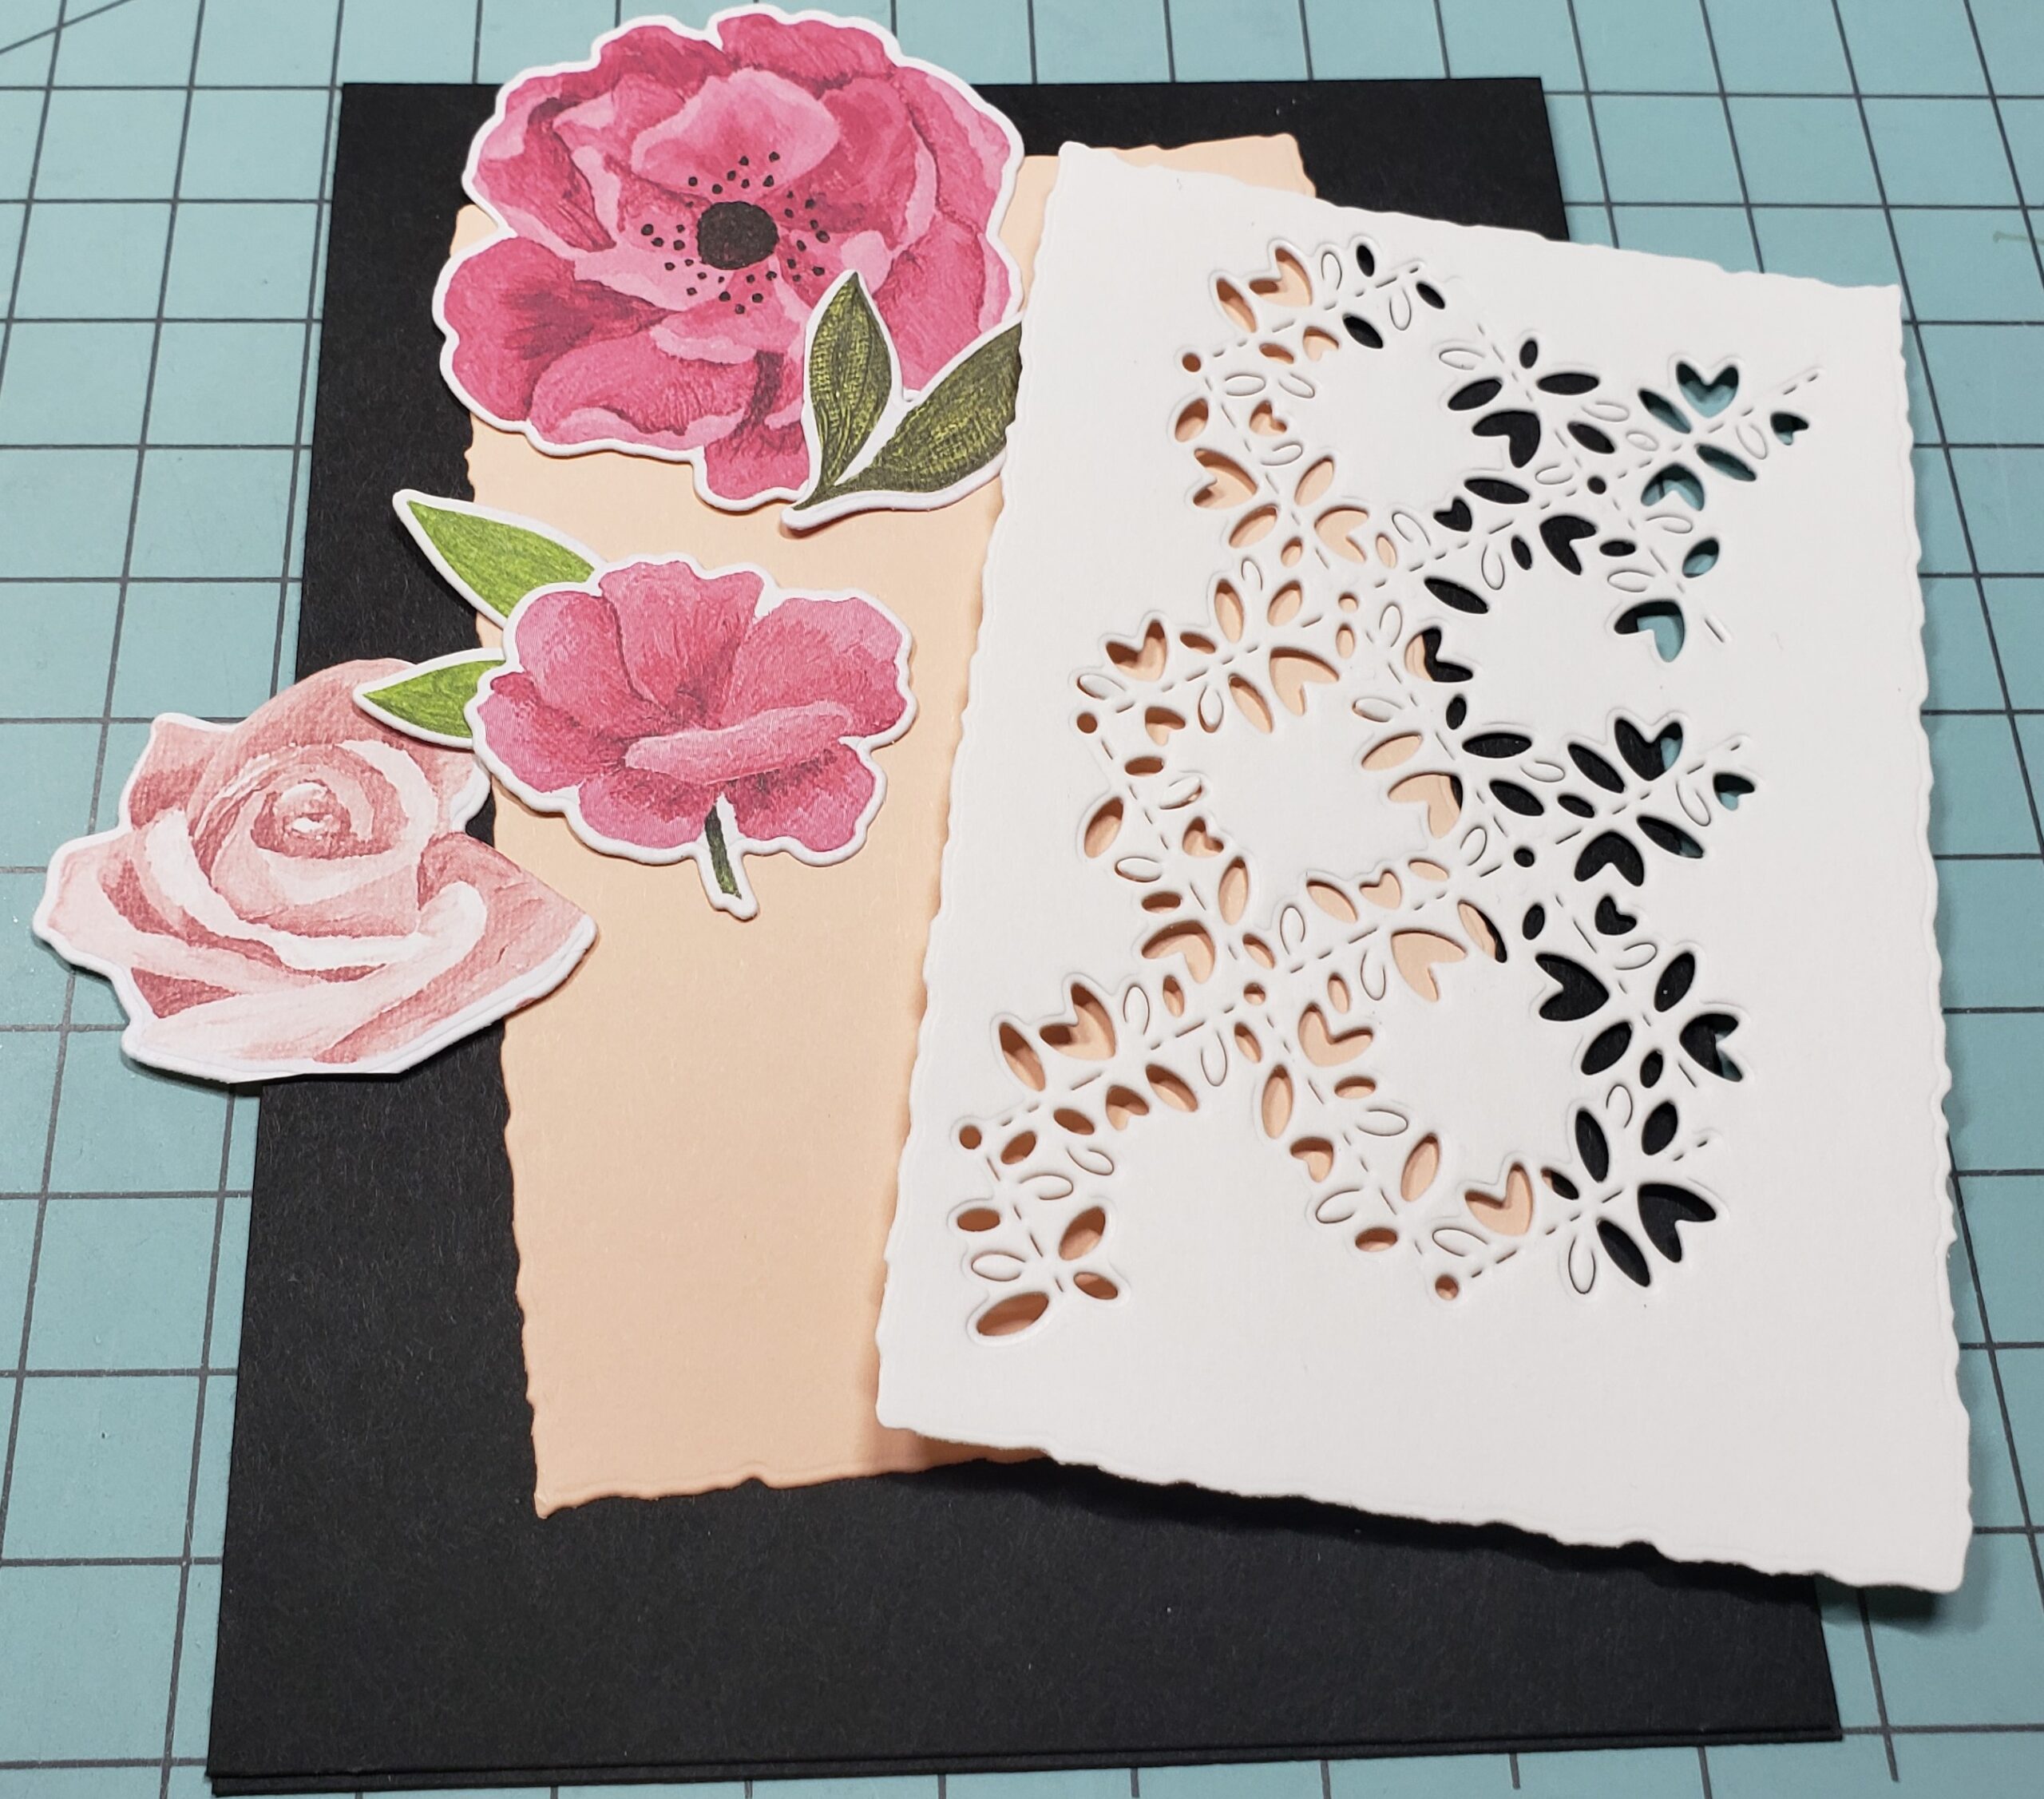
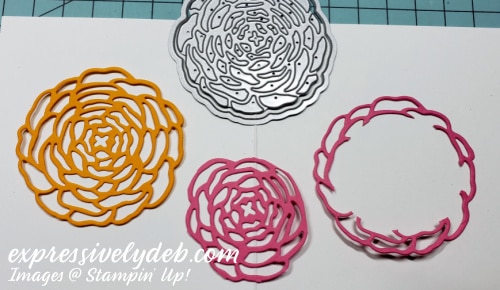
- I used the rose die from my Ranunculus Dies for the first time. The large rose die is beautiful. I wanted it smaller for my design so I die cut the rose and layer and sized it to comfortably fit two on my card.
- Sizing this die cut is easy. Just snip around the edge until you reach the size you want.
- See my photo below. (I was playing with color when I photographed this).
- How’s that for versatility! I can already think of other ways to use this die AND is fits easily into the specially priced Mini Stampin’ Cut & Emboss Machine. Save 20% now through the end of March.
- The matching base layer die can be sized as well. I attached the smaller version of the die cut rose to the base layer with low tack tape and snipped around it.
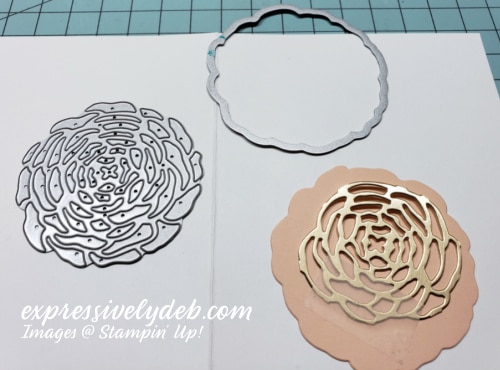
- The leaves are die cut with one of the Ranunculus Dies. The embossed detail in the leaf die is amazing.
- The sentiment is from the Honeybee Home stamp set. It happened to be sitting on my craft table from my last card. I thought the font was perfect for these roses.
So, take a look at some of your dies, give them a new purpose, add some sparkle and create something clean and simple.
…the only limitation is your imagination!
Today’s Card Product Details
Sale: $48.00
Price: $60.00
NOTES AND STAMPIN’ UP! NEWS
- Latest addition to the Stampin’ Up! Kits Collection:
- The Robot Buddies Kit contains everything you need to create adorable robot themed cards and projects.
- There are 9 card bases and envelopes along with sticker sheets and die cuts.
- The Kit also includes a photopolymer stamp set, two Stampin’ Ink Spots and a clear block .

- Savings Are In Bloom Promotion: This is a good time to purchase the Mini Stampin’ Cut & Emboss Machine. It’s 20% off the regular price.
- There are 13 fabulous Bundles that coordinate with the Mini Stampin’ Cut & Emboss Machine. Each Bundle is 20% off.

- Waves Of The Ocean Collection Early Release.
- Check in on a beautiful new product collection with stunning colors and canvas created art designed patterned paper. It’s stunning!
- This new collection will certainly make you want to head to the beach, even to just take a walk and enjoy the ocean.

Feb 28, 2022 | Encouragemet, Fancy Folds, Fun Folds, Gallery, Thinking of You, Tutorials |

Hello Friends!
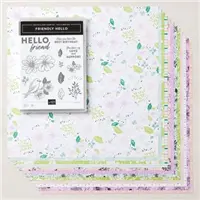
Today’s post is an easel card using the Friendly Hello Bundle. The Bundle is FREE with a $100 product purchase. Today is the last day to Sale-Brate! If you haven’t already checked the the FREE Sale-A-Bratiuon products, be sure to take a look and place your order.
Once you have your layers cut, this is an easy card to assemble. All of the measurements and a quick how to are below.

Today’s Card Details
- The Fresh Freesia card base is 4 ” x 11″. scored at 2 3/4″ and 5 1/2″ on the longer 11″ side.
- Fold at the center 5 1/2″ score line first then fold the 2 3/4″ piece in toward the center fold. Burnish your folds.
- The Basic White card front layer is 3 3/4″ x 5 1/4″.
- The card front patterned paper layer is 3 1/2″ x 5″.
The Inside
- The inside of the card has three Basic White layers.
- Cut the bottom Basic White layer 2″ x 3 3/4″ – Cut the center Basic White layer 3″ x 3 3/4″ – Cut the top Basic White layer 2 1/2″ x 3 3/4″.
- The patterned paper layer for the sentiment panel is 1 3/4″ x 3 1/2″.
- The patterned paper layer for the center of the inside is 3 1/2″ x 2 3/4″.
- Attach all of your layers to the inside of the card as shown below.
- The top two layers are attached with Multipurpose Glue while the bottom layer is attached with Dimensionals.
- The bottom layer will hold your card front in place when you create your easel because it has the height from the Dimensionals.

The Outside Card Front
- Attach the cut layers to the outside of the card base as shown below.

- Cut a white sentiment strip and cardstock layer to the size you need for your sentiment.
- The basic white sentiment strip in my card is 7/8″ x 2″.
- The cardstock layer for the sentiment strip is 1 1/8″ x 2 1/4″.
- I stamped and fussy cut the flowers and leaves from the Friendly Hello stamp set and shaded them with Fresh Freesia and Granny Apple Green Blends.
- They’re attached with Dimensionals.
- The large Friendly Hello sentiment is stamped directly onto the patterned paper front with Tuxedo Black Memento ink.
Just A Note
A regular A-2 card is 4 1/4″ wide. This card is 4″ wide. It has a bit of dimension and does fit nicely into a regular A-2 envelope.
I hope you enjoy re-creating this card as much as I enjoyed putting it together.
So, find some great patterned paper, add coordinating cardstock, fussy cut some flowers and create a special easel card to say hello to a special friend!
…the only limitation is your imagination!
Today’s Product Details
Feb 10, 2022 | Encouragemet, Gallery, Slimline Cards, The Paper Players |

Hello Friends!
I checked in on the Paper Players Challenge this week and saw the Theme was Love & Friendship. Stamping with the Paper Players tends to bring me back to my stamp set archives. There I found my “Seaside Sketches” stamp set. The rubber stamps are on wood blocks! It is fun to go back in time!

Today’s Card Bits And Pieces

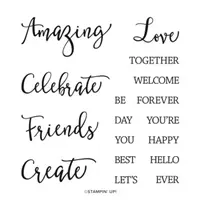
- Along with the Seaside Sketches stamp set, I used sentiments from the Create With Me stamp set. This set is in the current SU Annual Catalog on page 36. Love the larges sentiments!
- The Mini Slimline Basic White card base is cut to a 7″ square and scored at 3 1/2″.
- The layer of patterned paper is 7″ X 3 1/2″ and covers the card front.
- The Misty Moonlight mat layer is 3 1/8″ x 6 5/8″.
- For the stamped layer, I cut Basic White cardstock 3″ x 6 1/2″.
- The sentiments are stamped with Misty Moonlight ink and I used Tuxedo Black Memento ink for the image.
- Ink and a Blender Pen made the water coloring possible. Love those Blender Pens!
- The inside sentiment, part of the Seaside Sketches set, is perfect for this challenge.
- The font is small. It says “the best things in life are not free, but priceless”.

I’m happy to be back in the Paper Players’ Gallery. I always find lots of inspiration there.
So, pull out your ink and Blender Pens, add some color to a simple image and create something to celebrate love and friendship.
Today’s Product Details