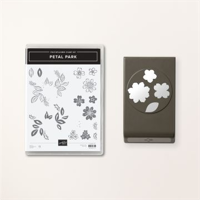
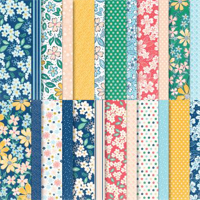
What a gret way to start my crafting week! The Petal Park Bundle and the Regency Park Designer Series Paper made it so much fun to come up with this card design and put it all together. Isn’t the mix of colors amazing! Love the “Brights” mixed with the “Subtles” and my favorite “Neutral”, Night of Navy, pulls it all together.
If you read my Blog regularly, you’ll know I’m always drawn to any shade of blue. The mix of Balmy Blue, Mango Melody and Night of Navy is, in my opinion, perfection.
So, let’s make a card!
Today’s Card Pieces And Parts
Start with a Night of Navy cardstock card base cut at 4 1/4″ x 11″, scored at 5 1/2″.
The Regency Park Designer Series Paper Layer is 5 1/2″ x 3 3/4″.
I die cut a stitched circle that measures approximately 3″ in diameter.
The Basic White sentiment layer is die cut with one of the Tailor Made Tags Dies. It measures approximately 1″ x 2 3/4″.
I stamped and punched the flowers and leaves from the Petal Park Bundle. I used Crushed Curry, Mango Melody, Calypso Coral and Petal Pink ink. Evening Evergreen and Soft Succulent ink give color to the leaves.
The die cut circle is adhered to the card front with Dimensionals, as is the sentiment layer.
I attached the flowers and leaves with glue.
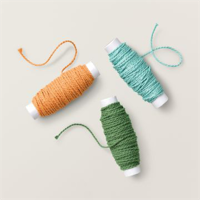
I added a bow using some Pumpkin Pie Baker’s Twine, and added a few Matte Dots to embellish.
This is a simple card to put together using the products from the Regency Park Suite. To me, the colors are “happy”.
The Inside
Cut a Basic White card layer 4″ x 5 1/4″ for the inside writing layer and add a strip of DSP and a few flowers. I didn’t add an inside sentiment to this card, but when you create your version, use what works for you. Most of all, have fun.
So, find that amazing and bold floral patterned paper, add a circle, some flowers and a Baker’s Twine bow, and create something to send to someone special.
March Mini Card Kit With Bonus Insert Fun Fold Card (Center)
From now through March 31st, with a product purchase of $50.00 (before shipping and tax), you will receive a FREE Mini Card Kit along with a Video Tutorial link and Project Sheet so you can assemble the cards with me. The card bases, layers and elements are all included. You add your sentiment, and supply your favorite adhesive. This Mini Card Kit uses the Dandy Designs DSP. There’s a Fun Fold Bomus this month. I added a third card (in the center of the photo). It’s a quick and easy insert card. You can wtire your message and attach a gift card to the insert. They’re all quick, easy and fun to put together.
March HOST CODE – NTRWBBCT
If your order is $50.00 (before shipping and tax), please use the Host Code above when prompted. You will receive Rewards from me along with the Mini Card Kit featured this month. If your order is over $150.00 (before shipping and tax), please do not use the Host Code. You will receive Stampin’ Rewards. You will also receive Creative Coins and the FREE Mini Card Kit from me.
Online Exclusives
Don’t forget to check in on the current Online Exclusives. You can click the images below to see the new products.
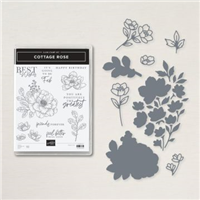
I know the flowers are baby cottage roses in today’s card, but the “floating” flowers remind me of a lotus. The Abigail Rose Designer Series Paper has such pretty subtle patterns, I thought I would mix in a little Basic Black. I like the outcome. The Basic Black mat layer gives this design a bit of pizzazz! A Petal Pink or Smoky Slate layer would to the same.
I am, by no stretch of the imagination, an expert with Stampin’ Blends. Today, they worked well for me. Not wanting to sponge or use a Blending Brush to color the flowers, the Blends gave me more defined color. I am happy with the outcome.
This truly is a quick and easy card. The layer dimensions and a brief “how to” are below.
Today’s Card Bits &Pieces
The Very Vanilla card base is 4 1/4″ x 11″, scored at 5 1/2″.
I cut the Basic Black layer 4″ x 5 1/4″.
The Smoky Slate leaf pattern paper layer is 3 3/4″ x 5″.
I cut the Petal Pink striped layer 3 1/2″ wide x 3 1/4″. long. With the striped pattern facing you, start at the top left corner and gently tear the paper toward you on the diagonal to the right edge.
Years ago, before we had detailed layering dies, we tore paper often to give our projects visual interest.
To make this layer look a little more “vintage”, you can lightly sponge a little ink over the torn edge. I chose not to for today’s card.
I used the large die cut from the Cottage Dies and the coordinating Designer Series Paper pattern to cut the flower images.
Light Calypso Coral and So Saffron Stampin’ Blends gave me the color for the flowers and I used a Light Just Jade Bland for the leaves.
Overall, it took very little time to “prep” my card pieces.
I adhered all the layers with Multipurpose Liquid Glue, stamped the sentiment with Memento Tuxedo Black Ink, and attached them all with glue.
I love how the Champagne Rhinestones look with this suite, so I added a little sparkle to the sentiment.
So, pull out the products from your Abigail Rose Suite, die cut a few flowers, add some color and create something with a little pizazz!
IT’S ALMOST CHRISTMAS IN JULY! TIME TO SALE-A-BRATE!
Amazing new products are coming your way in the July–December 2022 Mini Catalog. The catalog goes live on July 1st, 2022 and runs through January 4, 2023. Sale-A-Bration is back on July 1st with more fabulous products.
For those who placed an order with me over the past 6 months, you will automatically get the catalogs sent to you as a thank you for your business support! You should receive the new Mini Catalog on June 30th. If you don’t receive it, please email me.
Today, I’m showcasing the Brilliant Wings Dies. And they’re not going away! They are a beautiful set of classic butterfly dies.
It’s been a while since I created a “tag” card. I used the largest tag in the Tailor Made Tags Dies. These are also staying with us. It’s a versatile set of tag dies that can be used as a card or sentiment layer.
Today’s Card Bits And Pieces
The standard A-2 Highland Heather card base is cut 11″ x 4 1/4″, scored at 5 1/2″.
I added a Basic White card layer that measures 4 1/8″ x 5 3/8″.
The Highland Heather patterned paper layer is 4″ x 5 1/4″.
It’s a pattern from the Flowering Fields DSP pack.
The Brilliant Wings Die set has a die that resembles ink splatter. I love the texture it creates.
I used the ink splatter die to die cut texture into the patterned paper layer.
The Basic White tag is adhered with Dimensionals and stamped with an image from the Lovely You stamp set.
I scattered three die cut butterflies and a few 2021-2023 In Color Jewels to finish this card.
So, cut a Highland Heather card base, die cut some ink splatter, add a few gorgeous jewels and create something lovely!
Today’s card is my first Slimline card. I suppose you would call this a Mini Slimline. The finished card dimensions are 3 1/2″ x 7″. I thoroughly enjoyed putting this together. It was a nice change from my A-2 cards.
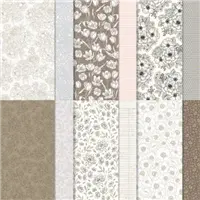
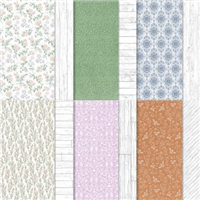
My inspiration for this card came from the beautiful, subtle designs in the Heart & Home Designer Series Paper. The card had to have a soft, delicate vibe to match he patterns. I laid out all of the patterns and made my choices. “Pattern Repeat” came to mind as I was making my pattern decisions. You can see the floral images repeated more than once in my card. Repeating a pattern in a card design, whether it’s flowers, circles or simple shapes always works!
Today’s Card Elements
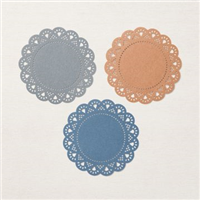
Working with a Product Suite makes it easy to create. The Heart & Home Suite includes the Honeybee Home Bundle, Heart & Home Designer Series Paper and the Heart & Home Doilies.
The Basic White card base is a 7″ square scored at 3 1/2″.
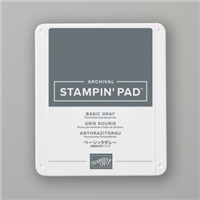
The Basic Gray and White wood grain patterned paper layer is 7″ x 3 1/2″, attached to the card front.
The large floral patterned paper is 2 1/2″ x 6″, attached to the right side of the card front, centered.
The smaller floral patterned paper is 2 1/2″ x 1 1/2″. I attached this to the top of the larger floral DSP.
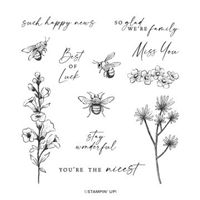
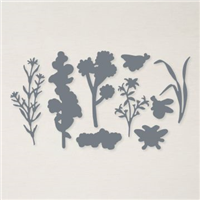
I used Basic Gray ink for all of the stamped images, die cut them with the matching Honeybee Blooms Dies and added a bit of color with Fresh Freesia and Pale Papaya Blends.
The pretty Basic Gray doily is the perfect “grounding” layer for all of the die cut elements.
I punched the sentiment with the scalloped oval with the Double Oval Punch.
I scattered some sparkle with a few 2021-2023 In Color Jewels. Love them!
The Envelope, Please
Now I have this pretty little card and no envelope. I went to Pinterest to see if I could fins slimline envelope templates to share with you. There were tons, but not with the dimensions of this card. With a piece of copy paper, I folded and scored until I got something I could share. Click the button below to download a quick PDF tutorial for the card envelope.
So, find that beautiful Designer Series Paper, add some pretty elements, create your own envelope and “Stay Wonderful”!
For every minimum $50 product purchase, you can choose a FREE qualifying product from the Sale-A-Bration Brochure and you will also receive a FREE gift from me. The Classic Matte Dots will find their way onto many of your projects. They’re clean and simple and are a perfect finishing touch.
Isn’t it great to start your Monday with a rainbow? And there are two of them. Happy Monday, indeed!
We have a fun week ahead. The customer launch of Stampin’ Up!’s new Annual Catalog is tomorrow. You’ve probably seen so many wonderful Sneak Peeks, but there’s more to come. I can promise you that. I’ll have a downloadable PDF of the new catalog available for you tomorrow and yes, I can now show you pictures of the new products and many more cards for your inspiration. So, stay tuned and keep checking in.
Aren’t these cards the cutest? This month’s Paper Pumpkin Kit is full of bright colors that shout warmer weather and lots of sunshine. I’m not a big fan of shaped cards, but I knew these rainbows would brighten someone’s birthday. I used two of the die cut rainbows from the kit. With Dimensionals, I attached one on a Bermuda Bay card layer and one on Granny Apple Green. The sun sticker had to be at the end of each rainbow which is exactly where the sun should be! I added a little sparkle under the sentiment banner and popped on a few Clear Epoxy Droplets. Two cards in just a few minutes.
There’s plenty more imagination in this Kit. I’m sure I’ll have fun remaking the rest of it. I will share more of it with you.
For more details on the Paper Pumpkin Monthly Kit, click here.
So, find a rainbow, add sunshine at the end, a few colorful layers and some sparkle, and create something colorful and happy!
…the only limitation is your imagination!
Stay Tuned for our JOIN+ Promotion starting tomorrow.
It’s a fabulous time to join Stampin’ Up! New team members get even MORE FREE products in their customizable Starter Kit. From May 4th through May 31st new team members can get$155 worth of eligible products for only $99 + free business supplies + free shipping +a FREE past Paper Pumpkin Kit+ and there just might be a rainbow in that Kit!… + all the fun being a part of Stampin’ Up!
More details tomorrow or you can click “Join My Team” in the menu above.
I would love to have you on my Team. We have monthly stamping meet-ups and wonderfully talented stampers. We share tips and projects with each other and most importantly, we have fun!
I am Debbie Crowley and welcome to my blog. Here you'll find fun projects that are sure to inspire you. I hope you'll stop
by often and leave a comment or two. To contact me, you can email me at: expressivelydeb@gmail.com
Current Catalogs
What are you looking for?
The content of this blog is the sole responsibility of Debra Crowley, expressively deb.com, as an Independent Stampin' Up! Demonstrator. The use of and content of classes, services or products offered is not endorsed by Stampin' Up!