Mar 17, 2021 | Encouragemet, Fancy Folds, Gallery, Spring |

I’m featuring a springtime “happy” Fun Fold card for you today. The Basket of Blooms stamp sets is one of those sets that is tucked away on page 48 in the current Annual Catalog. In my last post, I featured a card I made with the same stamps, but with different colors. The card design was also different. Today’s card is a Flip Fun Fold and very easy to put together.

Design Tip: Aren’t these colors beautiful together. Even though this is a really “cool” (wow) color combination, it’s very, very warm. Always remember when you are matching colors for your projects, warm tones will work well with warm and cool tones with cool. We usually recognize blues to be cool colors, but Pretty Peacock is a warm blue, meaning that it has red in it.
I verified this with the RGB numbers for Pretty Peacock: R 1, G 124, B 121. This means that Pretty Peacock is red and equal amounts of green and blue. Green and blue mixed create cyan (an aqua/teal blue shade). Add a small amount of red and you have a warmer blue tone. The same applies to Mossy Meadow. It’s green, but has a warm tone. The RGB for Mossy Meadow is: R 92, G 107, B 43. Lots of red in Mossy Meadow, and that’s what gives it a deep warm tone. It’s obvious that Terracotta Tile is warm, but just for fun its RGB is: R 229, G 118, B 184. Hmmm, red mixed with Cyan!
I love this pot of blooms but you already know that since I’ve used the same stamps twice. I ordered this stamp set because I liked the plant pot image and the basket image. Isn’t that little bow image adorable?
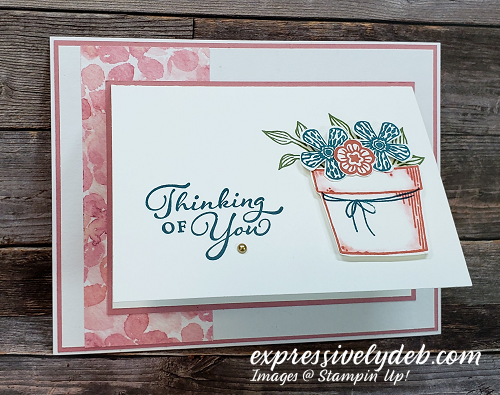
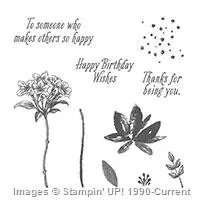
The Basket of Blooms stamp set is an image only set. There are no sentiments in the set, but the Happy Thoughts stamp set works so well with it. Below is the inside of my Fun Fold.

If you’d like to give this design a try, click the button below to download a FREE PDF Tutorial.

So, find that pretty pot of blooms, add a happy sentiment and create something thoughtful to send to a friend today!
…the only limitation is your imagination!

You can click on the images below for details on the products I used for today’s project.
Mar 7, 2021 | Gallery, Spring, The Paper Players, Thinking of You |

It’s Sunday and time for this week’s Paper Players challenge. Claire wants us to celebrate Spring! Her Theme Challenge is “Spring Is In The Air”. With only two weeks of Winter left to go, think “Spring” and play along with us this week. Claire gave us lots of possibilities.

I’m counting down the days for more sunshine, birds chirping, flowers and trees beginning to bloom and colorful landscapes. So, let’s talk about today’s card.

I used the Quite Curvy Bundle with the bird theme. How I would use it was the big question. Of course, I’m using Bumblebee and Misty Moonlight again! I chose the Misty Moonlight leaf pattern and Bumblebee dandelion pattern from the Dandy Garden DSP pack.
Still practicing my coloring, I used mixes of Misty Moonlight and Balmy Blue Stampin’ Blends to color the die cut bird. The leaf branch die from the Curvy Dies was a perfect perch for my bird. It also gave me a bit of a pattern repeat with the Misty Moonlight patterned paper layer, so I knew it would work. Actually, this was the first time I noticed that little leaf branch die.

All I had left to do was decide on a layer for my sentiment and bird. I was thinking about a stitched rectangle, but thought the circle worked better. I noticed another pattern repeat with the circle pattern in the dandelion patterned paper. The sentiment is from the Quite Curvy stamp set.
So, pull out some patterned paper, add something Spring to a stitched shape and create something made with love to link up with us over at the Paper Players.
…the only limitation is your imagination!

For more inspiration, check in on the rest of the Design Team to see what they came up with.
For details on the products used in my post today, click on the images below.

Jan 1, 2021 | Birthday, Gallery, Note Cards, Spring, Thinking of You |

Happy New Year! I wish you all lots of joy, good health and much love in 2021.
Here’s my Sneak Peek for the Garden Wishes Bundle. When I was thinking about what to do for my first post of 2021, many ideas came to mind. I kept going back to the Garden Wishes Bundle. The Bundle has been available for a while now and I’ve seen many versions of it. It’s part of the Dandy Garden Suite featured in the upcoming January-June 2021 Mini Catalog scheduled to go live on January 5th.
One of the perks I receive by being a Stampin’ Up! Demonstrator is that I get to see, touch and feel all of the new products before they’re available to the customer. This is probably the most exciting perk since excitement is generated early for the new and I look forward to that bit of a refresh. I’m sure you do, as well. We all need a refresh from time to time.
I’ve been stamping so many holiday cards and putting together holiday projects that stamping and coloring a few wisps of flowers blowing in the breeze is refreshing. Along with all of this, I love Misty Moonlight and here I go again with the blue and yellow color combination. I am going to work on “refreshing” that fact….maybe!

So, on to my card. Actually, my inspiration for this design was that little bee. I saw the bee stamp in the stamp set and had to use it somewhere. I’m not sure if you know it but the name “Debbie” means bee and I’ve always loved bumblebees. When you think about it, they are smart and industrious. Okay, enough about that. (smile)
This card design grew from that little bee. I love when that happens. It’s proof that inspiration can come from just about anyplace. I stamped all of the images except for the bee in Smoky Slate ink and used my Blends to color the images. A few layers later, my card was complete. There’s no sentiment today. This card will be one of my personal handwritten notes.
So, find that one little thing that you love, add a few colored images and a layer or two and create something simple and soothing.
…the only limitation is your imagination!

Mar 13, 2017 | Birthday, Clean and Simple, Congratulations, Encouragemet, Gallery, Get Well, Quick & Easy, Spring, Thinking of You |

Happy new week!
If you’re in the midst of the winter storm coming to the Northeast early this week, I hope you are safe, warm and well. I just heard a forecast for New Jersey and we’re supposed to get the greater part of 18 inches of snow. I’m not looking forward to that since we had a taste of Spring last week. Snow is pretty though, especially when it’s falling, so I’ll enjoy the view.
Speaking of Spring, let’s get to today’s card. My “Spring Butterfly” is another generic card… happy birthday, thinking of you, get well, wedding, and I’m sure you can think of a few more occasions. Another “Clean and Simple” card, I finished this one in just a few minutes.
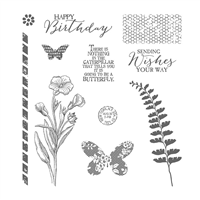
My inspiration for this card was Stampin’ Up!’s 2016-2017 Annual Catalog. Take a look at the image from the Catalog below. I used the cropped butterfly image with the gold thread behind it, the sentiment stamp is the same and the colors are the same.

The photo inspired me because I liked the softness of the color palette.


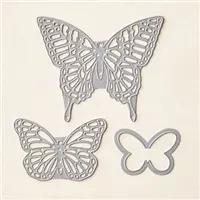
Here’s the simple “How To”: All images are from Stampin’ Up!’s Butterfly Basics stamp set and the cropped butterfly is from Stampin’ Up!’s Butterflies Thinlits Dies.
- Start with a Whisper White A-2 card base (4 1/4″ X 5 1/2″);
- Crop a Whisper White layer measuring 4″ X 5 1/4″;
- Directly in the center of the layer, stamp the fern image in Pear Pizzazz ink (stamp off once). Stamping off once means to ink your image, stamp it on a scrap piece of paper, then stamp onto your project. The image will stamp lighter.
- Ink up the honeycomb stamp with Sahara Sand ink and, stamping off once, stamp the honeycomb on the bottom left corner and the middle right side of the layer. (I used half the honeycomb image on the middle right side).
- Stamp the sentiment onto the bottom right corner with Sahara Sand ink.
- Crop the medium butterfly from the Butterflies Thinlies Dies using Pool Party card stock.
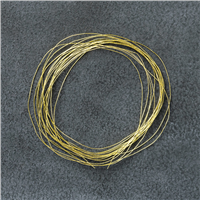
- Roll up some Gold Metallic Thread and anchor it to the stamped fern image about 1/3 from the bottom of the image.
- Attach the butterfly to the fern with some green glue
- Add a few embellishments (remember the design “rule of thirds”).
- Attach your finished layer to your card base with a few Stampin’ Dimensionals.
- Send your card to someone very special!
So, pull out your Stampin’ Up! 2016-2017 Annual Catalog, pour your favorite cup of tea and find your inspiration to create something stunning!

Mar 8, 2017 | Birthday, Blog Hops, Gallery, Spring, Thinking of You |

Welcome to the Pals Blog Hop for March 2017. We are thankful you stopped by to take a look at our 2017 Blog Hop monthly themes. This month we are featuring Spring or Spring related projects. We hope you enjoy our creations.
You may just be starting the Blog Hop or may have come from the previous link from the Line-up on the Pals Blog Hop listing shown below. The full lineup will help you move along from blog to blog so you may see all the projects.

When I think of Spring, I think of flowers. Flowers are wonderful to look at and smell. I enjoy having them around my home and I treat myself to fresh flowers often, especially in the winter.
When I was preparing my project for today’s Hop, I knew I was going to use the Avant-Garden Stamp Set, a FREE Sale-A-Bration product. This is the first time I used these stamps… they are gorgeous! It’s hard to say, since all the products in this year’s Sale-A-Bration Brochures are the best I’ve ever seen during a Stampin’ Up! Sale-A-Bration event, but I do think this set will stick around for a while, at least in my stamping room. For a look at all the Sale-A-Bration projects, you can click on the catalogs in the right sidebar.
I paired the Avant-Garden flower with the swirly circle stamp from the very “avant-garde” Timeless Textures stamp set (in the Annual Catalog). Both stamps have a beautiful texture. I stamped the swirly circles with Whisper White Craft Ink which adds even more texture to the already detailed stamp. I hope you can see it in the photo below, but if you run your fingers across the stamped circles, they are actually raised (keep in mind my stamp pad was pretty juicy, making the images a little thicker, and drying time a little longer).

My color inspiration came from a patio set that caught my eye from a catalog I just received in the mail… Crumb Cake, Whisper White and Bermuda Bay. I added just a hint of Crushed Curry for a little color pop… remember, when in doubt, go with a yellow. It seems everything was nicely laid out for me to complete my project. As we stampers always say, inspiration can come from anywhere.

So, get yourself the Avant-Garden stamp set, pair it with an avant-garde image or two, and create something gorgeous!
To continue with the hop, please refer to the Blog Hop Line-up below. We hope to see you on next month’s Pals Blog Hop!
- Mary Fish at Stampin’ Pretty
- Beth McCullough at Stamping Mom
- Sue Becker at RnR Stamping
- Wendy Klein at Doggone Delightful Stampin’
- Peggy Noe at Pretty Paper Cards
- Debbie Mageed at Secret Stamper
- Becky Retzer at Just in Thyme by Becky Retzer
- Patti MacLeith at Papercrafts by Patti
- Jennifer Michalski at Stamping Serenity
- Debbie Crowley at expressivelydeb… (you are here)
- Amy Hoptay at Craft Carnivore
- Mary Hanson at Up North Stampin’
- Susan Itell at Simple Stampin’
- Rae Harper-Burnet at Wild West Paper Arts
- Karen Hallam at Karen’s Stampin’ Habit!
- Jeanie Stark at Just Stampin’
- Lynn Tague at Beyond Beaches & Blessings
- Brian King at Stamp with Brian
- Lisa Pretto at InkBig Academy Stamps
- Pamela Sadler at Stampin Pink Rose
- Lisa Ann Bernard at Queen B Creations